Use an external OAuth 2.0 API with fetch
This tutorial explores how to call an external OAuth 2.0 API using the Forge
fetch function with authentication handled by the Forge platform. As shown in the example
below, this tutorial returns user profile data from a Google account in a Confluence
code block.
If you're not familiar with the Forge security model, the security concept page explains the foundations this tutorial builds on top of.
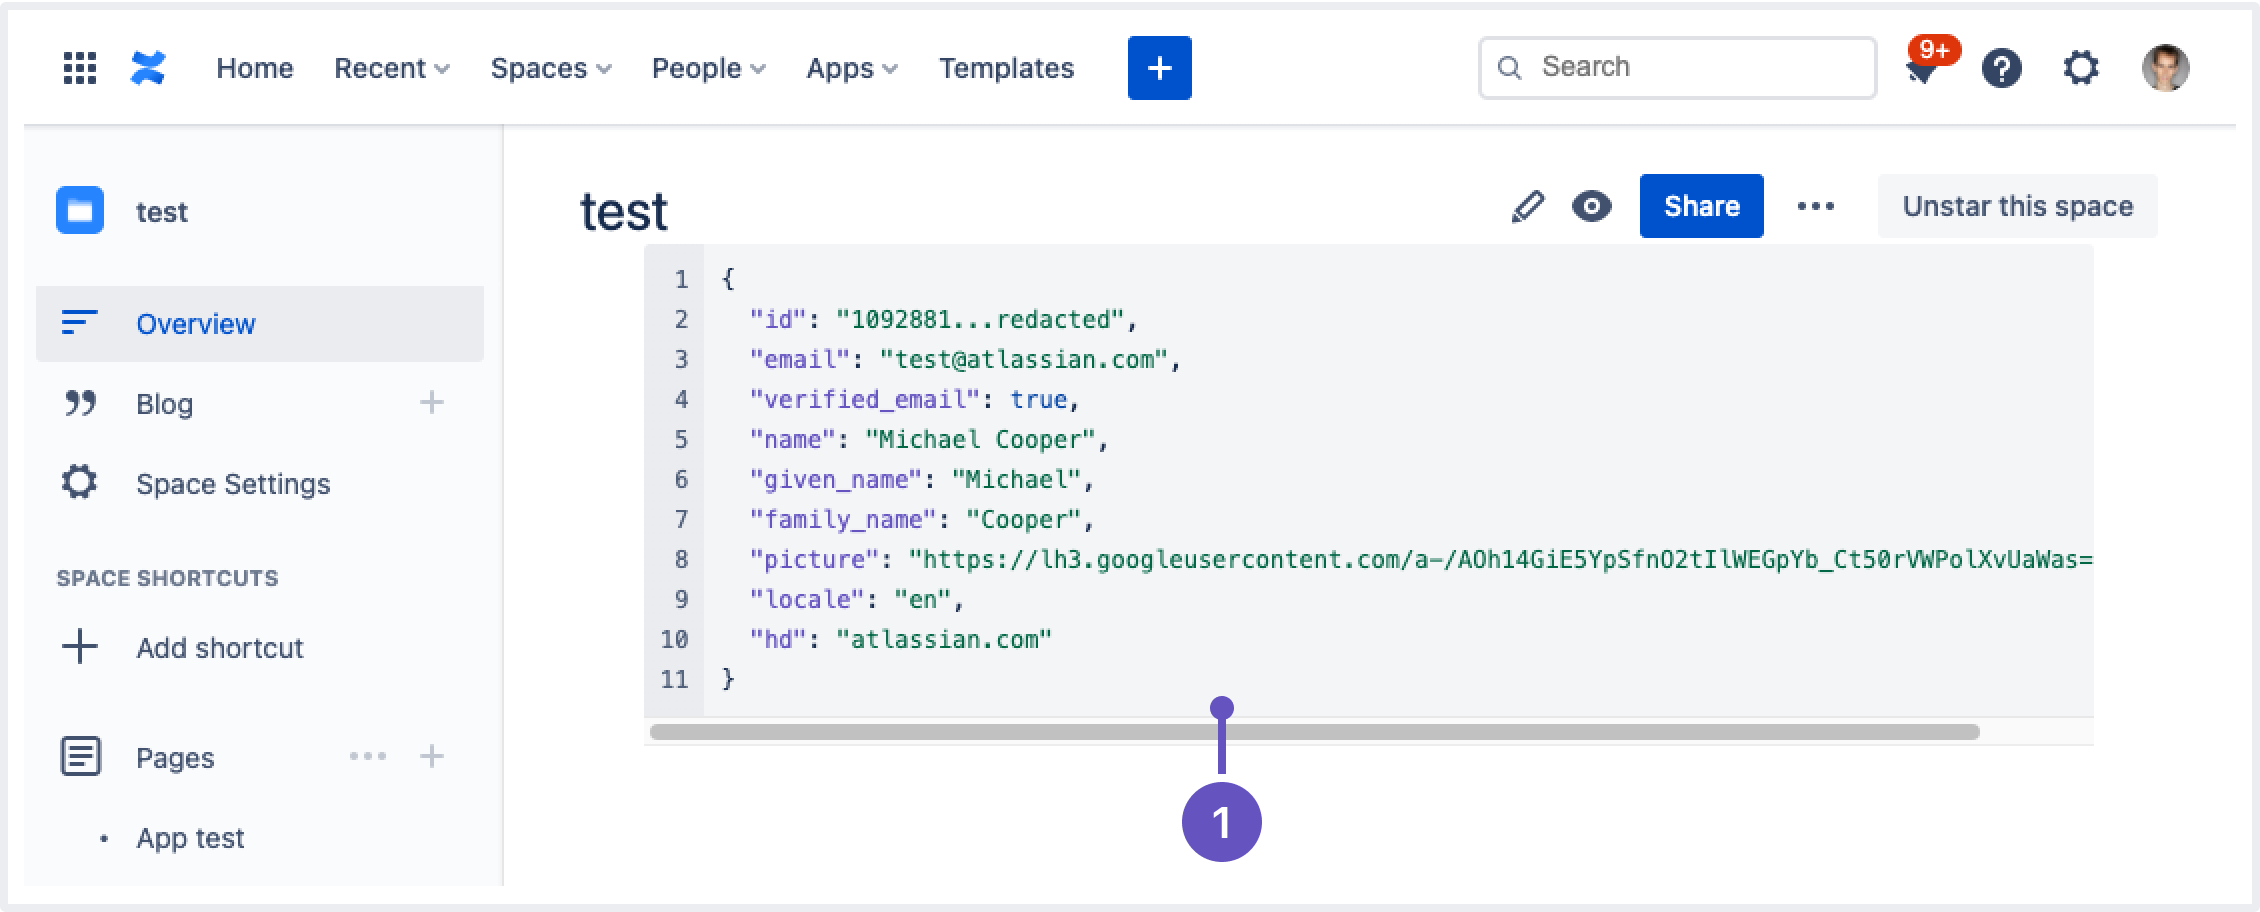
- Showing the user profile data from the Google API response.
Before you begin
You'll need to set up your Forge development environment and a development site. See Getting started for step-by-step instructions on setting up Forge.
This guide assumes you already have a Confluence macro app. If not, follow part 1 of the Build a Confluence hello world app guide to build from.
Google console setup
To use external authentication with Google, you'll need an OAuth 2.0 client ID and client secret from the Google console in Google's cloud platform.
- Create a project in Google cloud platform.
- Go to the Credentials section to create a new client ID.
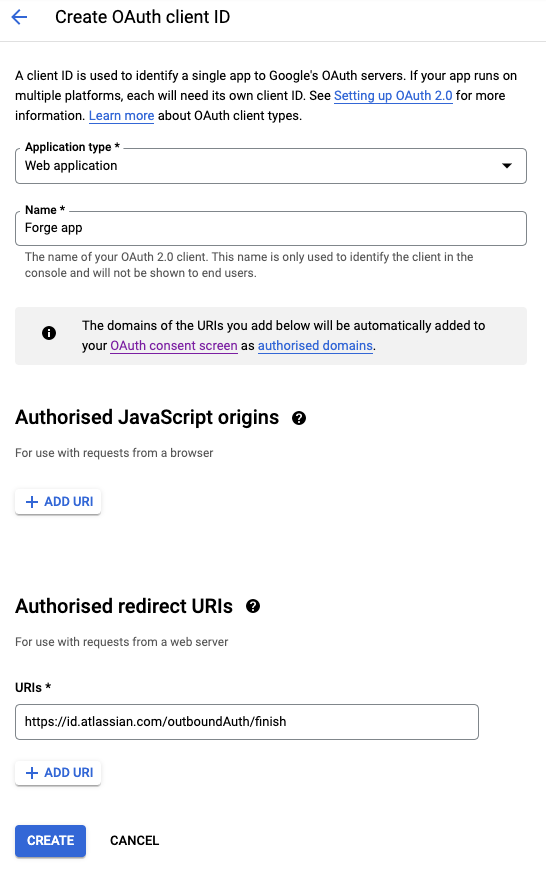
- Click Create credentials at the top, and select OAuth client ID.
- Select Web application as the application type.
- Set the authorized redirect URI as
https://id.atlassian.com/outboundAuth/finish. - Select Create.
- Copy the newly created client ID and client secret. You'll need them when defining the provider and deploying the app later.
Define the provider
-
In the
manifest.ymlfile, add a providers section with the following structure:1 2
providers: auth: - key: google name: Google scopes: - 'profile' - 'https://www.googleapis.com/auth/userinfo.email' type: oauth2 clientId: PLACEHOLDER remotes: - google-apis bearerMethod: authorization-header actions: authorization: remote: google-account path: /o/oauth2/v2/auth exchange: remote: google-oauth path: /token revokeToken: remote: google-oauth path: /revoke retrieveProfile: remote: google-apis path: /userinfo/v2/me resolvers: id: id displayName: email avatarUrl: picture -
Replace
PLACEHOLDERwith the client ID that you copied, following the instructions in Google console setup. -
In the
manifest.ymlfile, add remotes and permissions sections.1 2
remotes: - key: google-apis baseUrl: https://www.googleapis.com - key: google-account baseUrl: https://accounts.google.com - key: google-oauth baseUrl: https://oauth2.googleapis.com permissions: external: fetch: backend: - 'https://www.googleapis.com' - 'https://oauth2.googleapis.com' - 'https://accounts.google.com' -
Add a reference to the new provider in the function definition.
1 2
function: - key: main handler: index.handler providers: auth: - google
Calling an API
With a provider defined, use the runtime API to call Google's API and show the profile information of the user in a code block.
1
2//  src/frontend/index.jsx

import React, { useEffect, useState } from 'react';
// Step 1: Import CodeBlock and remove Text
import ForgeReconciler, { CodeBlock } from '@forge/react';
import { invoke } from '@forge/bridge';

const App = () => {
  const [data, setData] = useState({});

  useEffect(() => {
    invoke('getText', { example: 'my-invoke-variable' }).then(setData);
  }, []);

  // Step 2: Remove the Text component and use CodeBlock
  return (
    <CodeBlock text={JSON.stringify(data, null, 2)} language="json" showLineNumbers />
  );

};

ForgeReconciler.render(
  <React.StrictMode>
    <App />
  </React.StrictMode>
);
1
2//  src/resolvers/index.js

import Resolver from '@forge/resolver';
// Step 1: Add import
import api from "@forge/api";

const resolver = new Resolver();

// Step 2: Add 'async' to be able to wait for the promises inside to resolve
resolver.define('getText', async (req) => {

  // Step 3: Call the external APIs
  const google = api.asUser().withProvider('google', 'google-apis')

  if (!(await google.hasCredentials())) {
    await google.requestCredentials()
  }

  const response = await google.fetch('/userinfo/v2/me');

  // Step 4: Return the user's name
  if (response.ok) {
    const userInfo = await response.json();

    return userInfo;
  }

  // Step 5: Return the error response
  return {
    status: response.status,
    statusText: response.statusText,
    text: await response.text(),
  }

});

export const handler = resolver.getDefinitions();
Deploy the app
-
Navigate to the app's top-level directory and deploy your app by running:
1 2
forge deploy -
Set the client secret by running:
1 2
forge providers configure google -
Replace the client secret value with the client secret that you copied, following the instructions in Google console setup.
-
Depending on whether you've installed the application, do one of the following:
- Run
forge installto install your macro onto Confluence. - Run
forge install --upgradeto upgrade your app to the new version.
- Run
When deploying your application to production, you will need to also set the secret in production.
To do this use forge providers configure -e production after deployment.
Refresh tokens
For security reasons, most OAuth 2.0 providers expire access tokens after a certain period. To have long-term access a refresh token is used to continue getting new access tokens.
Forge automatically handles refresh tokens, if one is received during the initial exchange.
To get a refresh token from Google:
- Set the Authorization URL
to include
access_type=offline. - In the Forge manifest, update the authorization
action to include the
queryParametersas follows:
1 2actions: authorization: remote: google-account path: /o/oauth2/v2/auth queryParameters: access_type: offline
If users have previously consented to your app before access_type: offline was added, those users will not get a
refresh token even after the change. To force re-consent with Google, set prompt=consent:
1 2queryParameters: access_type: offline prompt: consent
Next steps
Links below contain additional detail that you may be interested in as you develop a Forge app using external authentication.
- Explore the example apps:
- Learn how to rotate an OAuth 2.0 Client ID or secret.
- Learn how to implement a dynamic profile retriever.
- For help debugging errors you may encounter, see common issues with external authentication.
Rate this page: