Set up continuous delivery for Forge apps
This tutorial describes how to create a continuous delivery workflow for your Forge app. This will include a reference Bitbucket Cloud pipeline configuration for a hello world app built in Forge.
We’ll demonstrate how to:
- Use environment variables to authenticate Forge CLI commands.
- Orchestrate deployment processes triggered by Git merges.
- Create deployment workflows for
stagingandproductionenvironments.
This tutorial is suitable for readers already familiar with CI/CD concepts and practices. You’ll learn useful tips specific to Forge app development. If you’re new to CI/CD, we recommend that you start with Continuous integration vs. delivery vs. deployment.
Before you begin
To complete this tutorial, you’ll first need to:
- Build a Forge app. We built a reference app using our Confluence hello world app tutorial.
- Install the app to an Atlassian site where you have admin rights.
- Import the app’s code to a Git repository that features CI/CD workflows. In this tutorial, we use Bitbucket Cloud, and the application files are in the repository’s root folder.
You need to keep your app’s login details handy. This is the Atlassian API scoped token and login email of your app’s owner.
While this tutorial is largely focused on Bitbucket Cloud pipelines, we also provide general guidance for GitHub users.
While we use the following command for simplicity in our guide npm install --global @forge/cli, we recommend that you
pin the CLI major version in your CI/CD pipeline to avoid breaking changes interfering with your pipelines.
Example: npm install --global @forge/cli@12
Pinning the CLI major version ensures that your pipeline only installs the latest minor upgrades within the specified
semantic version range, such as 12.x in the above example. This protects your pipeline from any breaking changes
introduced by later major versions.
Step 1: Create a pipeline from scratch
GitHub uses Actions to define CI/CD workflows (similar to how Bitbucket uses Pipelines). Refer to the GitHub Actions documentation for more details.
-
Create a new file named
bitbucket-pipelines.yml. -
Forge apps are based on Node.js, so you need to define a Node docker image for your workflow. Set your pipeline’s Node.js version by adding the following line:
1 2
image: name: node:18 -
Add a code linting step to check your app’s code for common errors:
1 2
pipelines: default: - step: name: Check Code linting script: - npm install - npm install --global @forge/cli - forge settings set usage-analytics true - forge lint caches: - node -
Save the file and add it to your repository’s root directory.
With a pipeline configuration added to your repository, you can now enable pipelines. Go to Repository settings > Pipelines > Settings to do so:
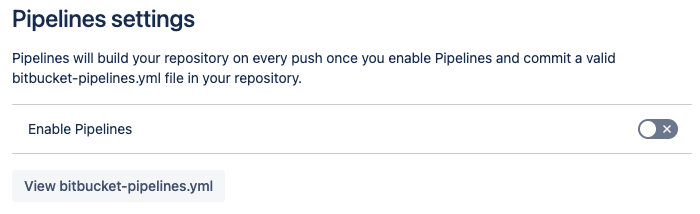
For more detailed information about pipelines, refer to the Bitbucket Cloud documentation.
Understanding usage analytics
Every step in this tutorial’s reference pipeline includes the following command:
1 2forge settings set usage-analytics true
This command provides the consent required by Forge to collect data about your app's deployments and installations (including error data). This, in turn, helps us monitor the overall performance and reliability of Forge. The collected data also helps us make better decisions on improving Forge's feature set and performance.
For information about how Atlassian collects and handles your data, read our Privacy Policy.
If you prefer not to enable usage analytics, change the setting to false.
Step 2: Define your login details as variables
Your Bitbucket pipeline will deploy and install your Forge app; both steps require your login details. The Forge CLI lets
you store your login email and Atlassian API scoped token through the environment variables FORGE_EMAIL and FORGE_API_TOKEN.
In CI/CD environments, you can store these variables as secrets for your builds. In your Bitbucket Cloud repository, you can define these variables in Repository settings > Pipelines > Repository variables.
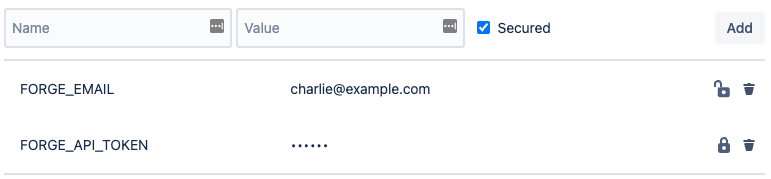
When you define FORGE_API_TOKEN, make sure to tick Secured. This will ensure that your token won’t show up on build logs.
For detailed information about deployment variables in Bitbucket Cloud, refer to Variables and secrets.
GitHub also lets you set encrypted repository variables for deployment workflows. See Encrypted secrets in the GitHub documentation for more information.
Step 3: Configure continuous delivery workflow
After defining your login details as repository variables, you can define your deployment steps. These steps will use
forge deploy and forge install commands, both of which require your login details.
Deploy to Staging
Your Bitbucket pipeline now has one step (forge lint). You can add another step to deploy and install the app to your staging environment:
1 2- step: name: Deploy to Staging deployment: staging caches: - node script: - npm install - npm install --global @forge/cli - forge settings set usage-analytics true - forge deploy -e staging - forge install --upgrade --site MYSITE.atlassian.com --product confluence --non-interactive -e staging
With this step, note the following:
- Replace
MYSITE.atlassian.comwith your Atlassian site’s domain name. - In the previous step, you securely defined your login details through the
FORGE_EMAILandFORGE_API_TOKENenvironment variables. The Forge CLI will use these automatically, so you don’t need to runforge login. - You use
forge install --upgradesince the app is already installed on the site. Refer to the Forge CLI reference for more information about the options used inforge install.
Deploy to Production
Add a new step for deploying the app to your production environment:
1 2- step: name: Deploy to Production trigger: manual deployment: production caches: - node script: - cd hello-world-app - npm install - npm install --global @forge/cli - forge settings set usage-analytics true - forge deploy -e production
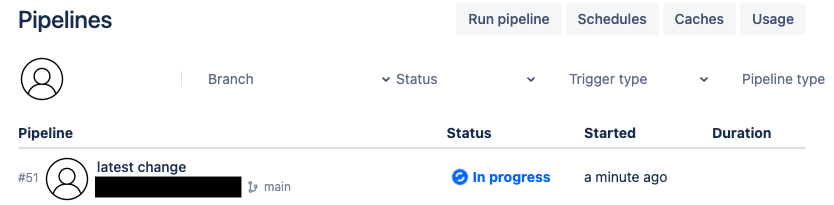
After you’ve added both pipeline configurations, commit the change. This will immediately run your pipeline. To view its progress through your Bitbucket Cloud repository, go to Pipelines:
Once the pipeline Status is Successful, select it to view its details. Notice that the Deploy to Production step didn’t run:
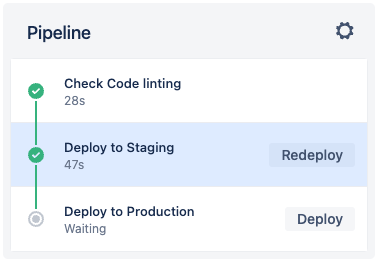
This is because the Deploy to Production step uses the trigger: manual option. To manually run the step, click Deploy.
Manual triggers help your team control changes to production while also automating all deployments to staging.
Our Deploy to Production step does not include a forge install command. As such, any production deployments that include
major updates will need to be approved through the UPM. You can also permanently remove the forge install command from the
Deploy to Staging step if you prefer this workflow.
See Updating an app from the UPM documentation for more information.
Reference pipeline
Refer to the following sample for the complete contents of this tutorial’s bitbucket-pipelines.yml file:
1 2image: name: node:18 pipelines: default: - step: name: Check Code linting script: - npm install - npm install --global @forge/cli - forge settings set usage-analytics true - forge lint caches: - node - step: name: Deploy to Staging deployment: staging caches: - node script: - npm install - npm install --global @forge/cli - forge settings set usage-analytics true - forge deploy -e staging - forge install --upgrade --site MYSITE.atlassian.com --product confluence --non-interactive -e staging # remove this forge install step if you prefer to deploy # major app changes through your site's Universal Plugin Manager. - step: name: Deploy to Production trigger: manual deployment: production caches: - node script: - npm install - npm install --global @forge/cli - forge settings set usage-analytics true - forge deploy -e production
Your pipelines should run npm and forge commands from your application’s root folder. This is the folder where your
manifest.yml and package.json files are located. For example, if both files are in the repository's hello-world-app folder,
add the following command before npm install in each step:
1
2- cd hello-world-app
Rate this page: