Use space settings and content byline item to implement space news
This tutorial describes how to create a Forge app with two modules, where an admin can create
news content using spaceSettings module, and make the news content available using contentBylineItem.
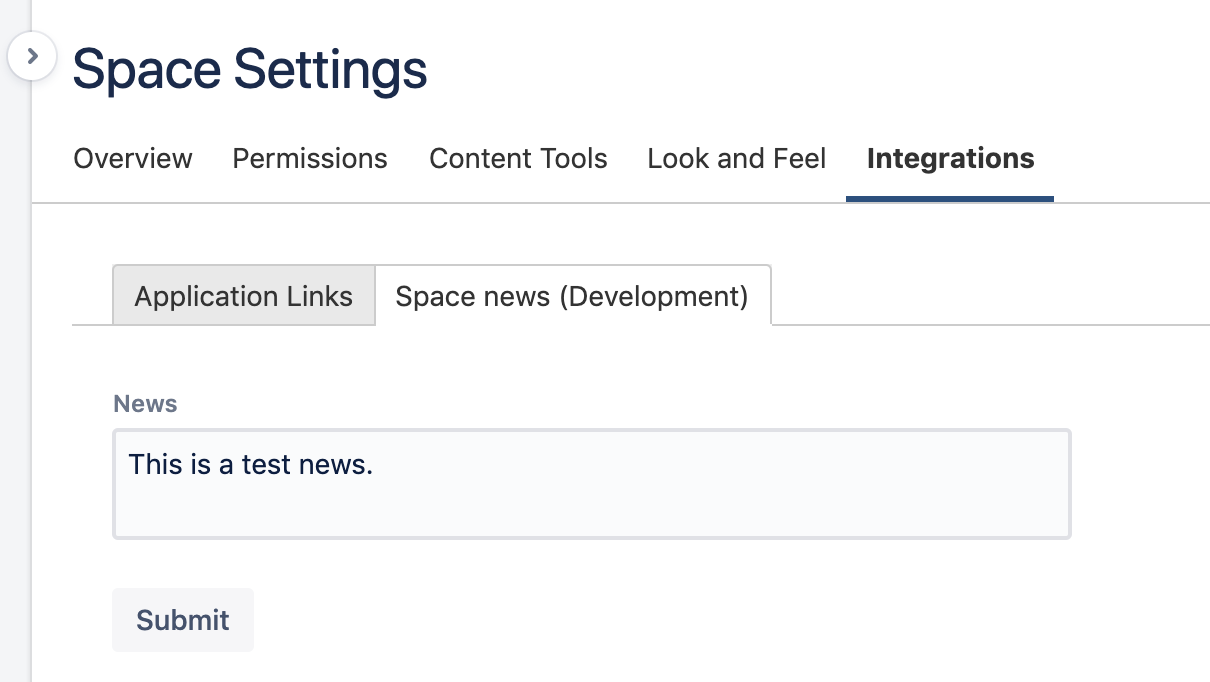
The final spaceSettings module looks like the following:
The final contentBylineItem module looks like the following:
Before you begin
This tutorial assumes you're already familiar with the basics of Forge development. If this is your first time using Forge, see Getting started first.
To complete this tutorial, you need the latest version of Forge CLI. To update your CLI version, run npm install -g @forge/cli@latest
on the command line.
Set up a cloud developer site
An Atlassian cloud developer site lets you install and test your app on Atlassian apps including Confluence and Jira. If you don't have one yet, set it up now:
- Go to http://go.atlassian.com/cloud-dev and create a site using the email address associated with your Atlassian account.
- Once your site is ready, log in and complete the setup wizard.
You can install your app to multiple Atlassian sites. However, app data won't be shared between separate Atlassian apps, sites, or Forge environments.
The limits on the numbers of users you can create are as follows:
- Confluence: 5 users
- Jira Service Management: 1 agent
- Jira Software and Jira Work Management: 5 users
Create your app
Create an app based on the confluence-macro template.
- Navigate to the directory where you want to create the app.
- Create your app by running:
1 2
forge create - Enter a name for the app. For example, space-news-tutorial.
- Select the UI Kit category, and then the Confluence Atlassian app.
- Select the confluence-macro template from the list.
- Open the app directory to see the app files.
Update the manifest with spaceSettings
To register the functionality of your app, add confluence:spaceSettings and function modules to
the manifest.
The confluence:spaceSettings module adds a tab inside the integration settings of a Confluence space.
The function modules contains the implementation of space settings and content byline items modules.
-
In the app's top-level directory, open the
manifest.ymlfile. -
Replace the
macroentry undermoduleswith the followingconfluence:spaceSettings.1 2
confluence:spaceSettings: - key: forge-space-news resource: settings render: native title: Space news -
Add permissions to the
manifest.ymlfile, so the app can read and write space settings.1 2
permissions: scopes: - 'read:space:confluence' - 'write:space:confluence' -
Your
manifest.ymlshould look like the following, with your value for the app ID:1 2
modules: confluence:spaceSettings: - key: forge-space-news resource: settings render: native title: Space news permissions: scopes: - 'read:space:confluence' - 'write:space:confluence' resources: - key: settings path: src/frontend/index.jsx app: id: '<your-app-id>'
Build, deploy, and install
Build, deploy, and install the app to see it in your Confluence site.
-
Navigate to the app's top-level directory and deploy your app by running:
1 2
forge deploy -
Install your app by running:
1 2
forge install -
Select your Atlassian context using the arrow keys and press the enter key.
-
Enter the URL for your development site. For example, example.atlassian.net. View a list of your active sites at Atlassian administration.
Once the successful installation message appears, your app is installed and ready
to use on the specified site.
You can always delete your app from the site by running the forge uninstall command.
View the app under space settings
With the app installed, it's time to see the entry in Space Settings.
- Navigate to your Confluence Cloud site.
- Select your favorite space.
- Click Space Settings from the left navigation.
- Click the Integrations tab.
You'll see the Space news tab from the app.
If you select the menu item, the default hello world content will be displayed, because you haven't implemented the app logic yet. You'll do this in the next step.
Implement space settings part of the app
- Start tunneling to view your local changes by running:
1 2
forge tunnel - Open the
src/index.jsxfile. - Replace the contents of the file with:
1 2
import React from "react"; // Import required components from the UI kit import ForgeReconciler, { TextArea, useSpaceProperty, useForm, Form, Button, } from "@forge/react"; const App = () => { const [news, setNews] = useSpaceProperty("space-news", "No news currently."); const { register, handleSubmit } = useForm({ defaultValues: { news, }, }); const onSubmit = async ({ news }) => { await setNews(news); }; return ( <Form onSubmit={handleSubmit(onSubmit)}> <TextArea {...register("news")} /> <Button type="submit">Submit</Button> </Form> ); }; ForgeReconciler.render( <React.StrictMode> <App /> </React.StrictMode> ); - Refresh Space news app.
- You can type and submit a test news.
In the code from this step:
- The import statement lists the components and hooks to use from the UI kit. See UI Kit components to learn more about these components. See useForm to learn more about form data management. See useSpaceProperty to learn more about it.
TextAreaprovides a text area input control. It's used to collect the news entry.Formcontains theTextAreacomponent. It also hasonSubmitproperty.onSubmitis called with form data when a user presses the submit button.useFormis a hook that provides form state and methods to manage form data.ForgeReconciler.renderprovides the mechanism that renders the app.
Update the manifest with contentBylineItem
To add more functionality to your app, add confluence:contentBylineItem.
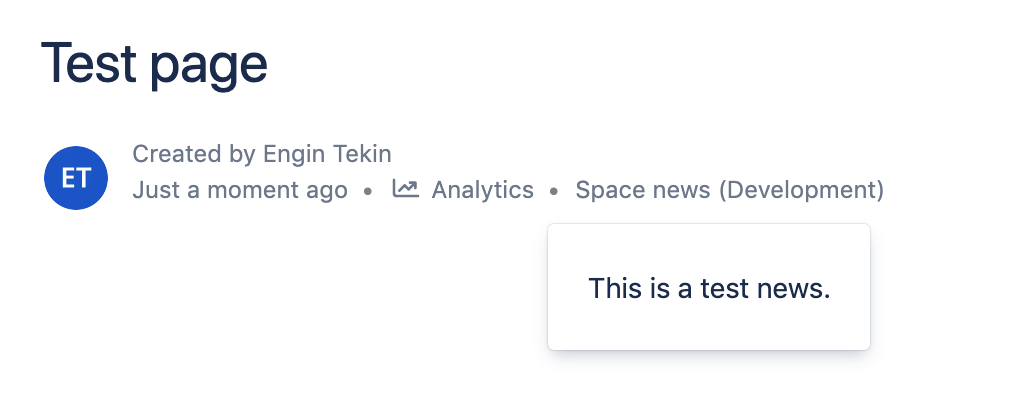
The confluence:contentBylineItem module displays Forge apps in the content byline section
(the area under the page title) of a Confluence page.
- In the app's top-level directory, open the
manifest.ymlfile. - Add a new entry under
modulesafterconfluence:spaceSettingswith the followingconfluence:contentBylineItem.1 2
confluence:contentBylineItem: - key: forge-space-news-byline resource: byline render: native title: Space news tooltip: Displays recent space news - Add a new entry under
resources.1 2
- key: byline path: src/frontend/byline.jsx
Your manifest.yml should look like the following, with your value for the app ID:
1
2modules:
  confluence:spaceSettings:
    - key: forge-space-news
      resource: settings
      render: native
      title: Space news
  confluence:contentBylineItem:
    - key: forge-space-news-byline
      resource: byline
      render: native
      title: Space news
      tooltip: Displays recent space news
permissions:
  scopes:
    - 'read:space:confluence'
    - 'write:space:confluence'
resources:
  - key: settings
    path: src/frontend/index.jsx
  - key: byline
    path: src/frontend/byline.jsx
app:
  id: '<your-app-id>'
Implement content byline item part of the app
- Create a new file
src/frontend/byline.jsxfile. - Replace the contents of the file with:
1 2
// Import required components from the UI kit import React from "react"; import ForgeReconciler, { Text, useSpaceProperty } from "@forge/react"; const App = () => { const [news] = useSpaceProperty("space-news", "No news currently."); return <Text>{news}</Text>; }; ForgeReconciler.render( <React.StrictMode> <App /> </React.StrictMode> );
In the code from this step:
- The import statement lists the components and hooks to use from the UI kit. See UI Kit components to learn more about these components. See useSpaceProperty to learn more about it.
Textdisplays the news text set by admin.ForgeReconciler.renderprovides the mechanism that renders the app.
Build and deploy
Build and deploy the app to see it in your Confluence site. The app needs to be redeployed after a manifest change.
-
Stop tunneling by pressing:
1 2
Control + C -
Deploy your app by running:
1 2
forge deploy
View the app under content byline item
With the app deployed again, it's time to see the entry in Content Byline Item. Navigate to your Confluence Cloud site, then open a page. You'll see the Space news entry from the app.
Congratulations! You've created a forge app with two modules that:
- Enables admins to create news content under space settings.
- Enables users to consume the news content from any page in that space.
Next steps
Check out an example app, continue to one of the other tutorials, or read through the reference pages to learn more.
- See Example apps for a collection of apps we've built.
- See the Automate Jira using Triggers tutorial for information on using triggers to respond to user actions in Jira.
- See the reference pages to learn what else you can do with what you’ve learned.
Rate this page: