Developing for Atlassian Government Cloud?
This content is written with standard cloud development in mind. To learn about developing for Atlassian Government Cloud, go to our Atlassian Government Cloud developer portal.
Orchestrate your builds using Dynamic Pipelines
This tutorial describes how to create a Forge app implementing bitbucket:dynamicPipelinesProvider
module and install it in a Bitbucket workspace. The Dynamic Pipelines provider app responds to
requests from Bitbucket Pipelines when user wants to see which pipelines they can run for a branch,
or when a particular pipeline is requested to run by a user, on schedule, or by a commit pushed
event in the repository. The app is expected to respond with a valid Pipelines configuration, or
with an error in case the pipeline run should be aborted instead.
Before you begin
To complete this tutorial, you need the latest version of Forge CLI. To update your CLI version, run
npm install -g @forge/cli@latest on the command line.
We recommend that you complete all the steps in Getting started so that you’re familiar with the Forge development process.
Set up a shared team workspace
For Bitbucket apps you need to join or create a shared Bitbucket team workspace (as Forge apps are not supported on personal workspaces). If you don't have a Bitbucket workspace, see the references below for related instructions:
A free Bitbucket team space can have up to 5 users.
Step 1: Create your app
Create an app based on the Dynamic Pipelines provider template.
-
Navigate to the directory where you want to create the app.
-
Create your app by running:
1 2
forge create -
Enter a name for the app. For example, dynamic-pipelines-provider-app.
-
Select the
Triggers and Validatorscategory. -
Select
BitbucketAtlassian app. -
Select the
bitbucket-dynamic-pipelines-providertemplate from the list. -
Open the app directory to see the app files.
Step 2: Define app permissions
Should your app need to retrieve more information about the pipeline context such as commit or branch information from Bitbucket Cloud, it has to define the Forge app scopes to use when calling the Bitbucket Cloud REST API.
In this section, we'll add the read:repository:bitbucket scope (required to access the commits
in the repository).
-
Open the
manifest.ymlfile. -
Add the following section:
1 2
permissions: scopes: - 'read:repository:bitbucket'See Scopes for detailed information about the available scopes.
-
The full manifest file should now look like:
1 2
modules: bitbucket:dynamicPipelinesProvider: - key: dynamic-pipelines-provider function: main name: Example Dynamic Pipelines provider description: A Dynamic Pipelines provider example function: - key: main handler: index.main permissions: scopes: - 'read:repository:bitbucket' app: id: <your-app-id-here>
Step 3: Review & deploy the template app
The dynamic pipeline app is executed when the Forge runtime calls the function declared in the
manifest file. This will happen in one of two scenarios:
- When an event occurs that requires the generation of a pipeline configuration in order to actually execute a pipeline. e.g. A new commit being pushed to a Pull Request.
- When a user completes an action that requires the generation of a list of pipeline configurations that could be run against a particular branch or tag. e.g. Opening the “Run Pipeline” dialog on the Pipelines tab of a repository in Bitbucket Cloud.
For this tutorial, when the app is executed the main function in the src/index.js file will be called.
1
2export const main = (request, context) => {
  console.log(`Handling Dynamic Pipelines request: ${JSON.stringify(request, null, 4)}`);
  return { pipelines_configuration: request.pipelines_configuration };
};
The implementation of the main function logs the request payload and returns the unchanged
configuration back to Bitbucket. This would result in a detailed log being written to the Forge app
logs, and the Pipelines system executing the exact configuration that was contained in the .yml
file of the originating repository.
-
In your app's top-level directory, deploy your app by running:
1 2
forge deploy -
Then run the
installcommand:1 2
forge install -
Then select
Bitbucketfrom the app list:1 2
Select an Atlassian app: Jira Confluence Compass ❯ Bitbucket -
Enter the URL for your Bitbucket workspace:
1 2
Enter the workspace URL: bitbucket.org/{your-workspace-id} -
Agree to the scopes that the app will have access to:
1 2
Your app will be installed with the following scopes: - read:repository:bitbucket ? Do you want to continue? (y/N) y
The app will then install into your workspace.
1
2✔ Install complete!
Your app in the development environment is now installed in Bitbucket on bitbucket.org
Step 4: Configuring your repository to use the dynamic pipeline app
Now that the app is installed into the workspace, you need to configure it to run for a particular repository when pipelines are executed.
-
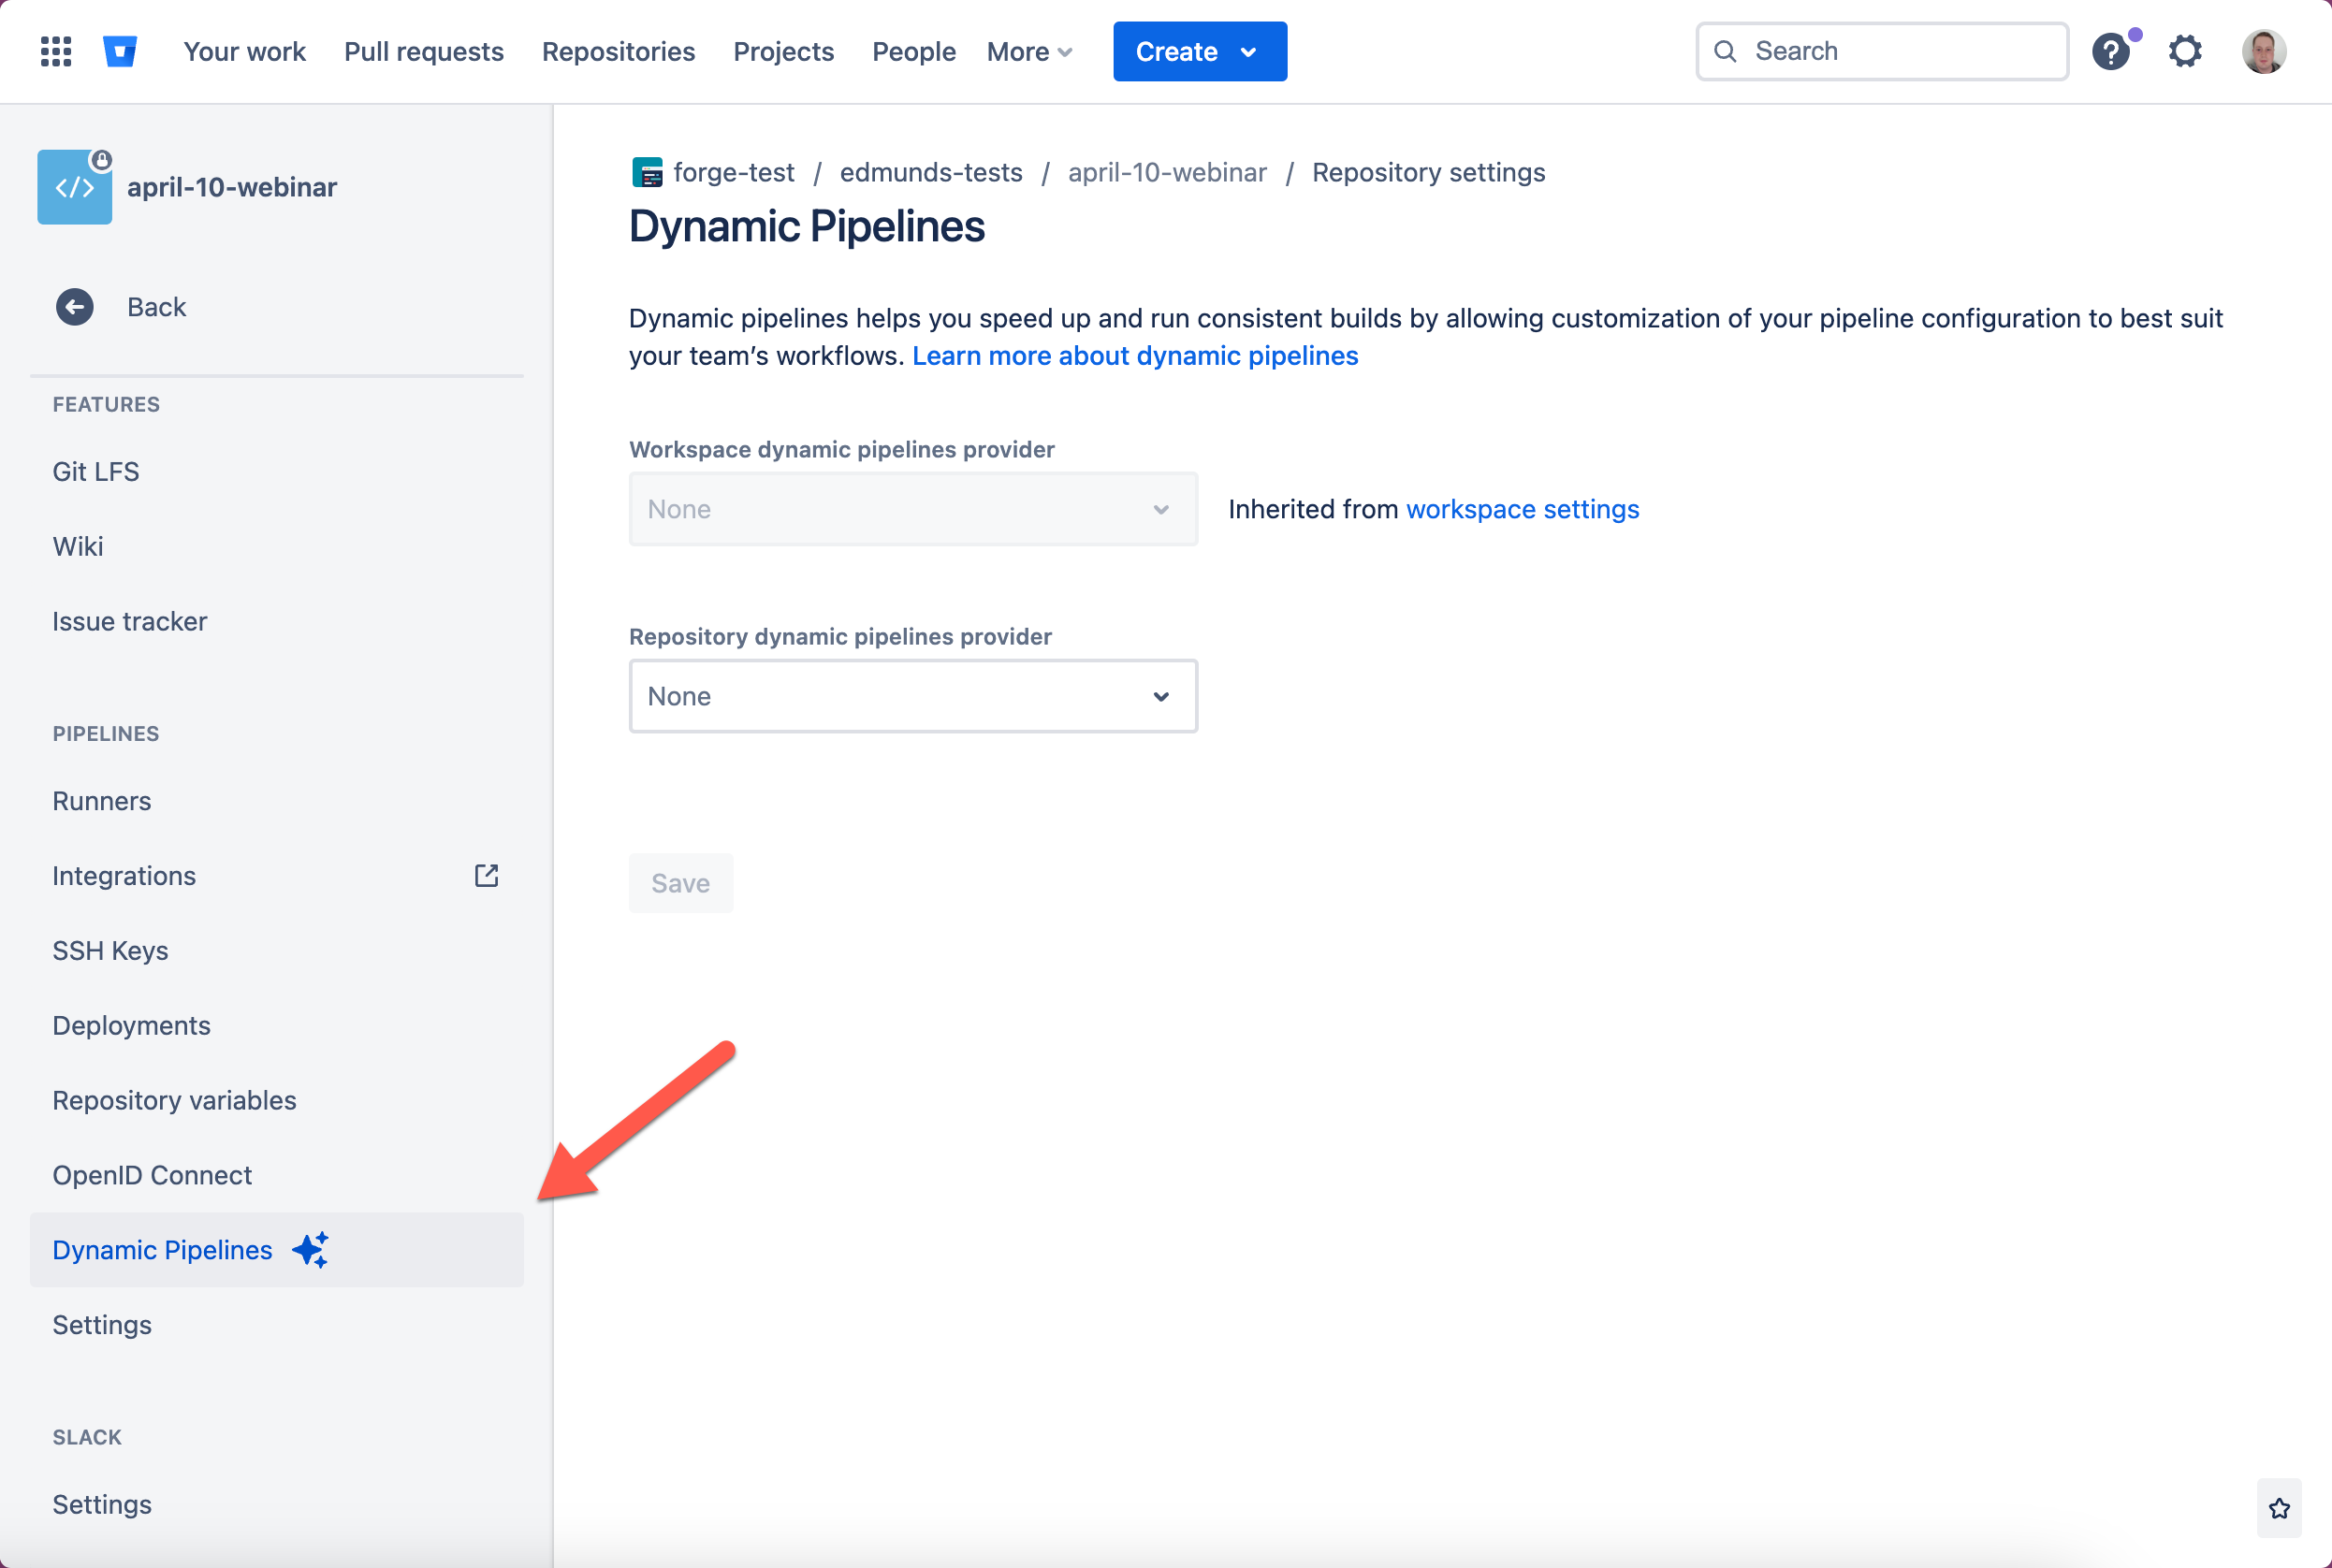
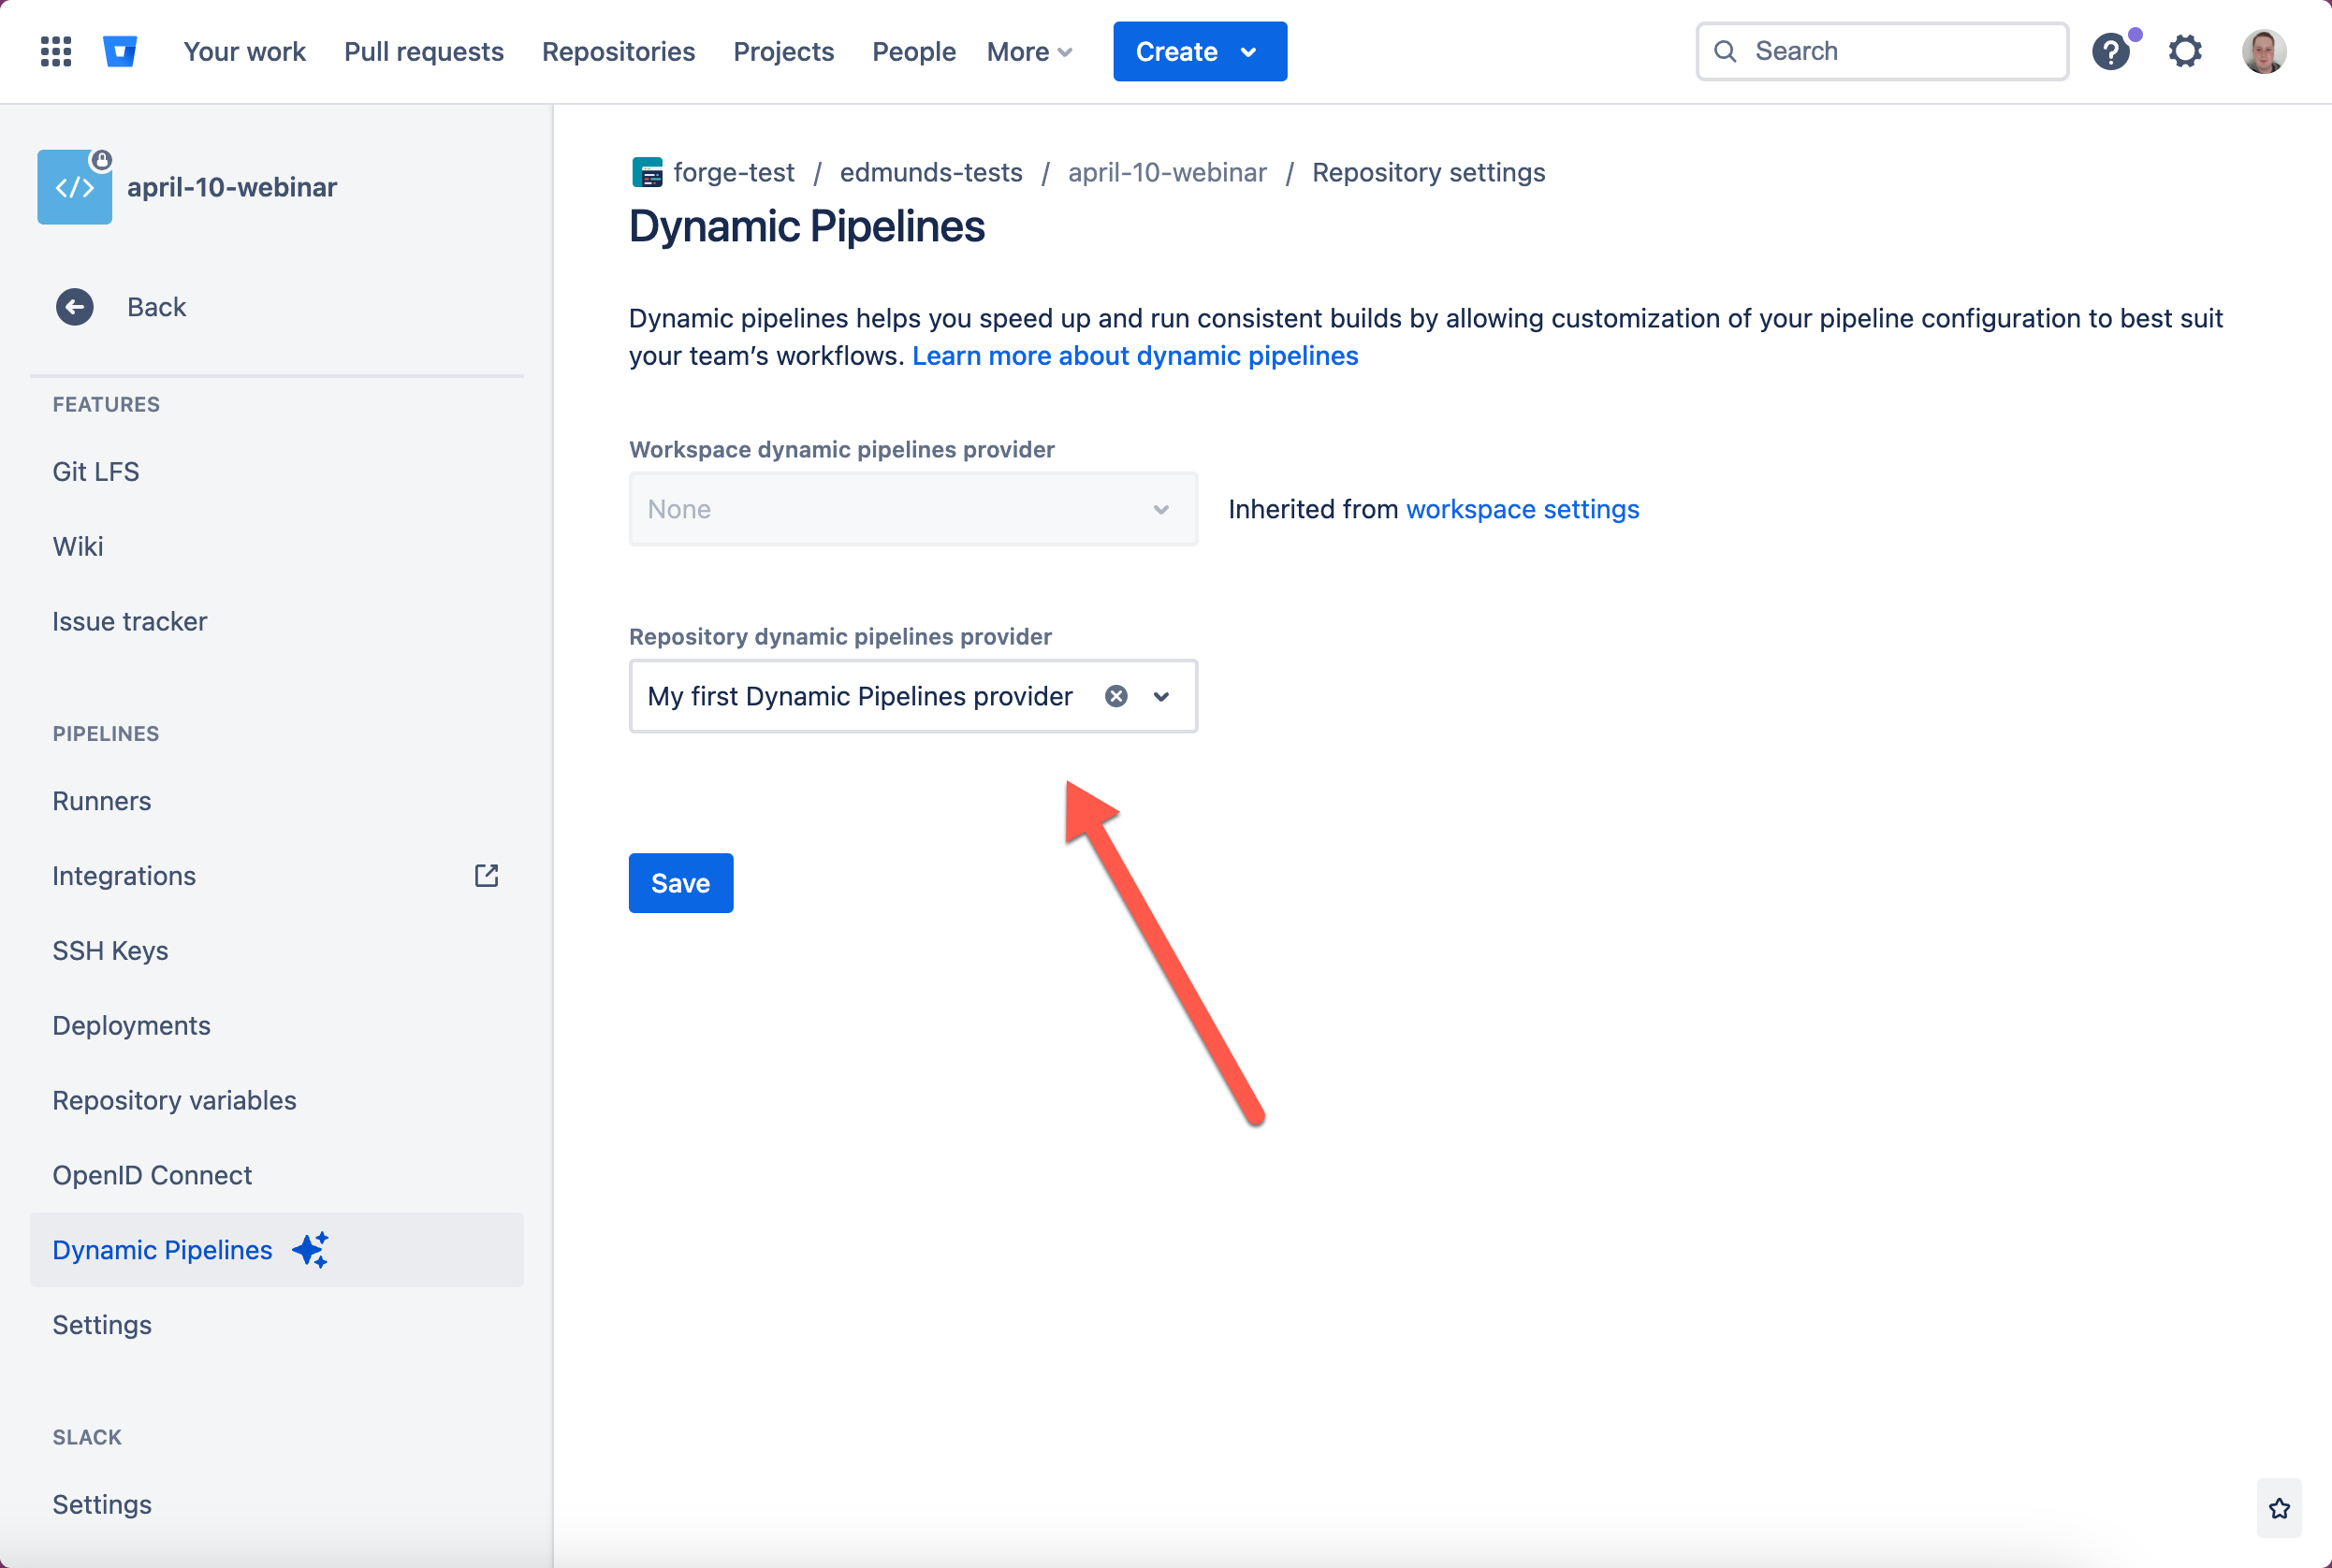
Navigate to the settings for a repository in the installed workspace where you want to test the dynamic pipeline app and open the “Dynamic Pipelines” tab.
-
From that tab, select the dynamic pipelines provider you just installed from the “Repository dynamic pipeline provider” list, and then press “Save”:
Step 5: Use the Forge tunnel to test the app
Next up, we’re going to test the Dynamic Pipeline to make sure it is working correctly. To do this, we will use the Forge tunnel utility that you would have set up in the Getting started guide.
-
Start a tunnel by running:
1 2
forge tunnelThis enables you to test your app without having to deploy it after each change.
The tunnel works for changes to the code, not for configuration changes to the
manifest.ymlfile. If you change the app configuration in themanifest.yml, you need to redeploy the app (forge deploy), and then restart the tunnel (forge tunnel). -
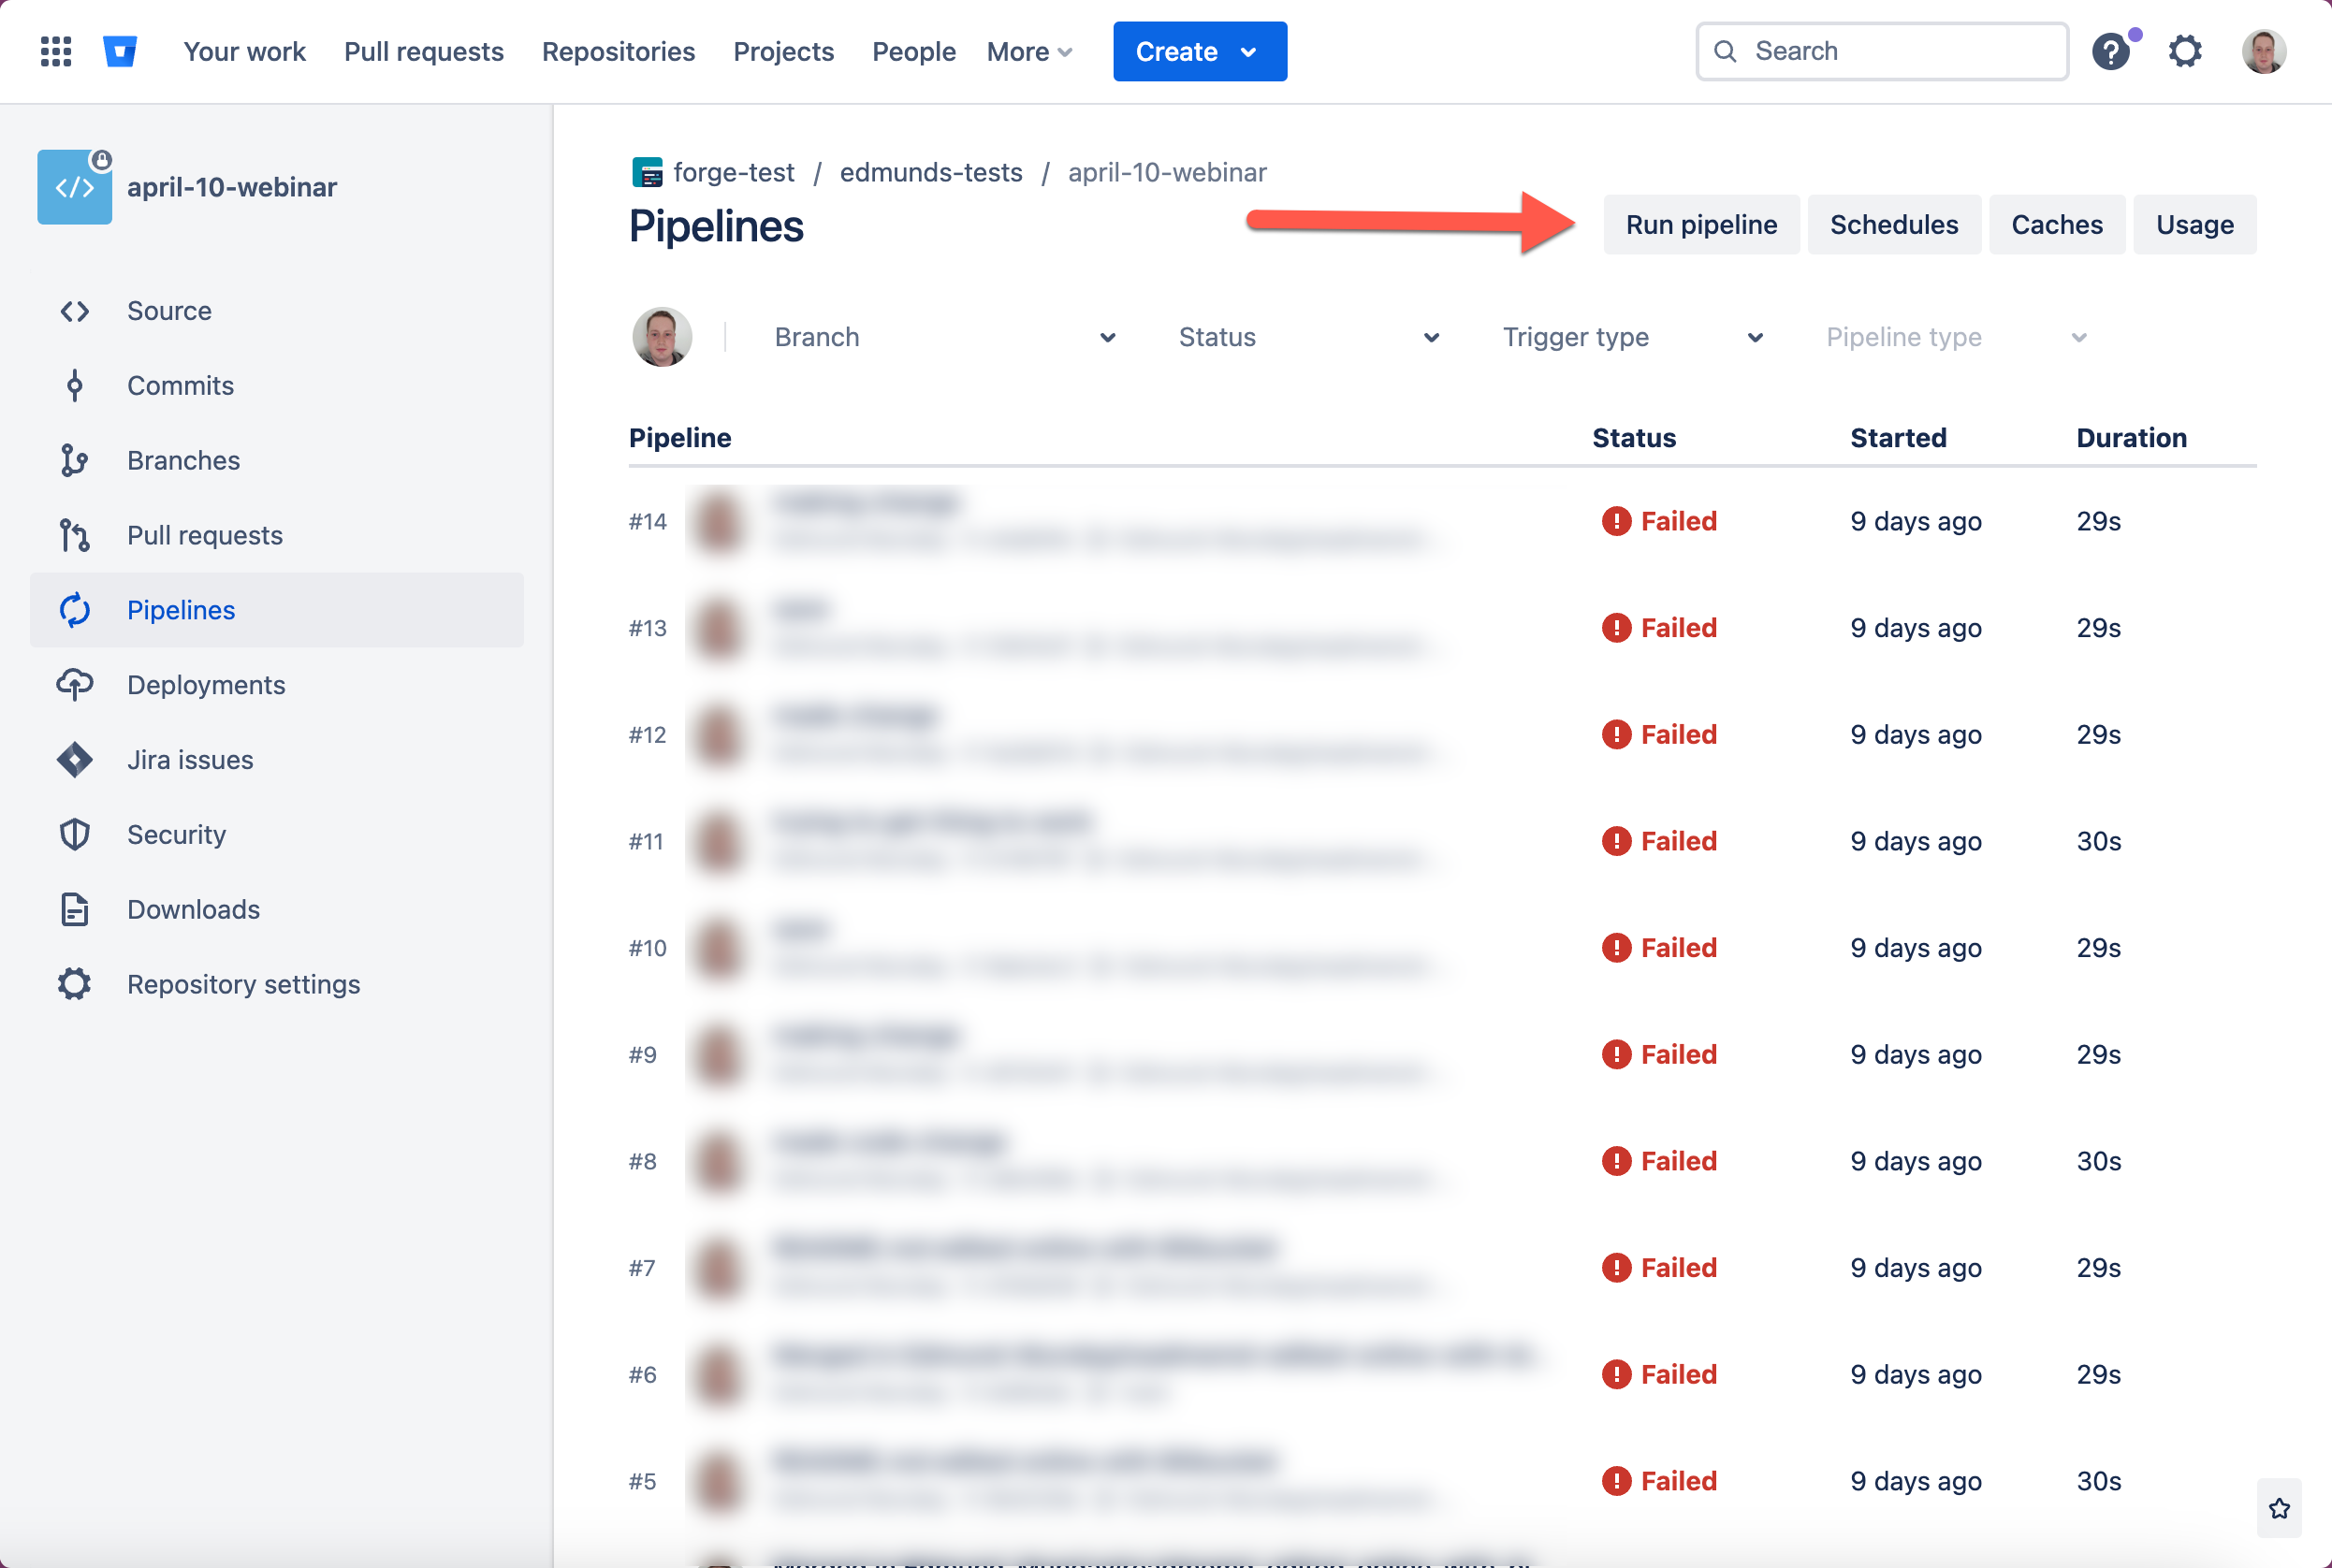
Run a pipeline in the repository you previously configured with your dynamic pipeline by either creating a commit in that repo, or manually via UI.
-
Verify
Handling Dynamic Pipelines requestplus the printedrequestobject appears in your tunnel CLI output.Note: The request object you see will be different to that shown here, the main thing to verify is that a request object with a similar shape is printed.
1 2
INFO 23:55:21.092 b8a065db98924683b85b09b383c6dc9c Handling Dynamic Pipelines request: { "target": { "commit": { "hash": "<commit-hash>" }, "type": "pipeline_commit_target" }, "trigger": "definitions", "pipelines_configuration": { "pipelines": { "default": [ { "step": { "name": "Scan for secrets", "script": [ { "pipe": "atlassian/git-secrets-scan:1.5.0", "variables": { "ANNOTATION_SUMMARY": "Secret found in code.", "FILES": "*" } } ] } } ] }, "image": { "name": "node:18" } }, "creator": "<user-uuid>", "repository": "<repo-uuid>", "workspace": "<workspace-uuid>", "context": { "cloudId": "<random-uuid>", "moduleKey": "my-bitbucket-dynamic-pipelines-provider" }, "contextToken": "a-really-long-string" }
Step 6: Transform the pipeline configuration
In Step 5, we demonstrated how requesting a pipeline run invoked the main method in src/index.js.
In this step, you’ll extend the app to modify the pipeline definition and add an extra step to it in
cases where the default pipeline from the static YML configuration was selected.
-
Create a new
addStepIfDefaultPipelinefunction:1 2
const addStepIfDefaultPipeline = (request) => { // If the pipeline does not contain a 'default' definition, just return what was sent in the request. if (!request.pipelines_configuration?.pipelines?.default) { return { pipelines_configuration: request.pipelines_configuration }; } // Otherwise prepend a step to the 'default' pipeline request.pipelines_configuration.pipelines.default = [ { step: { name: "Dynamic step", script: ["echo 'This step was added dynamically'"], }, }, ...request.pipelines_configuration.pipelines?.default, ]; // and return it. return request; };This function prepends a step to the pipeline definition in situations where the
defaultpipeline was selected from the staticbitbucket-pipelines.ymlfile. -
Modify the
mainfunction to call theaddStepIfDefaultPipelinefunction when a pipeline run is requested, log the outcome from that function call, and return the outcome in the response:1 2
export const main = (request, context) => { const updatedPipelineRequest = addStepIfDefaultPipeline(request); console.log(`Updated request: ${JSON.stringify(updatedPipelineRequest, null, 4)}`); return { pipelines_configuration: updatedPipelineRequest.pipelines_configuration }; }; -
Start your tunnel if it’s not still running from Step 5.
-
Run the
defaultpipeline in a repo in your Bitbucket workspace, and verify the following:Updated requestappears in your tunnel and the logged output contains the new step.
- The triggered pipeline has an extra step which was generated by the app, and that step correctly logged the input specified.
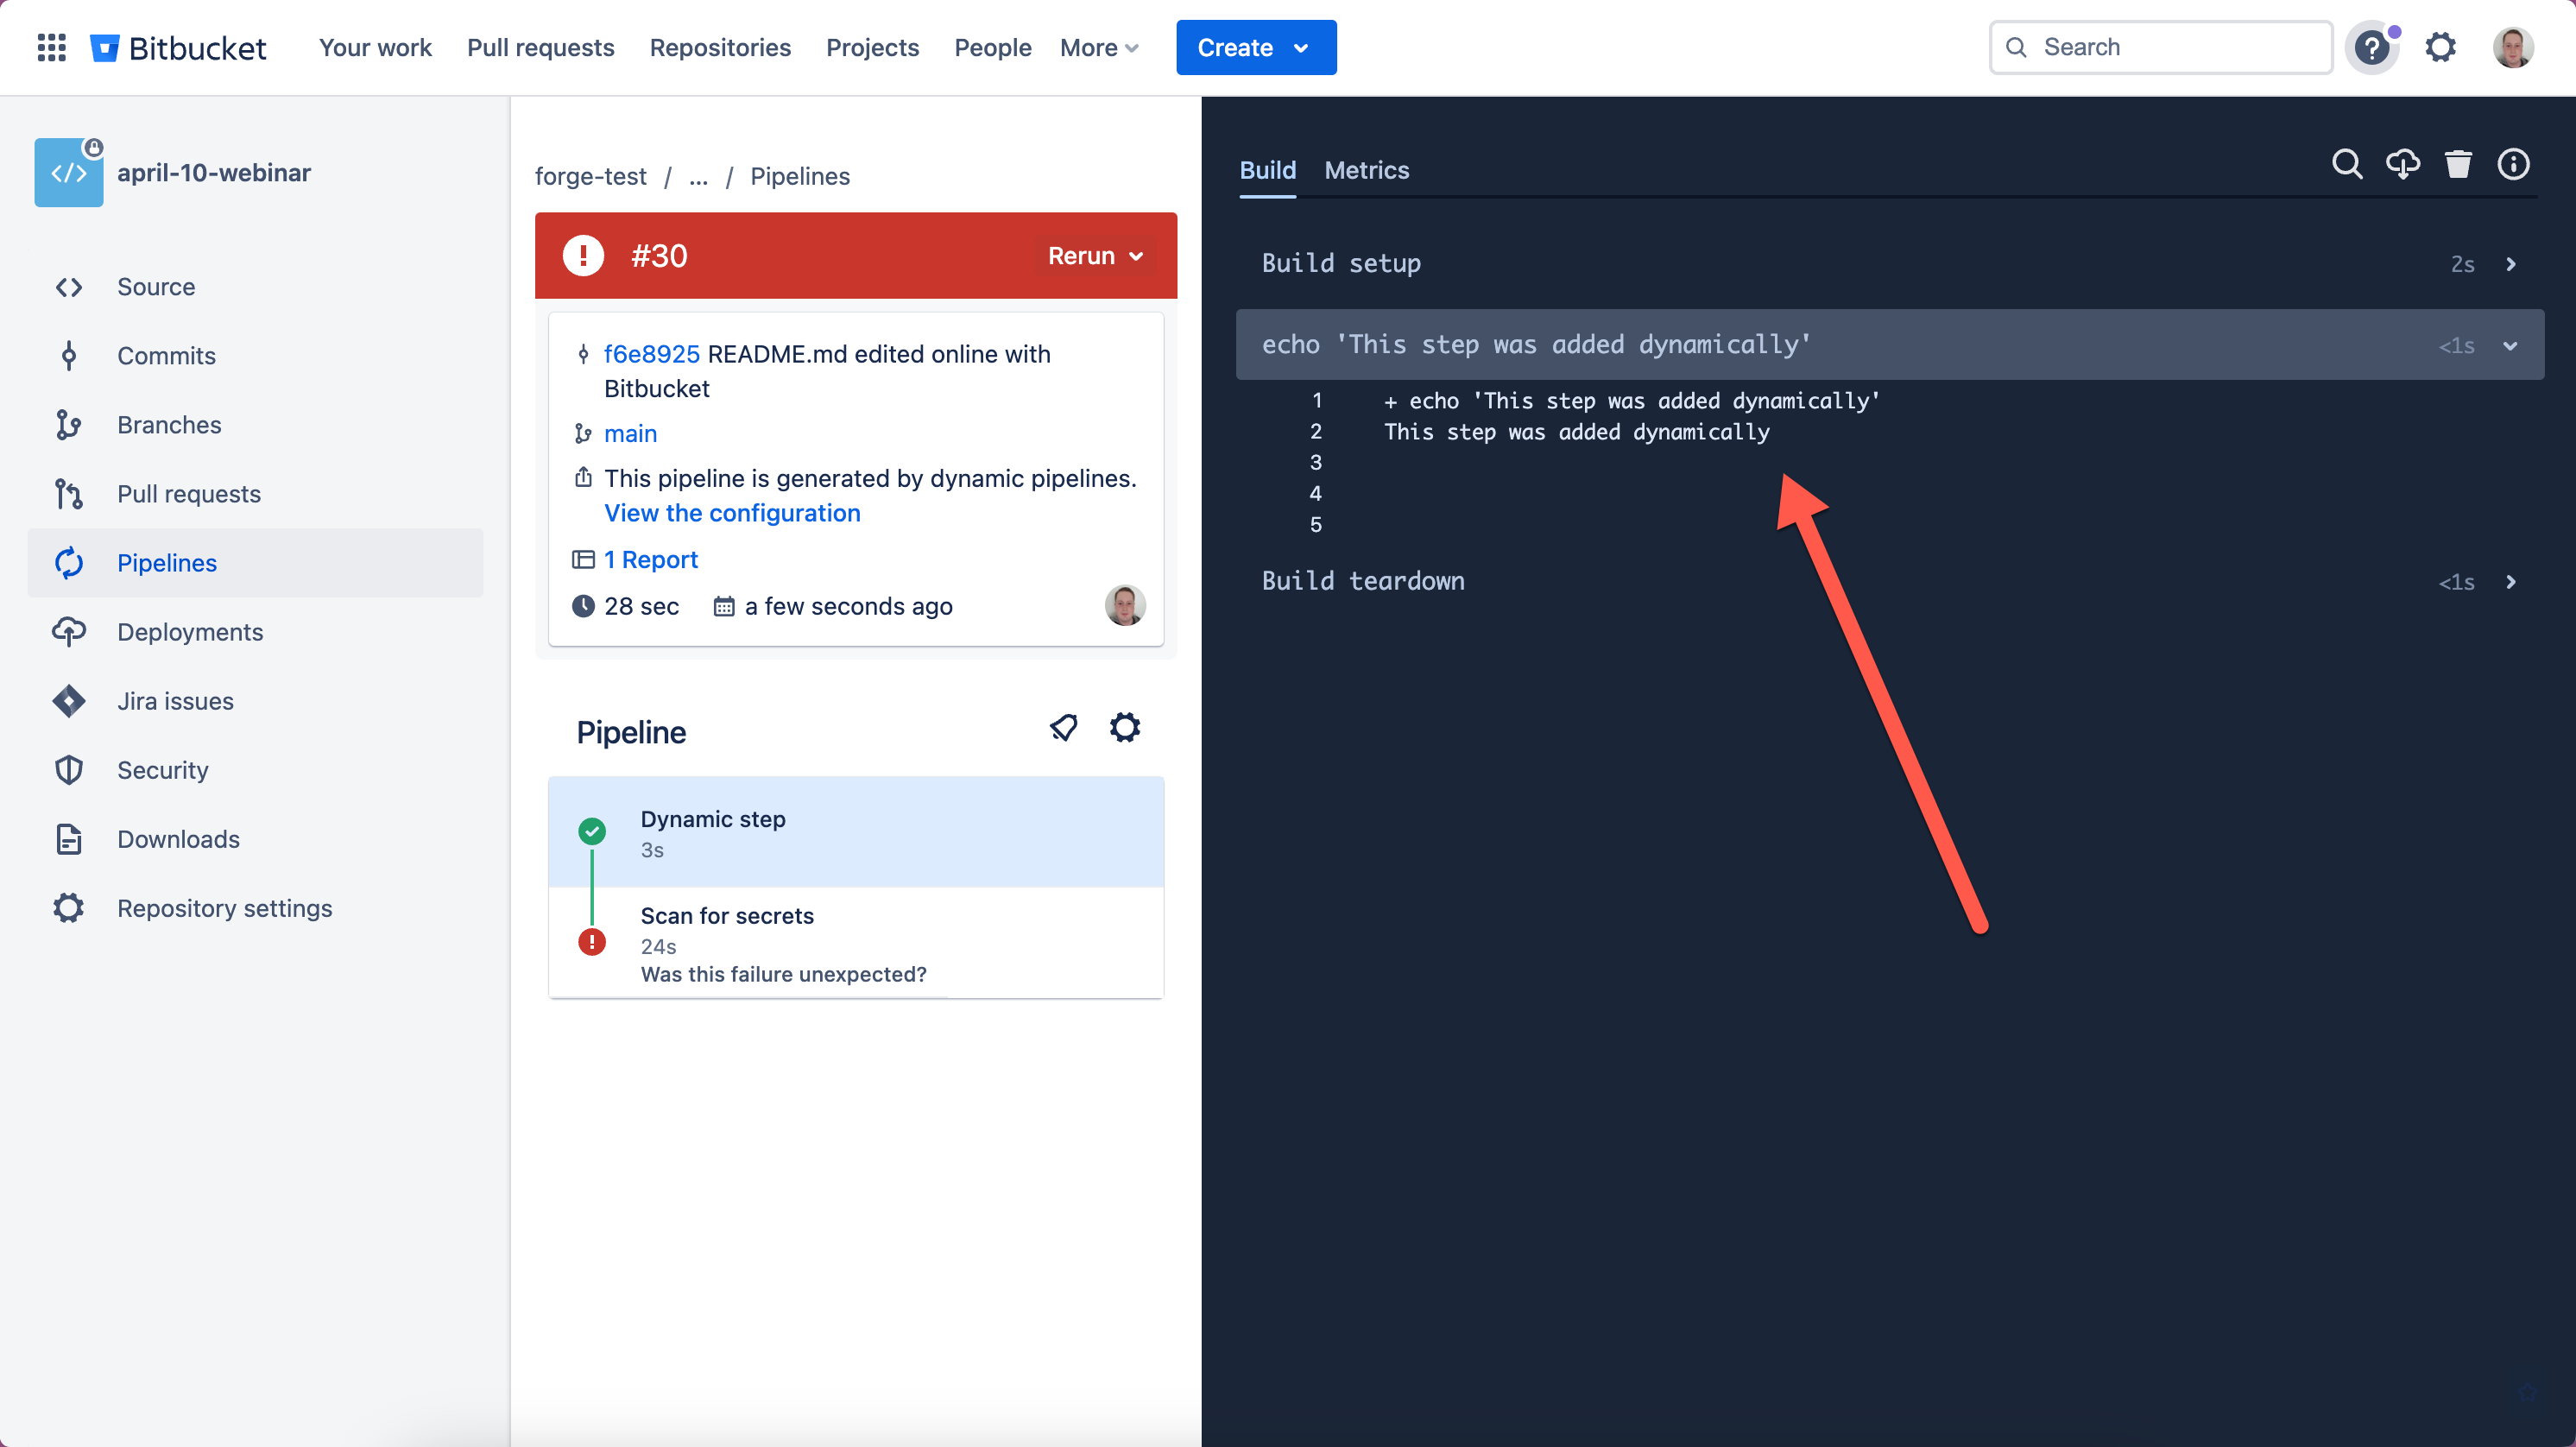
- The link to the dynamic configuration appears in the sidebar.
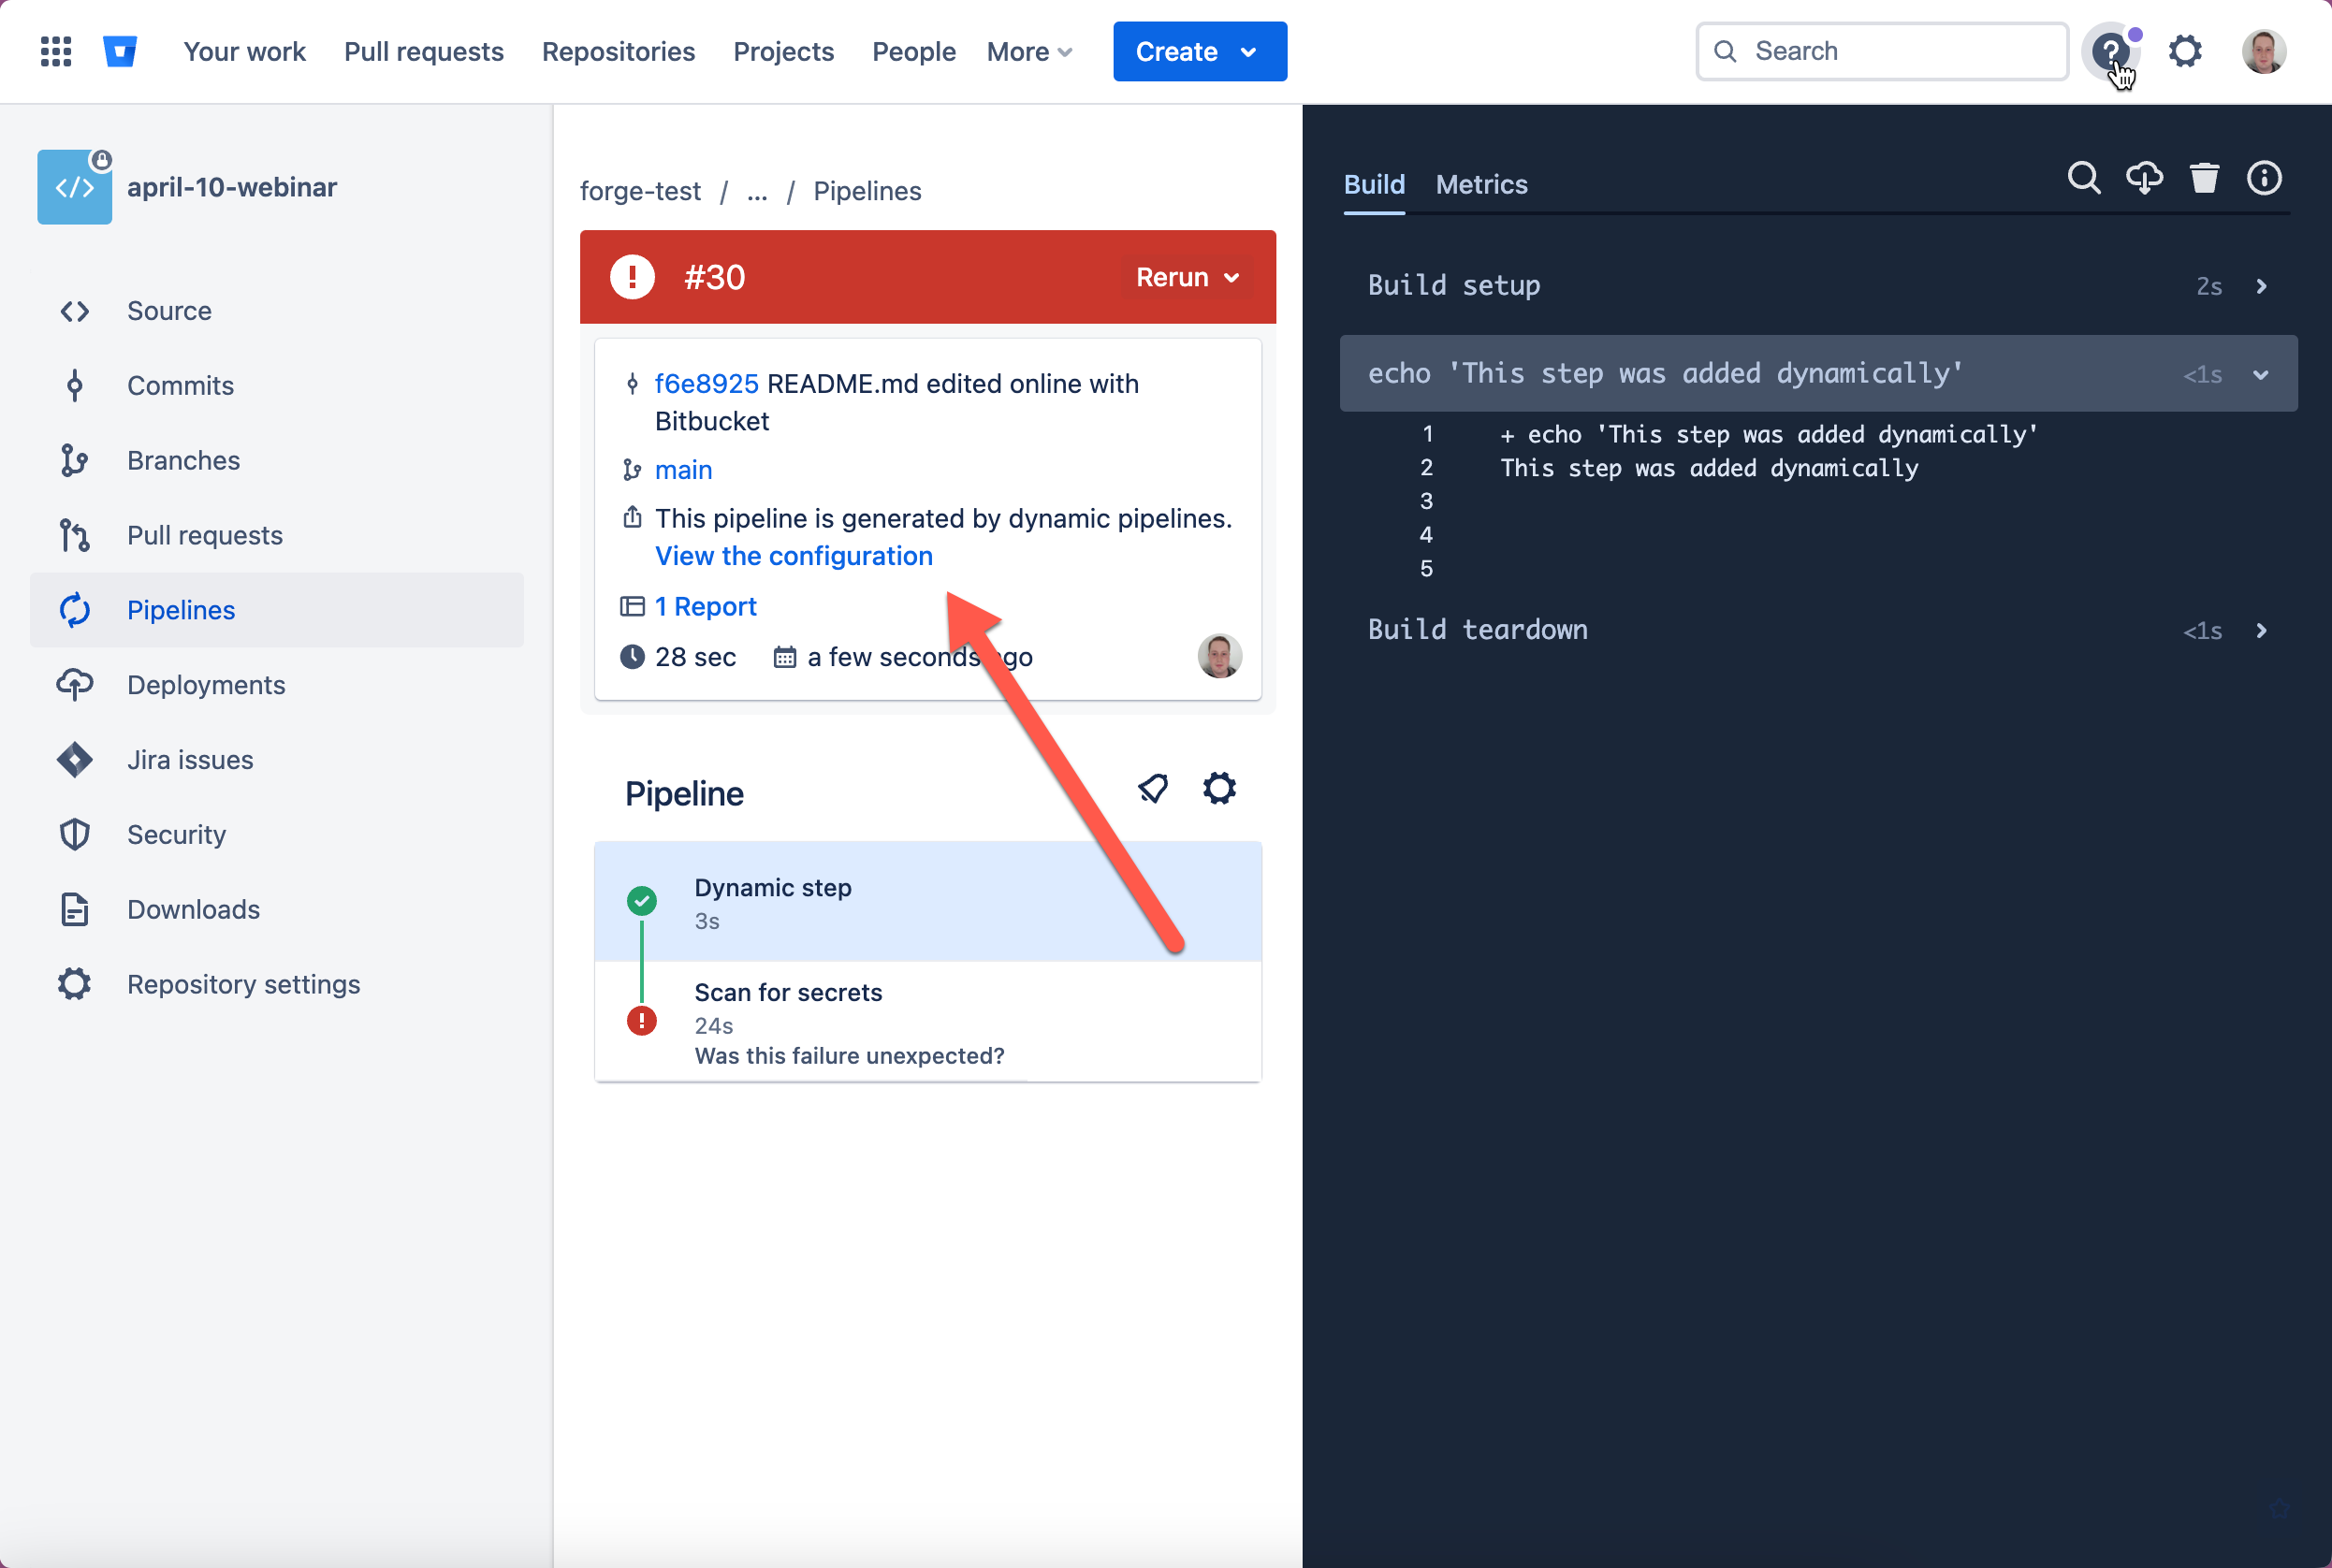
-
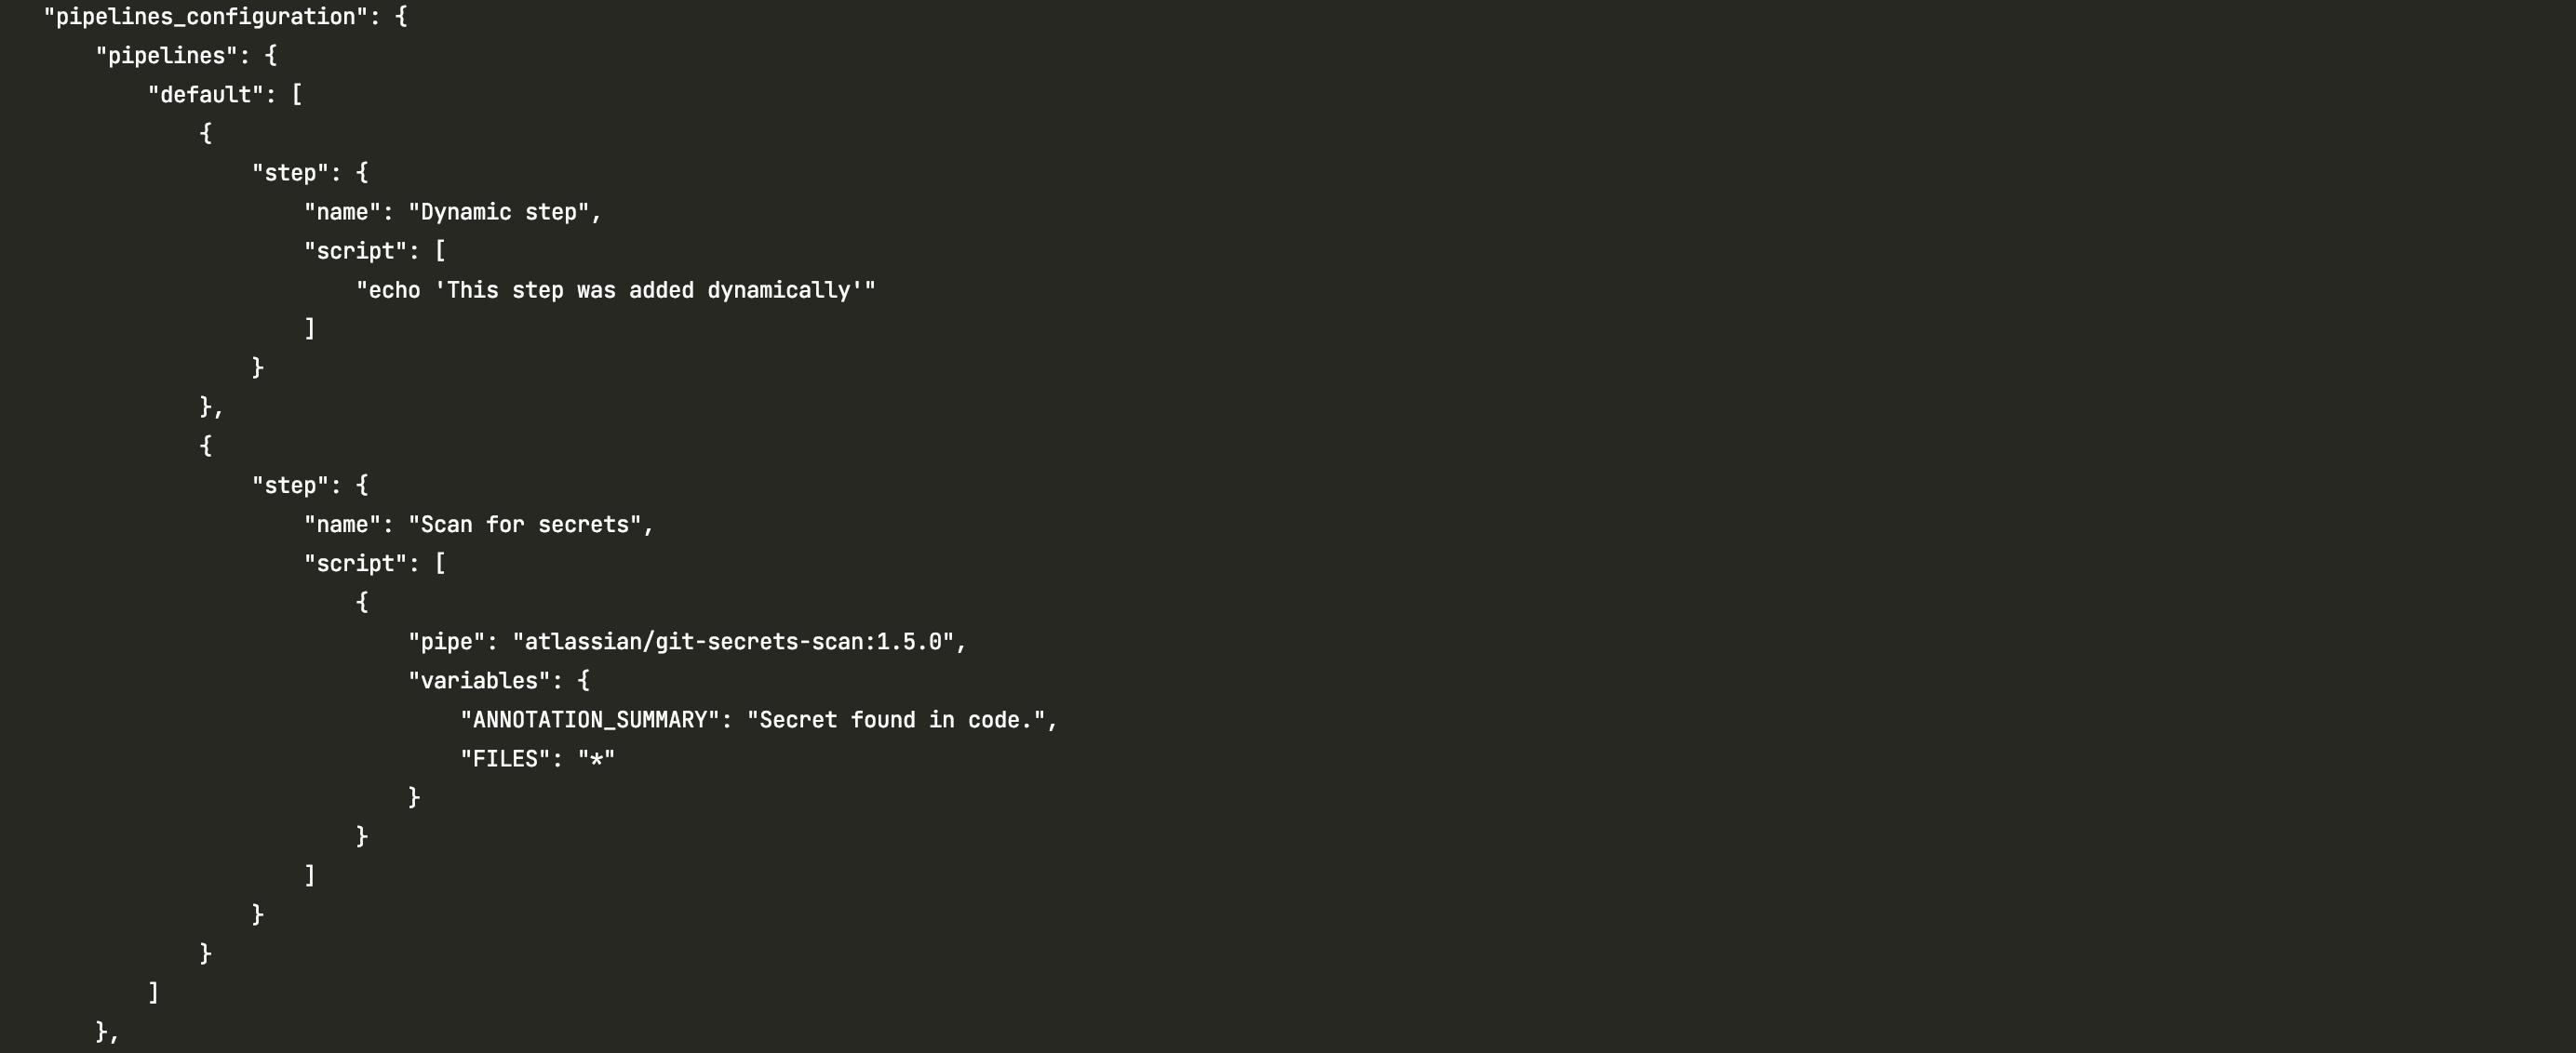
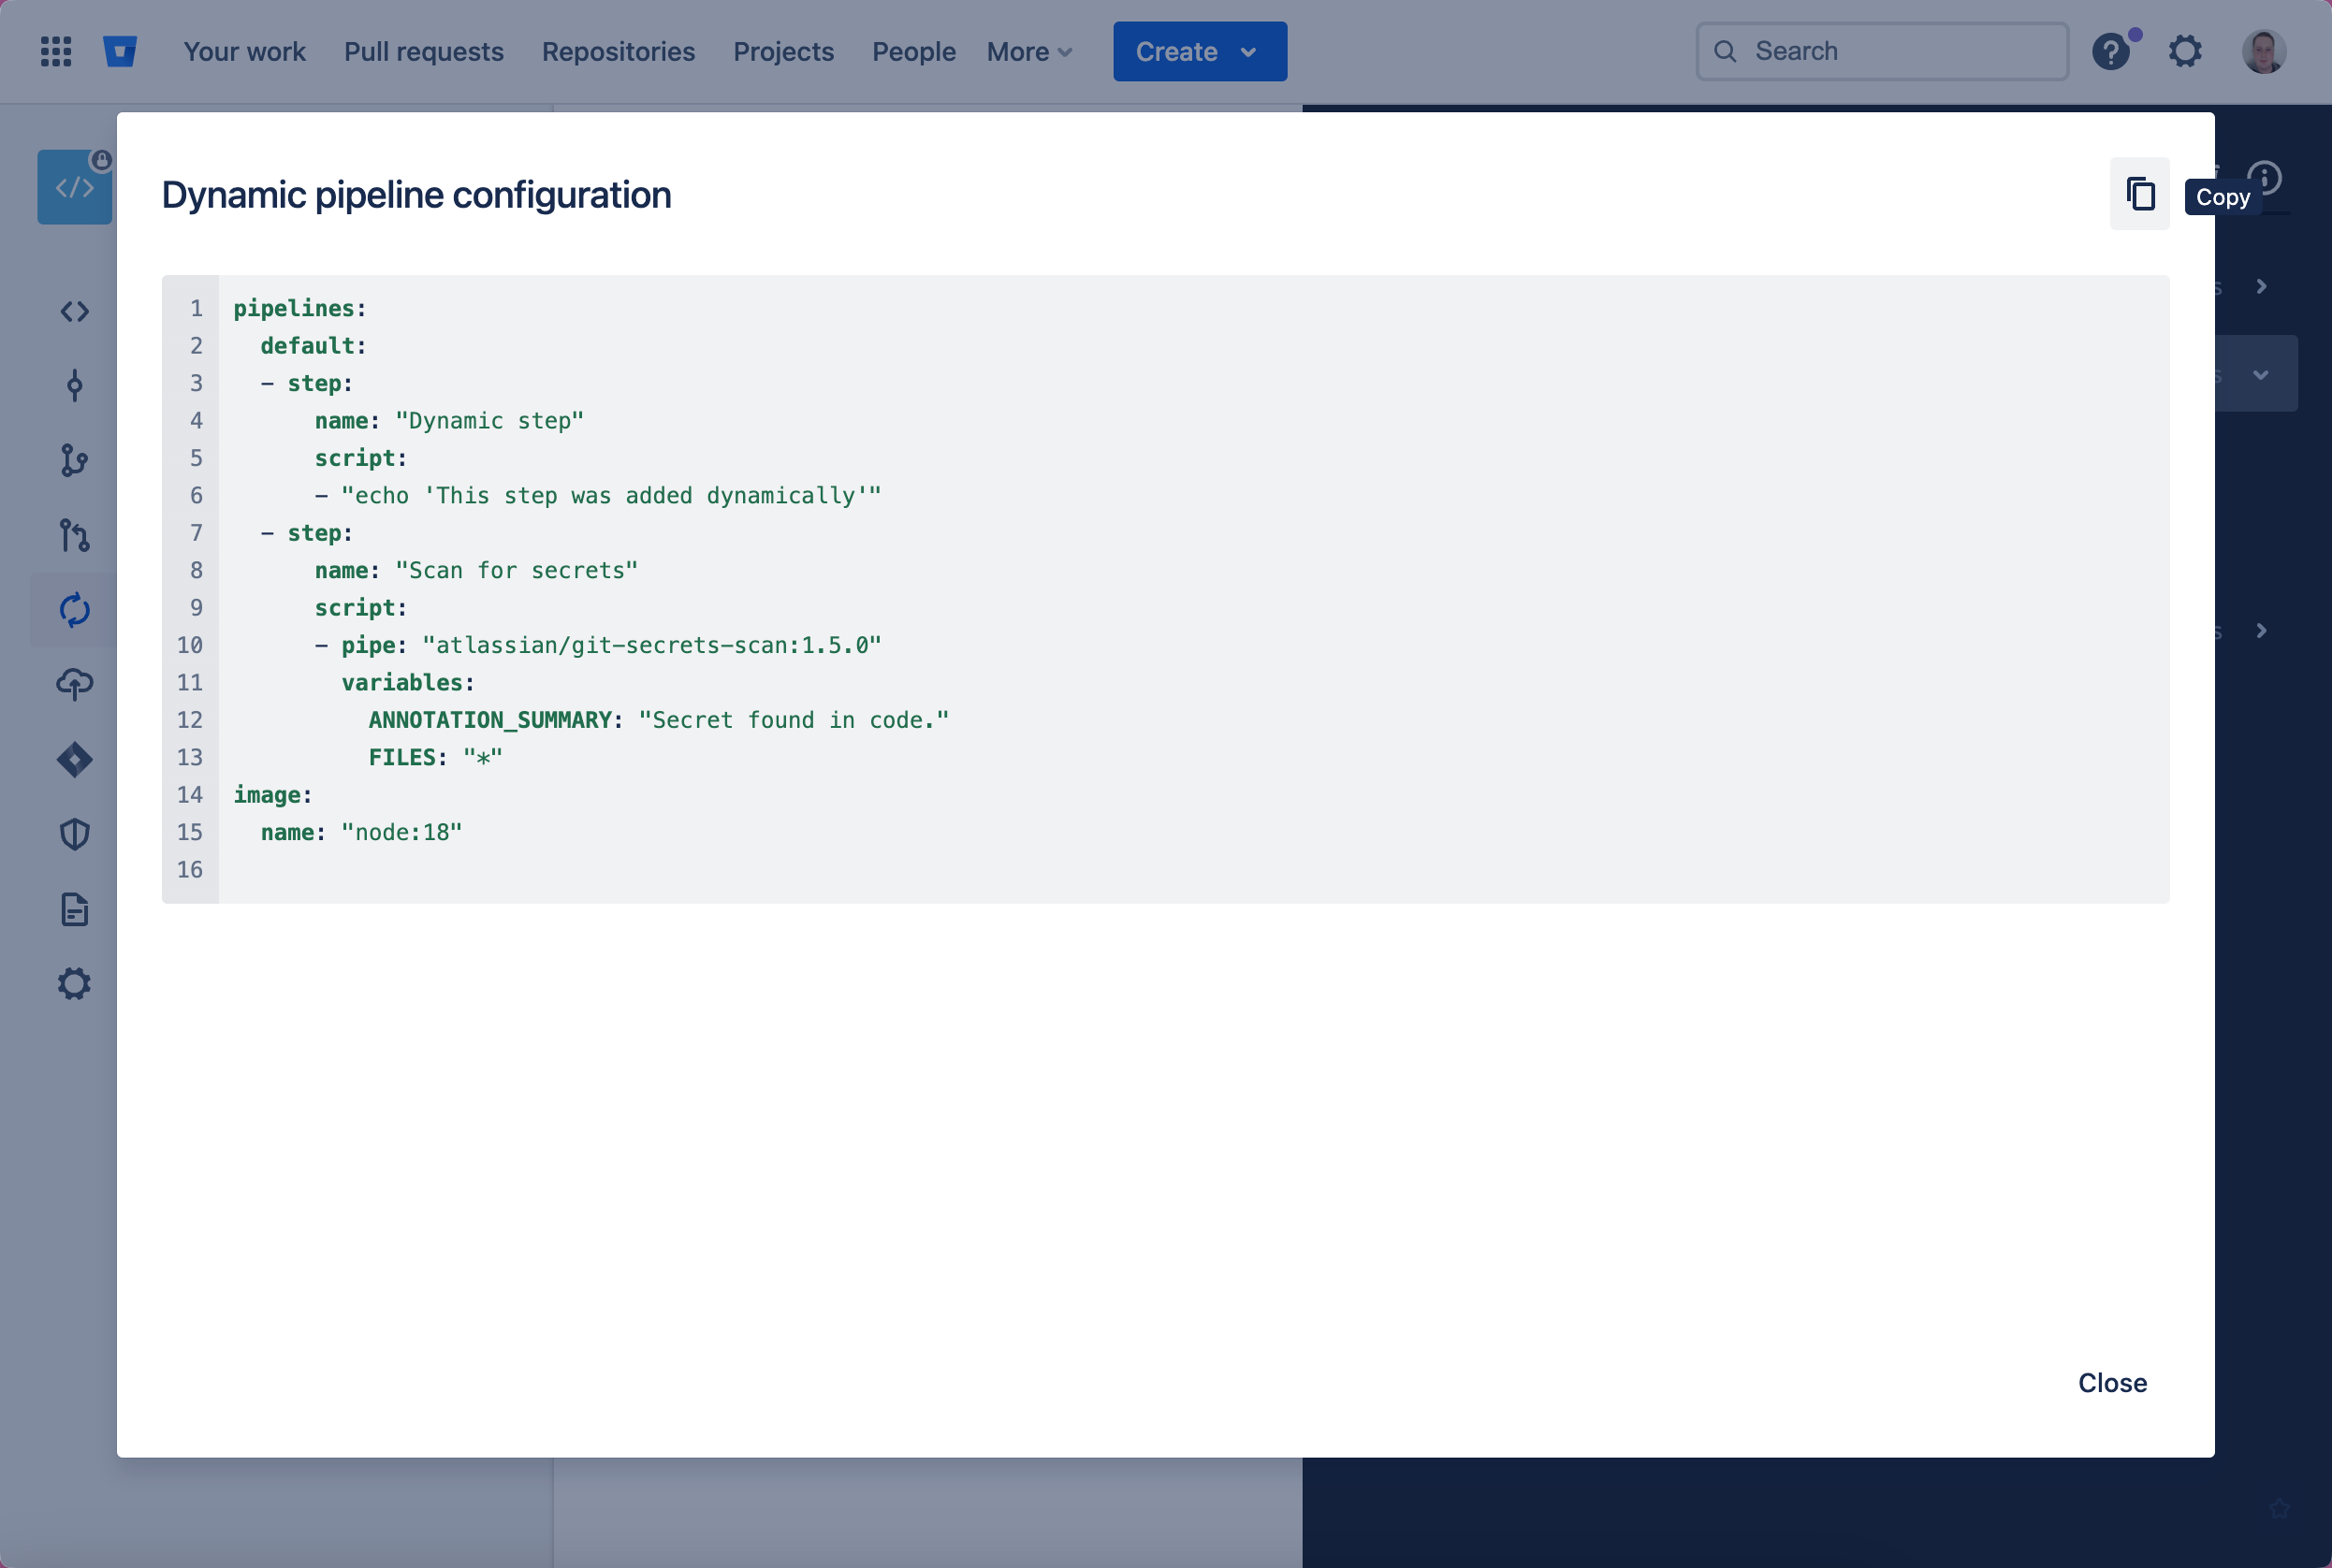
And you can open the dynamically generated configuration and view it from the UI.
Note: The configuration rendered in the UI is translated back into the equivalent YAML representation, with the dynamically generated changes includes. We do this as most users are familiar with pipeline configurations in their YAML representation, not JSON.
-
Run some other pipeline in the same repo (not the default pipeline), and verify the following:
Updated requestappears in your tunnel.- The triggered pipeline does not have steps generated dynamically.
Step 7: Use the Bitbucket REST API to modify the response
In Step 6, we dynamically applied some changes to the pipeline configuration. In this section,
you'll update your app to call the Bitbucket REST API. Using the
Product Fetch API from the @forge/api package,
you'll get the latest commit stats and print the number of changed files directly to the pipeline
step logs so that they’re visible from the pipeline details view in Bitbucket Cloud.
-
In the app’s top-level directory, install the npm package dependency for the Forge API by running:
1 2
npm install @forge/api --save -
Start your tunnel (or restart it in case you still have it running from Step 6) to use the new NPM modules by running:
1 2
forge tunnel -
In the
src/index.js, import the@forge/apipackage by adding the following to the top of the file:1 2
import api, { route } from "@forge/api"; -
Declare a new
getCommitDiffStatfunction:1 2
const getCommitDiffStat = async (workspaceId, repositoryId, commitHash) => { const requestUrl = route`/2.0/repositories/${workspaceId}/${repositoryId}/diffstat/${commitHash}`; // Use the Forge Runtime API to fetch data from Bitbucket API using your app credential let response = await api.asApp().requestBitbucket(requestUrl); if (response.status !== 200) { console.log(response.status); const responseBody = await response.json(); throw `Unable to get diffstat for commit ${commitHash}, status: ${ response.status }, response: ${JSON.stringify(responseBody, null, 4)}`; } return response.json(); }; -
Update your
addStepIfDefaultPipelinefunction to useasync/awaitnow that you are making another API call from inside it:1 2
const addStepIfDefaultPipeline = async (request) => { // code from earlier }; -
From inside the
addStepIfDefaultPipelinefunction, call the newgetCommitDiffStatefunction and pass in the workspace ID, repo ID, & commit hash, remembering toawaitthe response:1 2
const addStepIfDefaultPipeline = async (request) => { // If not the 'default' pipeline definition matched from the static YML configuration, return unmodified configuration if (!request.pipelines_configuration.pipelines?.default) { return { pipelines_configuration: request.pipelines_configuration }; } // All the values you need are part of the "request" object. const commitDiffStat = await getCommitDiffStat( request.workspace, request.repository, request.target.commit.hash, ); // Otherwise prepend a step to the 'default' pipeline ... }; -
From the returned
commitDiffStat, extract thesizeproperty, which indicates the number of files changed, and include that in the log line you print from the injected step:1 2
const addStepIfDefaultPipeline = async (request) => { // If the pipeline does not contain a default definition, just return what was sent in the request. if (!request.pipelines_configuration?.pipelines?.default) return request; // get the diff state for the commit. const commitDiffStat = await getCommitDiffStat( request.workspace, request.repository, request.target.commit.hash, ); // get the number of files changed. const changedFilesNumber = commitDiffStat.size; // add a second line to the script section, injecting the number of files changed for the comit. request.pipelines_configuration.pipelines.default = [ { step: { name: "Dynamic step", script: [ "echo 'This step was added dynamically'", `echo 'The change for this request contained ${changedFilesNumber} files.'` ], }, }, ...request.pipelines_configuration.pipelines?.default, ]; // and return the whole request. return request; }; -
Finally, adjust the
mainfunction to beasyncand ensure youawaittheaddStepIfDefaultPipeline()request:1 2
export const main = async (request, context) => { const updatedPipelineRequest = await addStepIfDefaultPipeline(request); console.log(`Updated request: ${JSON.stringify(updatedPipelineRequest, null, 4)}`); return { pipelines_configuration: updatedPipelineRequest.pipelines_configuration }; }; -
Run the
defaultpipeline in a repo in your Bitbucket workspace, and verify that the triggered pipeline now has an extra step that prints the number of changed files in the commit the pipeline runs against.
Step 8: Deploy your app
In the previous step, you made changes to your app using the Forge Runtime API and then tested the changes using a tunnel. Now that your app is working, deploy the changes so the app continues to work when the tunnel is closed.
-
Close the tunnel by pressing Ctrl+C.
-
Deploy the app by running:
1 2
forge deploy -
Run a pipeline in a repo in the workspace the app is installed in, and confirm that it runs the expected steps.
Great work! You’ve created a Forge app that:
- Detects when a pipeline is requested to run in the workspace where it is installed.
- Responds by looking up the commit the pipeline was requested to run against, identifying how many files were changed in that commit, and dynamically adjusting the configuration of that pipeline based on what you found.
What’s next?
- You could check which files were changed, and adjust which pipeline steps you run based on the outcome.
- You could apply some validation to your pipeline, to ensure it meets the processes and rules set by your team.
- You could configure this dynamic pipeline to run at the Workspace level, and see how it works across every repository in the workspace.
- And many many more things in addition to just those.
If you’d like to learn more, share ideas for different capabilities, ask questions, and see what’s coming soon, make sure you check out the Forge for Bitbucket Cloud community group and get involved!
Rate this page: