Use custom entities to store structured data
This tutorial demonstrates how to store structured data through custom entities and query that data. This will help you understand how custom entities work in Forge.
You’ll build a Confluence app that can create users with multiple attributes (name, age, and country). This app will also allow you to query those users through any of their attributes, and delete them.
In this tutorial, we’ll use a web trigger to streamline how data is stored in the Custom Entity Store. For related details, see Web triggers and webtrigger Operation. To simplify testing, this tutorial doesn’t include a front end (UI Kit).
Before you begin
This tutorial assumes you're already familiar with developing on Forge. If this is your first time using Forge, see Getting started for step-by-step instructions on setting up Forge.
To complete this tutorial, you need the following:
- The latest version of Forge CLI. To update your CLI version, run
npm install -g @forge/cli@lateston the command line. - An Atlassian site with Jira and Confluence Cloud where you can install your app.
Step 1: Create your app
Create an app based on the Hello world template. Using your terminal complete the following:
-
Navigate to the directory where you want to create the app.
-
Create your app by running:
1 2
forge create -
Enter a name for the app. For example, user-management-via-entities.
-
Select the Triggers and Validators category.
-
Select Show All for the Atlassian app.
-
Select the webtrigger template.
-
Your app has been created in a directory with the same name as your app; for example user-management-via-entities. Open the app directory to see the files associated with your app.
-
Install the latest version of the Forge API package:
1 2
npm install --save @forge/kvs@latest -
Install the UUID package, which will generate UUID keys required by your app:
1 2
npm install --save uuid
Step 2: Configure the app manifest
We’ll add the scope required by the storage API and declare the entity we’ll use (along with its indexes).
- Enable the
storageAPI by adding thestorage:appscope to themanifest.yml file. Learn more about adding scopes to call an Atlassian REST API.1 2
permissions: scopes: - storage:app - In the
appsection of themanifest.ymlfile, add the following entity declaration:1 2
app: ... storage: entities: - name: 'users' attributes: name: type: 'string' age: type: 'integer' country: type: 'string' indexes: - name: 'by-country' range: - 'country' - name: 'by-country-name' range: - 'name' partition: - 'country'
Here, we declare a users entity with the following attributes: name, age, and country. This declaration also consists of two indexes:
by-country: for querying bycountryby-country-name: for querying bynameandcountry, together
See Indexes for more details about how to construct an index.
Step 3: Deploy and install your app
-
Navigate to the app's top-level directory and deploy your app by running:
1 2
forge deploy -
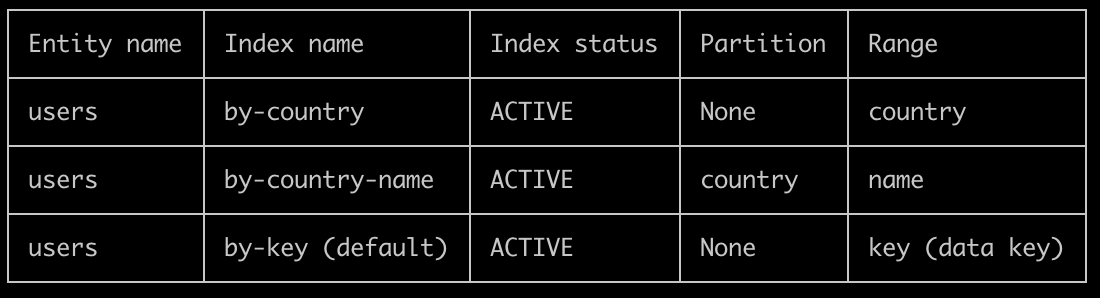
Before installing your app, check that the indexes are already created first:
1 2
forge storage entities indexes list -e developmentIf the indexes were created successfully, this command should display the following:
-
Install your app by running:
1 2
forge install -
Select your Atlassian app using the arrow keys and press the enter key.
-
Enter the URL for your development site. For example, example.atlassian.net. View a list of your active sites at Atlassian administration.
Once the successful installation message appears, your app is installed and ready to use on the specified site. You can always delete your app from the site by running the forge uninstall command.
Running the forge install command only installs your app onto the selected Atlassian app.
To install onto multiple Atlassian apps, repeat these steps again, selecting another Atlassian app each time.
You must run forge deploy before running forge install in any of the Forge environments.
Step 4: Add a web trigger for creating users
When using web triggers, consider the security and authentication implications. To simplify this tutorial, we didn't include an authentication mechanism.
We’ll now add a function for creating users and assign a name, age, and country to each one.
In the src/directory, add a new file named create-user.js with the following contents:
1 2import kvs from '@forge/kvs'; import { v4 as uuidv4 } from 'uuid'; const validateInput = (payload) => { let input = {}; try { input = JSON.parse(payload); } catch (e) { throw e; } if (!input.name || !input.age || !input.country) { throw new Error('Request body did not have necessary information'); } if (typeof input.name !== 'string' || typeof input.age !== 'number' || typeof input.country !== 'string') { throw new Error('At least one of the request parameters is the wrong type'); } if (input.country !== 'India' && input.country !== 'Australia' && input.country !== 'Indonesia') { throw new Error('Country must either be India, Australia or Indonesia'); } return input; }; const createUserInStorage = async (data) => { try { await kvs .entity('users') .set(`user-${uuidv4()}`, { ...data, age: data.age, }); } catch (e) { throw e; } } export const createUser = async (event, context) => { try { if (event.method !== 'POST') { return { statusCode: 400, body: "POST method must be provided" }; } const input = validateInput(event.body); await createUserInStorage(input); const result = { body: JSON.stringify(input), headers: { 'Content-Type': ['application/json'], }, statusCode: 200, statusText: 'OK' }; return result; } catch (e) { // Assume all errors are client errors return { statusCode: 400, body: e.message }; } };
The create-user.js file features a function named createUser which makes a call to set storage operation.
-
Modify the
manifest.ymlto add this new endpoint.1 2
modules: webtrigger: ... - key: user-management-via-entities-webtrigger-create-user function: create-user urlFormat: v2 response: type: dynamic function: ... - key: create-user handler: create-user.createUser -
Re-deploy and verify your changes in the app by running:
1 2
forge deploy -
Use the web trigger to create several users, with multiple ones for each country from the allowed list. These will help us in the next step, where we will query these users based on their country and (or) their name.
Invoke your app
To use the web trigger in this tutorial you'll need some kind of client like curl to make POST requests.
- Find the URL by using
forge webtrigger create - Choose the relevant site
- The web trigger will have the name
user-management-via-entities-webtrigger-create-user - Send a
POSTrequest to this URL with a payload that matches thevalidateInputfunction
An example curl command
1 2curl -v $URL -d '{"name": "Mudit", "age": 28, "country":"India"}'
Step 5: Add a tab for querying users
After using the create-user web trigger to create users, enhance it with the capability to query users by country and age:
Next, add a file in the src/ directory named query-users.js with the following contents:
1 2import kvs, { WhereConditions } from '@forge/kvs' const validateInput = (payload) => { let input = {}; try { input = JSON.parse(payload); } catch (e) { throw e; } if (!input.name || !input.country) { throw new Error('Request body did not have necessary information'); } if (typeof input.name !== 'string' || typeof input.country !== 'string') { throw new Error('At least one of the request parameters is the wrong type'); } if (input.country !== 'India' && input.country !== 'Australia' && input.country !== 'Indonesia') { throw new Error('Country must either be India, Australia or Indonesia'); } return input; }; const searchByNameInStorage = async (data) => { try { let queryBuilder = kvs .entity("users") .query() .index('by-country-name', { partition: [data.country] }) if (data.name) { queryBuilder = queryBuilder .where(WhereConditions.beginsWith(data.name)); } const results = await queryBuilder .getMany(); return results.results; } catch (e) { throw e; } } export const queryUsers = async (event, context) => { try { if (event.method !== 'POST') { return { statusCode: 400, body: "POST method must be provided" }; } const input = validateInput(event.body); const results = await searchByNameInStorage(input); return { body: JSON.stringify(results), headers: { 'Content-Type': ['application/json'], }, statusCode: 200, statusText: 'OK' }; } catch (e) { // Assume all errors are client errors return { statusCode: 400, body: e.message }; } };
The query-users.js file will hold the functionality to submit your query. This file:
- Uses the
by-country-nameindex we previously declared in themanifest.ymlto filter by thecountryattribute. - Uses the
beginsWithcondition to filter partial or exact matches to the user’sname. See Filtering methods and Conditions for more information about building queries.
Modify the manifest.yml to add this new endpoint.
1 2modules: webtrigger: ... - key: user-management-via-entities-webtrigger-query-users function: query-users urlFormat: v2 response: type: dynamic function: ... - key: query-users handler: query-users.queryUsers
After creating query-users.js and modifying the manifest.yml files, continue with the next steps:
-
Re-deploy the app by running:
1 2
forge deploy -
The new web trigger will be under a different URL. Use the
forge webtriggercommand to grab the URL.
An example curl command to use the queryUsers function.
1 2curl -v $URL -d '{"name": "M", "country":"India"}'
Step 6: Call the Storage API’s custom entities endpoints
Finally, add the following to your app:
- Get details: uses the
kvs.entity("entity-name").getendpoint to fetch details about a selected user, identified by its key. Learn more about the endpoint here. - Delete user: uses the
kvs.entity("entity-name").deleteendpoint to trigger the deletion of a specific user, identified by its key. Learn more about the endpoint here.
To do this, create a new file in the src/ directory named called get-and-delete-user.js with the following contents:
1 2import kvs from '@forge/kvs'; const validateInput = (payload) => { let input = {}; try { input = JSON.parse(payload); } catch (e) { throw e; } if (!input.key) { throw new Error('Request body did not have necessary information'); } if (typeof input.key !== 'string') { throw new Error('At least one of the request parameters is the wrong type'); } return input; }; const getUserDetail = async (userKey) => { return await kvs.entity('users').get(userKey); }; const deleteUserInStorage = async (userKey) => { await kvs.entity('users').delete(userKey); }; export const getUser = async (event, context) => { try { if (event.method !== 'POST') { return { statusCode: 400, body: "POST method must be provided" }; } const input = validateInput(event.body); const results = await getUserDetail(input.key); return { body: JSON.stringify(results), headers: { 'Content-Type': ['application/json'], }, statusCode: 200, statusText: 'OK' }; } catch (e) { // Assume all errors are client errors return { statusCode: 400, body: e.message }; } }; export const deleteUser = async (event, context) => { try { if (event.method !== 'POST') { return { statusCode: 400, body: "POST method must be provided" }; } const input = validateInput(event.body); await deleteUserInStorage(input.key); return { statusCode: 200, statusText: 'OK' }; } catch (e) { // Assume all errors are client errors return { statusCode: 400, body: e.message }; } };
Modify the manifest.yml to add two new endpoints.
1 2modules: webtrigger: ... - key: user-management-via-entities-webtrigger-get-user function: get-user urlFormat: v2 response: type: dynamic - key: user-management-via-entities-webtrigger-delete-user function: delete-user urlFormat: v2 response: type: dynamic function: ... - key: get-user handler: get-and-delete-user.getUser - key: delete-user handler: get-and-delete-user.deleteUser
After updating manifest.yml, re-deploy and verify the app by running:
1
2forge deploy
You can now test both new web triggers to fetch data about a user or delete them. If needed, create more users to test custom entities even further.
Next steps
Explore the app storage API in further detail over the following pages:
- Read about the Custom Entity Store.
- Learn more about Querying the Custom Entity Store.
- View the Limits that apply to apps using the app storage API.
Rate this page: