Build a Jira issue analyst Rovo Agent
When you use Rovo APIs, you must comply with the Atlassian Acceptable Use Policy, including the section titled “Artificial intelligence offerings and features.” For the protection of our customers, Atlassian performs safety screening on Agents at our sole discretion. If we identify any issues with your Agent, we may take protective actions, such as preventing the Agent from being deployed or suspending your use of Rovo APIs. Where possible we will notify you of the nature of the issue, and you must use reasonable commercial efforts to correct the issue before deploying your Agent again.
This tutorial guides you in building a Forge Rovo Agent called Jira Issue Analyst, which integrates with Atlassian Rovo to help identify trends, recognize patterns in issue queues leading to improved response times and customer satisfaction.
For a step-by-step guide on completing this tutorial, check out this video:
The source code of the app is available here. Readers are recommended to review the code as they complete this tutorial.
Before you begin
This agent must be used within the context of an issue page. It will not function correctly in other views, such as the board view, project settings, list view, etc. We have identified this bug and will be fixed soon.
Before starting this tutorial, you must familiarize with the following:
-
Activate Rovo for your organization
-
Install the
@forge/cliversion10.3.0or higherTo install:
1 2
npm install --g @forge/cli@latest or npm install --g @forge/cli@^10.3.0` -
Building a Rovo agent tutorial to ensure you are familiar with the basics of creating, installing and viewing Rovo apps.
-
Basic knowledge of JavaScript, React and the Forge platform.
-
Forge APIs
Understand how the Jira analyst Rovo Agent work
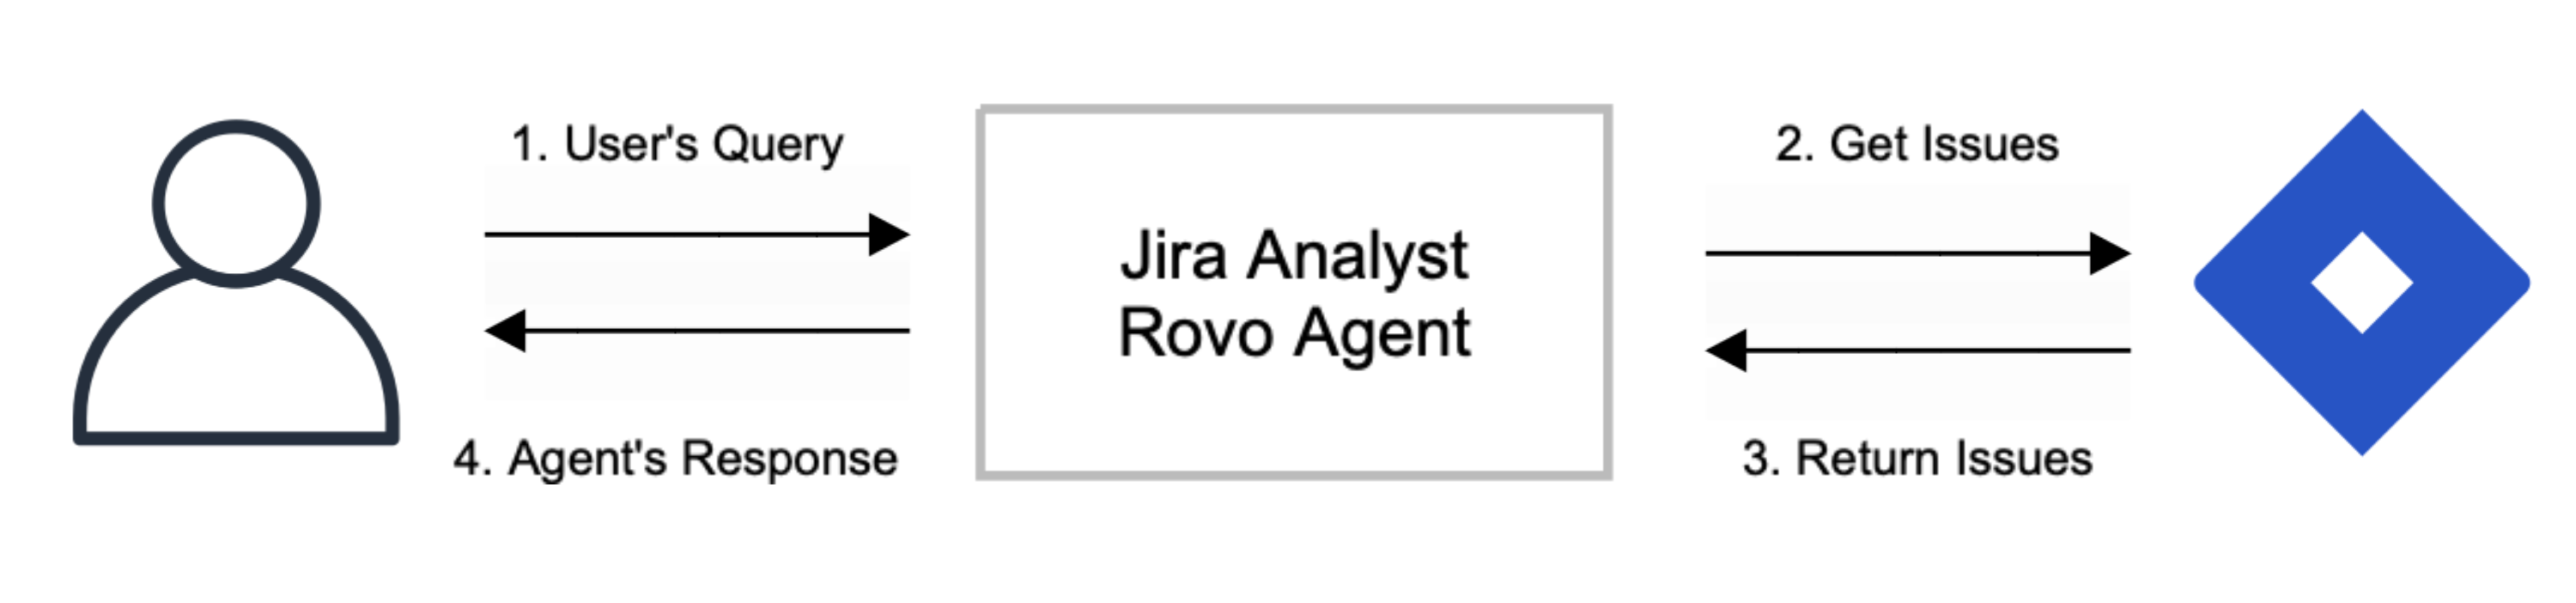
- User's Query: The user initiates a query to the analyst using a prompt defined in the manifest or through conversation starters.
- Get issues: The Jira Analyst Rovo agent triggers the corresponding action, such as fetching issues from the getIssues API.
- Return issues: The agent retrieves the issues.
- Agent's response: The Jira Issue Analyst Rovo agent returns the analyzed Jira issues to the user.
Step 1: Create your app
When you create a new app, Forge will prompt you to set a default environment. In this
tutorial we use the development environment as our default.
Learn more about staging and production environments.
-
Navigate to the directory where you want to create the app. A new subdirectory with the app’s name will be created there.
-
Create your app by running:
1 2
forge create -
Enter a name for your app (up to 50 characters). For example, Jira Analyst.
-
Select the Rovo agent and action (EAP) category.
-
Select the action template.
-
Change to the app subdirectory to see the app files:
1 2
cd Jira Analyst
Step 2: Add the Agent module to the manifest
1
2modules:
  rovo:agent:
    - key: analyst-agent
      name: Jira Analyst
      description: An agent that can analyze Jira issues.
      prompt: >
        You are an experienced data analyst specializing in analyzing Jira issues.

        You can perform the following jobs based on the user's request:

        a. Analyze a list of Jira issues

        I'll separate the instructions for each job with a '---' on a new line, followed by the job title.

        ---

        a. Analyze a list of Jira issues

        To do this, follow these steps:

        1. Check if the project key is available in the context. If not, prompt the user to provide the project key.
           Also check if the user has provided labels to filter the issues by.

        2. Fetch the issues using the get-issues action.
           If there are no issues, skip steps 3 and 4 and return a message to the user specifying the project key and label used in this run.

        3. Analyze the Jira issues data according to the user's request. Structure your response as follows:
          i. A brief summary of the main findings
          ii. Show the data in tabular format wherever possible. Table should have columns 'Category', 'Count', 'Percentage of Total'.
          iii. Detailed explanations of identified trends or patterns
          iv. Any additional insights that may be relevant to the user's request
          v. If applicable, recommendations based on your analysis

          Follow these rules:
            - Mention the common theme between issues of certain type.
            - Do not mention specific issue details unless asked by the user.

        4. Return the analysis to the user.

      conversationStarters:
        - Analyse Jira Issues
      actions:
        - get-issues
rovo:agent module has the following properties:
key: A unique identifier for the Rovo agent module, used for referencing the agent within the app.name: The display name of the agent, indicating its primary function, in this case, "Jira Analyst."description: A brief explanation of the agent's purpose, which is to analyze Jira issues.prompt: A detailed instruction set guiding the agent's behavior and outlining the tasks it can perform for the user. The prompt lets the agent know its capabilities and how to perform them. You can learn here about how to write effective prompts. A good prompt has multiple parts:- Role - Specify the personality of the agent.
- Jobs** - Define its capabilities and the tasks it could perform.
- Steps to perform for each job - Step by step instructions for each task.
- Guardrails - Rules to be mindful of while generating the response or performing actions.
conversationStarters: Predefined phrases or prompts that users can use to initiate interactions with the agent, such as "Analyze Jira Issues."actions: Specifies the actions the agent can perform, such as fetching issues using the get-issues action.
For more information on the manifest structure and properties of the rovo:agent module,
see here.
Step 3: Add the Action module and permission scope to the manifest
1
2modules:
  action:
    - key: get-issues
      name: Get issues
      function: getIssues
      description: Fetches issues from a project.
      inputs:
        label:
          title: Label
          type: string
          description: The label to filter the issues by.
          required: false
      actionVerb: GET
  function:
    - key: getIssues
      handler: index.getIssues
app:
  runtime:
    name: nodejs24.x
  id: <your-app-id>
permissions:
  scopes:
    - read:jira-work
Action module
- key: Identifies the action uniquely as "get-issues," allowing it to be referenced within the app.
- function: Links the action to a specific Forge function module, in this case,
getIssues, which handles the action logic. - description: Describes what the action does, such as fetching issues from a Jira project.
- inputs: Details the parameters the action can accept:
- label: An optional input parameter used to filter issues. It includes:
- title: A user-friendly name for the input, "Label."
- type: Specifies the data type, "string."
- description: Explains the purpose of the input, which is to filter issues by label.
- required: Indicates whether the input is mandatory, set to "false," meaning it is optional.
- label: An optional input parameter used to filter issues. It includes:
- actionVerb: Specifies the type of operation the action performs, such as "GET," indicating a retrieval action.
For more information on actions, see here
Function
- key: Uniquely identifies the function as
getIssues, which is used to link the action to its handling logic. - handler: Specifies the entry point for executing the function, in this case, the
getIssuesfunction within theindex.jsfile.
For more information on Functions, see here
Permissions and scopes
- scopes: Lists the permissions required for the app to interact with Jira and external APIs.
In this case, the
read:jira-workscope grants the app permission to read Jira work data, which is necessary to call the Search for issues using JQL (GET) API.
For more information on permissions, see here
Your manifest file which includes rovo:agent and action modules should look like this:
1
2modules:
  rovo:agent:
    - key: analyst-agent
      name: Jira Analyst
      description: An agent that can analyze Jira issues.
      prompt: >
        You are an experienced data analyst specializing in analyzing Jira issues.

        You can perform the following jobs based on the user's request:

        a. Analyze a list of Jira issues

        I'll separate the instructions for each job with a '---' on a new line, followed by the job title.

        ---

        a. Analyze a list of Jira issues

        To do this, follow these steps:

        1. Check if the project key is available in the context. If not, prompt the user to provide the project key.
           Also check if the user has provided labels to filter the issues by.

        2. Fetch the issues using the get-issues action.
           If there are no issues, skip steps 3 and 4 and return a message to the user specifying the project key and label used in this run.

        3. Analyze the Jira issues data according to the user's request. Structure your response as follows:
          i. A brief summary of the main findings
          ii. Show the data in tabular format wherever possible. Table should have columns 'Category', 'Count', 'Percentage of Total'.
          iii. Detailed explanations of identified trends or patterns
          iv. Any additional insights that may be relevant to the user's request
          v. If applicable, recommendations based on your analysis

          Follow these rules:
            - Mention the common theme between issues of certain type.
            - Do not mention specific issue details unless asked by the user.

        4. Return the analysis to the user.

      conversationStarters:
        - Analyse Jira Issues
      actions:
        - get-issues

  action:
    - key: get-issues
      name: Get issues
      function: getIssues
      description: Fetches issues from a project.
      inputs:
        label:
          title: Label
          type: string
          description: The label to filter the issues by.
          required: false
      actionVerb: GET

  function:
    - key: getIssues
      handler: index.getIssues
app:
  runtime:
    name: nodejs24.x
  id: ari:cloud:ecosystem::app/fbe803d8-7661-4267-bef4-0916ce416720
permissions:
  scopes:
    - read:jira-work
Step 4: Update index.jsx
The index.js file contains functions that interact with Jira's API to fetch and process issue data.
When the get-issues action is invoked, it triggers the getIssues function, as defined in the manifest.
This function retrieves and processes Jira issue data based on user input and context.
Replace the index.jsx with the following code:
1
2import api, { route } from '@forge/api';

// Fetch issues from jira in a specific project
export const getIssues = async (payload, context) => {
  console.log(`Payload: ${JSON.stringify(payload)}`);
  console.log(`Request Context: ${JSON.stringify(context)}`);

  const projectKey = payload.context.jira.projectKey;
  const label = payload.label ? payload.label : null;

  console.log(`Fetching issues for project: ${projectKey} and label: ${label}`);
  const jql = label ? `project=${projectKey} AND labels=${label}` : `project=${projectKey}`;
  const response = await api.asApp().requestJira(route`/rest/api/3/search/jql?jql=${jql}`);
  const data = await response.json();
  const cleanData = await extractIssueDetails(data);
  return cleanData;
}

// Extract issue details from the response
export const extractIssueDetails = async (data) => {
  // console.log(`Extracting issue details from response: ${JSON.stringify(data)}`);
  return data.issues.map(issue => ({
      key: issue.key,
      summary: issue.fields.summary
  }));
}
Overview of the code:
- Function invocation: The
getIssuesfunction is triggered once theget-issuesaction is invoked, as specified in the manifest. - Payload and request context: These are inputs to the function, with
payloadcontaining necessary information like the project key and any user-specified labels. - JQL construction: The function builds a JQL query to filter issues based on the project key and optional label, enabling precise data retrieval from Jira.
- API request: The function uses
api.asApp().requestJira()to execute the JQL query and fetch matching issues from Jira. - Data extraction: The
extractIssueDetailsfunction processes the raw API response, extracting only thekeyandsummaryfor each issue, making the data more manageable. - Data return: The cleaned data is returned to the agent, which can then perform additional analysis or actions based on user queries.
Let's understand the purpose of different components in the code:
-
Import statements:
import api, { route } from '@forge/api';: This imports the Forge API module, which allows the function to make requests to Jira's REST API.
-
getIssues function:
- Purpose: Fetches Jira issues for a specific project and optionally filters them by label.
- Parameters:
payload: Contains the context and user inputs, such as project key and label.context: Provides additional context about the request (not explicitly used in the function).
- Process:
- Extracts the
projectKeyfrom thepayload.context.jira. - Checks for a
labelin the user input. If none is provided, it defaults tonull. - Constructs a JQL query expression to filter issues based on the
projectKeyand, if present, thelabeluses theapi.asApp().requestJira()method to call the Search for issues using JQL (GET) API and then parses the response as JSON and passes the data to theextractIssueDetailsfunction for further processing.
- Extracts the
-
extractIssueDetails function:
- Purpose: Simplifies the API response by extracting essential issue details.
- Process:
- Maps through the
data.issuesarray to create a new array containing only thekeyandsummaryof each issue. - Returns this cleaned-up data, which includes only the necessary details for further analysis.
- Maps through the
Step 5: Install your app
To use your app, it must be installed onto an Atlassian site. The
forge deploy command builds, compiles, and deploys your code; it'll also report any compilation errors.
The forge install command then installs the deployed app onto an Atlassian site with the
required API access.
You must run the forge deploy command before forge install because an installation
links your deployed app to an Atlassian site.
-
Navigate to the app's top-level directory and deploy your app by running:
1 2
forge deploy -
Install your app by running:
1 2
forge install -
Select your Atlassian app using the arrow keys and press the enter key.
-
Enter the URL for your development site. For example, example.atlassian.net. View a list of your active sites at Atlassian administration.
Once the successful installation message appears, your app is installed and ready
to use on the specified site.
You can always delete your app from the site by running the forge uninstall command.
Running the forge install command only installs your app onto the selected organization.
To install onto multiple organizations, repeat these steps again, selecting another organization each time.
You must run forge deploy before running forge install in any of the Forge environments.
Step 6: View your agent
With your app installed, it is time to chat with your new agent.
This agent must be used within the context of an issue page. It will not function correctly in other views, such as the board view, project settings, list view, etc. We have identified this bug and will be fixed soon.
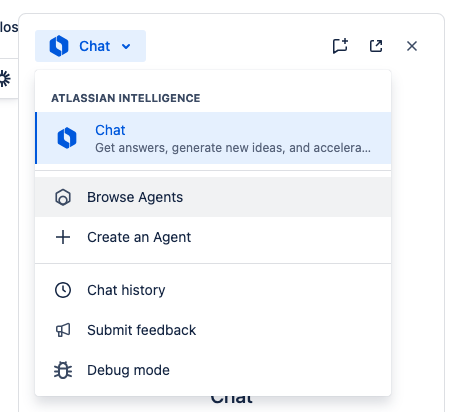
- Access Rovo chat by clicking Chat on the top menu within the Atlassian app where you have installed your Forge app.
- In the Chat side panel, click the agent selector and go to Browse agents.
- Find the
Jira Analystagent and then select it.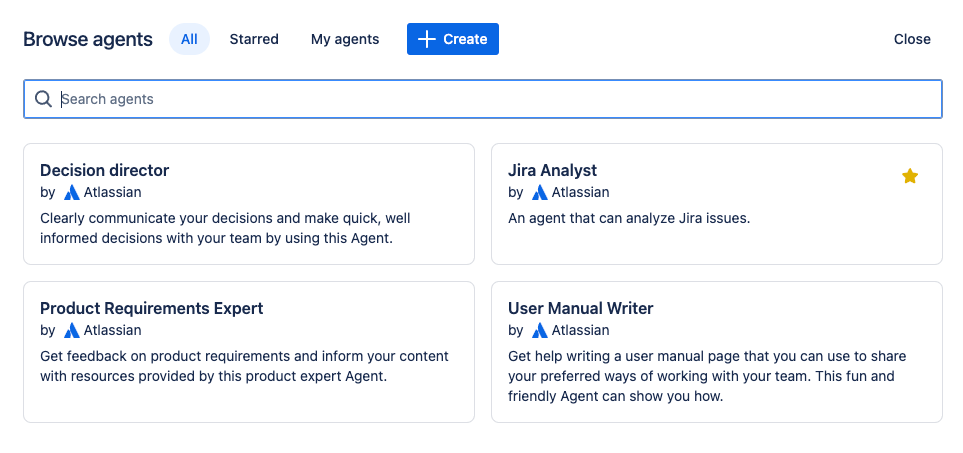
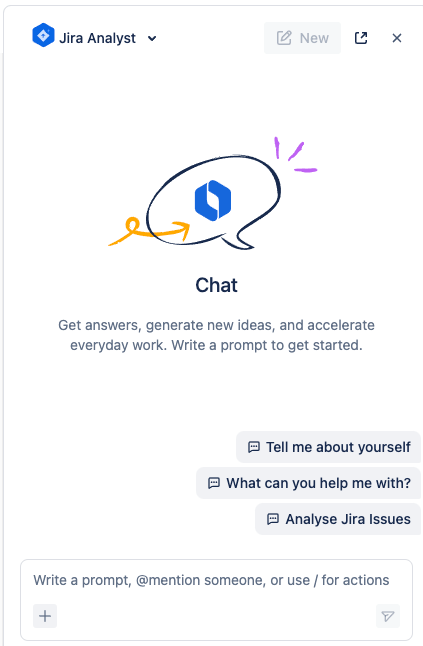
- Chat with the agent and ask it to Analyse Jira Issues using conversation starters or prompts.
Next steps
Congratulations on creating your first Rovo Agent! For more inspiration on building AI agents compatible with other Atlassian apps, be sure to check out the Rovo example apps.
Developing for Atlassian Government Cloud
This content is written with standard cloud development in mind. To learn about developing for Atlassian Government Cloud, go to our Atlassian Government Cloud developer portal.
Rate this page: