Build a Confluence keyword extractor with Forge and OpenAI
If you frequently work with Confluence pages, you may find yourself spending a lot of time manually categorizing and organizing content. This can be a time-consuming process that takes away from other important tasks. With an app that extracts keywords from your Confluence pages, you can save time and streamline the organization process. Instead of sifting through large quantities of information, simply let the app do the work for you by identifying key themes and topics within your pages.
In this tutorial, we will build a Forge app that integrates with OpenAI APIs to extract keywords from the content of a Confluence page.
Before you begin
Make sure you have the following:
- Basic knowledge of JavaScript, React, and the Forge platform
- Completed Confluence hello world app
- An OpenAI API key, which you can obtain from the OpenAI website
The tutorial uses these components to build the app: permissions, requestConfluence, useProductContext, and invoke.
Set up a cloud developer site
An Atlassian cloud developer site lets you install and test your app on Atlassian apps including Confluence and Jira. If you don't have one yet, set it up now:
- Go to http://go.atlassian.com/cloud-dev and create a site using the email address associated with your Atlassian account.
- Once your site is ready, log in and complete the setup wizard.
You can install your app to multiple Atlassian sites. However, app data won't be shared between separate Atlassian apps, sites, or Forge environments.
The limits on the numbers of users you can create are as follows:
- Confluence: 5 users
- Jira Service Management: 1 agent
- Jira Software and Jira Work Management: 5 users
About the app
Demo of the finished app
The GIF above is an example of how the app will work. When a user clicks Keyword extractor in the three dots menu, the extracted keywords will be added to the page as Confluence labels.
You can find the source code for this demo here.
How does the app work?
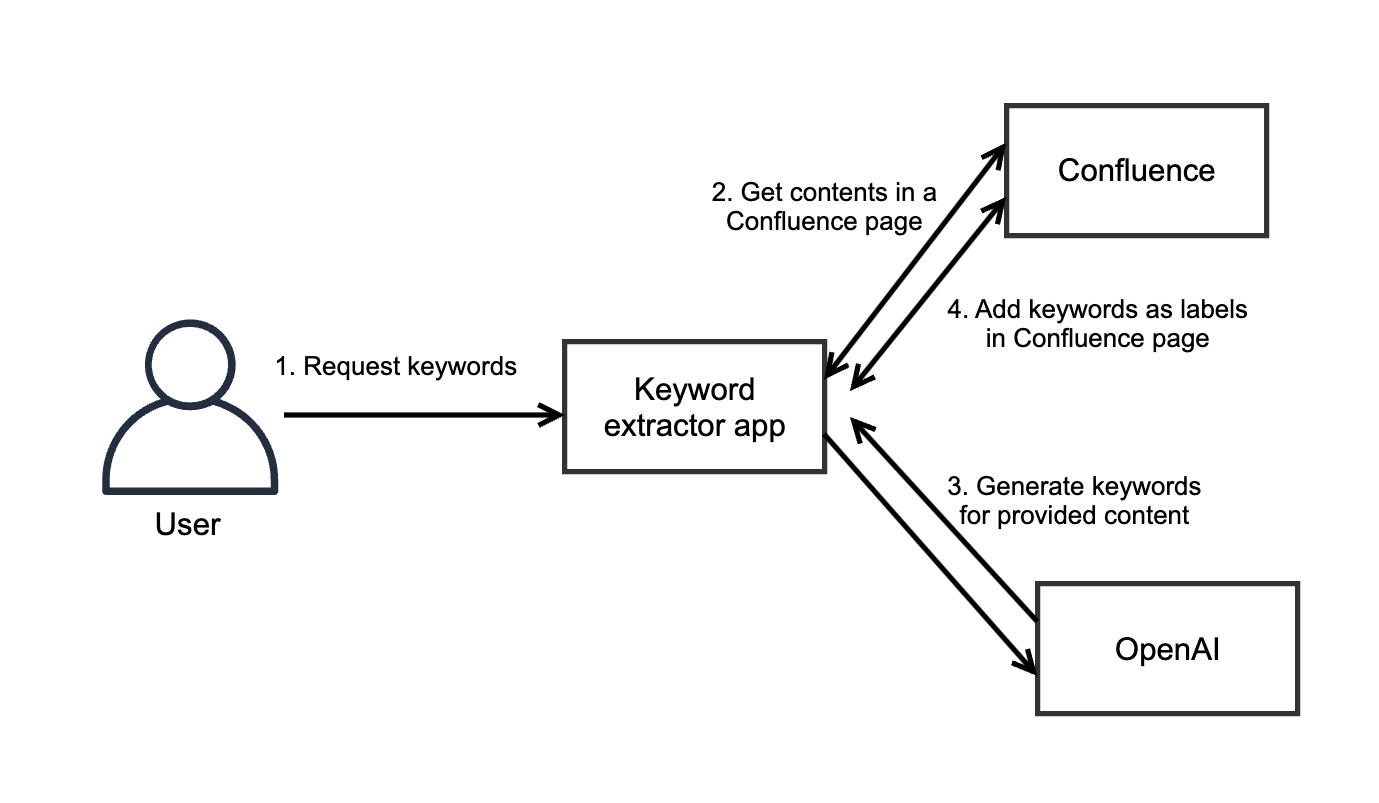
A high-level outline of how the app works is:
- First, the user requests the keywords. This is as simple as a clicking a button, as shown in the demo above.
- The Keyword extractor app gets all the content from the particular Confluence page using the Confluence API.
- The Keyword extractor app then passes the content to OpenAI along with a prompt to generate keywords.
- Once the app gets the keywords, they are added as labels to the page.
Let’s see how to build this app.
Step 1: Create the app
Assuming your development environment is set up, you can get right to it. Follow these steps:
- Create a new project by running
forge create. - You’ll be asked to give your app a name, such as
keyword-extractor. - Select a template to help you build the app. In this case, select the category
UI kit, theConfluenceapp, and then the templateconfluence-content-action. - Try to deploy the app and see how it looks. In your terminal, navigate to the app’s directory
and run
forge deploy. - Run
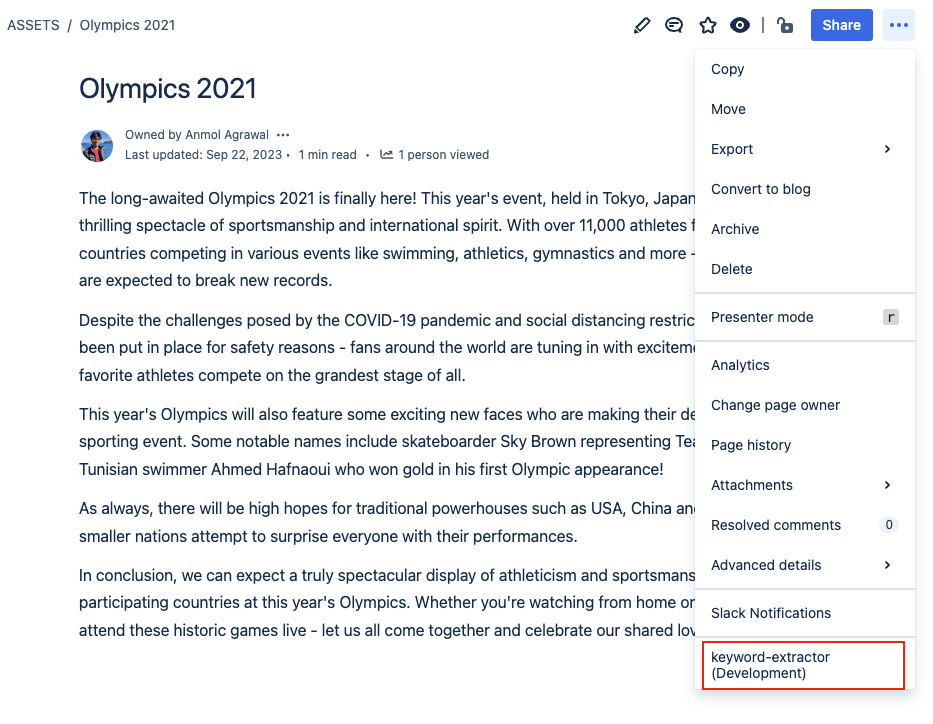
forge installto install the app on your Confluence instance. You’ll be asked to provide a destination site. - Once the app is installed, you’ll be able to access it from the three dots menu on any Confluence page on your site. If you used the example name suggested here, it’ll appear as keyword-extractor(DEVELOPMENT). This is part of the behavior of the ContentAction module.
Step 2: Get all the content of a Confluence page via REST API
Update the manifest to include the required permissions
manifest.yml
1
2modules:
  confluence:contentAction:
    - key: keyword-extractor
      resource: main
      resolver:
        function: resolver
      render: native
      title: keyword-extractor
  function:
    - key: resolver
      handler: index.handler
resources:
  - key: main
    path: src/frontend/index.jsx
app:
  runtime:
    name: nodejs24.x
  id: <your-app-id>
permissions:
  scopes:
    - read:confluence-content.summary
    - write:confluence-content
  external:
    fetch:
      backend:
        - https://api.openai.com
To call certain Confluence and external APIs, you need to give your app permission to do so.
This is done by adding scopes and external permissions
to the app’s manifest.yml file. This app will call three APIs:
- Get page API - The
read:page:confluencepermission is required to call this API. - Add labels to content API - The
write:confluence-contentpermissions is required to call this API. - OpenAI API - The
external.fetch.backendpermission is used to define external domains your Forge functions can talk to.
Update index.jsx with the main top-level logic for your app
Navigate to src/frontend/index.jsx. This contains the top-level code which calls other functions to interact with the Confluence and ChatGPT APIs. You will add to this file as you work through the tutorial.
index.jsx
1
2import React, { useState, useEffect } from 'react';
import ForgeReconciler, { useProductContext } from '@forge/react';
import { invoke } from '@forge/bridge';

const App = () => {
  // Get the confluence page id
  const context = useProductContext();
  const contentId = context?.extension?.content?.id;

  // Use states to store page data asynchronously
  const [data, setData] = useState();
  const [keywords, setKeywords] = useState();
  const [response, setResponse] = useState();

  // Fetch and store page data
  useEffect(() => {
    if(contentId){
        invoke('getContent', { contentId }).then(setData);
    }
  }, [contentId]);

  console.log(data);

  // Define a prompt to be used for the OpenAI API
  const prompt = `Here is the data:"${data}"
  Give me the 5 most important keywords from the text. Return the results in the form of a JavaScript array.
  The response shouldn't contain anything apart from the array. No extra text or JavaScript formatting.`

  // Call OpenAI API and store the result (keywords)
  useEffect(() => {
    if(prompt){
        invoke('callOpenAI', prompt).then(setKeywords);
    }
  }, [prompt]);

  console.log("Prompt response - " + keywords);

  // Use state to add the extracted keywords as labels to the current page
  useEffect(() => {
    if(keywords){
        invoke('addKeywordsToLabels', {keywords, contentId}).then(setResponse);
    }
  }, [keywords, contentId]);

  console.log(response)

  // Render nothing as the main purpose is API interactions and data processing
  return (null);
};

// Render the main component within a ContentAction
ForgeReconciler.render(
  <React.StrictMode>
    <App />
  </React.StrictMode>
);
This is the main part of the app, which contains the top-level logic to call other functions and render the UI.
- The app imports the UI components and API it'll use to call resolver functions.
- The run function is executed. This is handled in
manifest.ymlby definingindex.handler. App()is then triggered. This is where all the magic happens:- Try to get the current page ID using
useProductContext. - Then, try to get all the content in the page using the
getPageData()resolver function, which is defined later in this tutorial. - After the content is retrieved, create the prompt to be used by ChatGPT.
- Pass that prompt to OpenAI via an API call using the
callOpenAI()method. - Add the retrieved keywords to the current page using the
addKeywordsToLabels()method.
- Try to get the current page ID using
Update index.js to call a Confluence API to get the content of a page
Navigate to src/resolvers/index.js. This contains the backend functions, which will handle the asynchronous events for the app.
index.js
1
2import Resolver from '@forge/resolver';
import { route, asUser } from '@forge/api';
import { OpenAI } from 'openai';

const resolver = new Resolver();

// Resolver function to fetch page data from Confluence
resolver.define('getContent', async ({ payload }) => {

  const response = await asUser().requestConfluence(route`/wiki/api/v2/pages/${payload.contentId}?body-format=storage`, {
    headers: {
      'Accept': 'application/json'
    }
  });

  if (!response.ok) {
    const err = `Error while getContent with contentId ${payload.contentId}: ${response.status} ${response.statusText}`;
    console.error(err);
    throw new Error(err);
  }

  const responseData = await response.json();
  const returnedData = responseData.body.storage.value;

  return returnedData;
});

resolver.define('callOpenAI', async (prompt) => {
  // Resolver function to interact with the OpenAI API using a given prompt
});

resolver.define('addKeywordsToLabels', async ({ payload }) => {
  // Resolver function to add keywords as labels to the current page
});

export const handler = resolver.getDefinitions();
This function calls the get page API
using the asUser() method.
- Once the app retrieves all the content using the Confluence API, try to extract only the text
from the page and exclude other data like
created atandauthor. - The app will use this data to construct the
promptvariable it sends to ChatGPT.
Step 3: Integrate your app with the OpenAI API
Now that the app can retrieve all the content of a Confluence page via an API, the next step is to pass it to the OpenAI API to get the keywords.
Update index.js to call the ChatGPT API to retrieve the keywords
In the previous step, you added the variable prompt, then constructed a prompt using the page content
and a command that tells OpenAI what to do with that data - in this case, extract keywords.
The code passes the prompt variable to the callOpenAI function, which calls the OpenAI API
and returns the results.
Here is the code for the callOpenAI function:
index.js
1
2// Resolver function to interact with the OpenAI API using a given prompt
resolver.define('callOpenAI', async (prompt) => {

  // Create an instance of the OpenAIApi with the provided configuration
  const openai = new OpenAI({
    apiKey: 'API-KEY',
    organisation: 'ORG-ID'
  });

  // Create a chat completion request using the OpenAI API
  const chatCompletion = await openai.chat.completions.create({
    messages: [{
      role: "user",
      content: prompt
    }],
    model: "gpt-3.5-turbo"
  })

  // Extract the response content from the API response
  const response = chatCompletion.choices[0].message.content;

  // Return the generated response from the OpenAI API
  return response;
});
Here, the app makes a basic API call to OpenAI. You can learn more about this through their documentation. The steps involved include:
- Create an instance of the OpenAI API with the provided API key and organization ID.
- Make an API call using the chat.completions.create() method and pass the prompt to it.
- Extract the content from the API response.
The API_KEY environment variable is where you set the OpenAI API key that is needed to interact
with their APIs. You might also need to pass an organisation ID, here referred to as ORG_ID.
To create an environment variable in Forge, enter the following command in your terminal:
1
2forge variables set --encrypt API_KEY your-api-key
forge variables set --encrypt ORG_ID your-org-id
The --encrypt flag instructs Forge to store the variable in encrypted form.
Step 4: Add keywords to the page as labels
The last step is to add the keywords in the form of a JavaScript array as labels to the page. We’re going to do that using the add labels to content API.
index.js
1
2// Resolver function to add keywords as labels to the current page
resolver.define('addKeywordsToLabels', async ({ payload }) => {

  // Parse the keywords and prepare them for adding as labels
  const bodyData = JSON.parse(payload.keywords).map(label => ({
    prefix: "global",
    name: label.split(" ").join("-")
  }));

  // Make a request to the Confluence API to add labels to the page
  const response = await asUser().requestConfluence(route`/wiki/rest/api/content/${payload.contentId}/label`, {
    method: 'POST',
    headers: {
    'Accept': 'application/json',
    'Content-Type': 'application/json'
    },
    body: JSON.stringify(bodyData)
  });

  // Parse and return the response JSON
  const responseJson = await response.json();

  return responseJson;
});
Step 5: Deploy your app
Now it’s time to:
- Run
forge deployin the terminal again as themanifest.ymlfile was updated. - Run
forge install --upgradeand select the installation to upgrade. If you have followed along with this tutorial, it should list the development environment for your Confluence instance. - Try out the app in your cloud instance. The first time you run it, Atlassian asks you for permission for that app to access Confluence content and your user information.
Next steps
You've shown incredible dedication and skill by finishing the Forge app tutorial. Well done! If you need help, reach out to our developer community. Keep up the excellent work and continue to explore new opportunities for your apps using Forge and OpenAI technology.
Developing for Atlassian Government Cloud
This content is written with standard cloud development in mind. To learn about developing for Atlassian Government Cloud, go to our Atlassian Government Cloud developer portal.
Rate this page: