Build a Custom UI app in Jira Service Management
This tutorial walks through creating a Forge app to display content on the queues page of Jira Service Management. Using Custom UI, you can define your own user interface using static resources, such as HTML, CSS, JavaScript, and images. The Forge platform hosts your static resources, enabling your app to display custom UI on Atlassian apps. Custom UI apps inherit modern security features to ensure high trust between Atlassian, developers, and users.
At the end of this tutorial, you’ll have created a Forge app in Jira Service Management that uses Custom UI to display customized UI content.
When you create a new app, Forge will prompt you to set a default environment. In this
tutorial we use the development environment as our default. See Default environments for more information.
Forge also provides a staging and production environments where you can deploy your app. See
Environments and versions for more information.
Before you begin
This tutorial assumes you're already familiar with the basics of Forge development. If this is your first time using Forge, see Getting started first.
To complete this tutorial, you need the latest version of Forge CLI. To update your CLI version, run npm install -g @forge/cli@latest
on the command line.
Set up a cloud developer site
An Atlassian cloud developer site lets you install and test your app on Atlassian apps including Confluence and Jira. If you don't have one yet, set it up now:
- Go to http://go.atlassian.com/cloud-dev and create a site using the email address associated with your Atlassian account.
- Once your site is ready, log in and complete the setup wizard.
You can install your app to multiple Atlassian sites. However, app data won't be shared between separate Atlassian apps, sites, or Forge environments.
The limits on the numbers of users you can create are as follows:
- Confluence: 5 users
- Jira Service Management: 1 agent
- Jira Software and Jira Work Management: 5 users
Create your app
This app displays custom content in the Queues page of a Jira Service Management using Custom UI.
-
Navigate to the directory where you want to create the app. A new directory with the app’s name will be created there.
-
Create your app by running:
1 2
forge create -
Enter a name for your app. For example, hello-world-custom-ui.
-
Select Jira Service Management as the context.
-
Select the Custom UI category.
-
Select the jira-service-management-queue-page template.
-
Change to the app subdirectory to see the app files.
1 2
cd hello-world-custom-ui
Jira Service Management queuepage Custom UI template
The jira-service-management-queuepage-custom-ui template has React JS for the static frontend and Node JS
for the FaaS backend. The template contains the following structure:
1
2hello-world-custom-ui
|-- src
|   `-- index.js
|-- static
|   `-- hello-world
|       `-- src
|           `-- index.js
|           `-- App.js
|       `-- public
|           `-- index.html
|       `-- package.json
|       `-- package-lock.json
|-- manifest.yml
|-- package.json
|-- package-lock.json
`-- README.md
Let’s have a look at what these files are:
src/index.js: Where you write your FaaS backend functions.static: Where you write and include your static frontend assets.manifest.yml: Describes your app. It contains the name and ID of your app, along with the modules it uses.package.json: The app’s Node.js metadata. See the Node documentationfor more information.package-lock.json: Records the version of the app’s dependencies.README.md: Information about the app. We recommend updating this as you change the behavior of the app.
Change the panel title
This app displays content in a Jira Service Management project's Queues section using the jiraServiceManagement:queuePage module. Jira Service Management shows the
title of the jiraServiceManagement:queuePage as the page's heading. Let's change the title to include your name.
- In the app’s top-level directory, open the
manifest.ymlfile. - Find the
titleentry under thejiraServiceManagement:queuePagemodule. - Change the value of
titlefromhello-world-apptoHello World from <your name>. For example, Hello World from Emma Richards.
Your manifest.yml file should look like the following, with your values for the title and app ID.
1
2modules:
  jiraServiceMangement:queuePage:
    - key: hello-world-panel
      resource: main
      resolver:
        function: resolver
      title: Hello World from Emma Richards
  function:
    - key: resolver
      handler: index.handler
resources:
  - key: main
    path: static/hello-world/build
app:
  id: '<your app id>'
Build the content for your Custom UI
In this template, we're using create-react-app to
generate the static content that your app will be using. This library is generally used to create
new single-page React applications. We'll use the library to generate a simple Hello, world!
message in a Jira Service Management Queue page by serving a single-page React app.
You need to install and build these resources so your app can use them. Follow these steps to build the resources for your app:
-
Navigate to the
static/hello-worlddirectory. -
Install the needed dependencies:
1 2
npm install -
Build the assets:
1 2
npm run build -
Navigate back to the top-level directory of your app.
Deploy and install your app
Any time you make changes to your app code, rebuild the static frontend as prescribed above
and then run a deploy using the forge deploy command. This command compiles your FaaS code,
and deploys your functions and static assets to the Atlassian cloud.
To install your app on a new site, run the forge install command. Once the app is installed on a
site, it will automatically pick up all minor app deployments, which means you don't need to run the
install command again. A minor deployment includes any change that doesn't modify app permissions
in the manifest.
-
Navigate to the app's top-level directory and deploy your app by running:
1 2
forge deploy -
Install your app by running:
1 2
forge install -
Select your Atlassian context using the arrow keys and press the enter key.
-
Enter the URL for your development site. For example, example.atlassian.net. View a list of your active sites at Atlassian administration.
Once the successful installation message appears, your app is installed and ready
to use on the specified site.
You can always delete your app from the site by running the forge uninstall command.
View your app
With your app installed, it’s time to see the app in the Queues section.
- Create a new Jira Service Management Project.
- View the app you created in the Queues section of the JSM project.
The app should display on the page with the content of your Custom UI, like the image below.
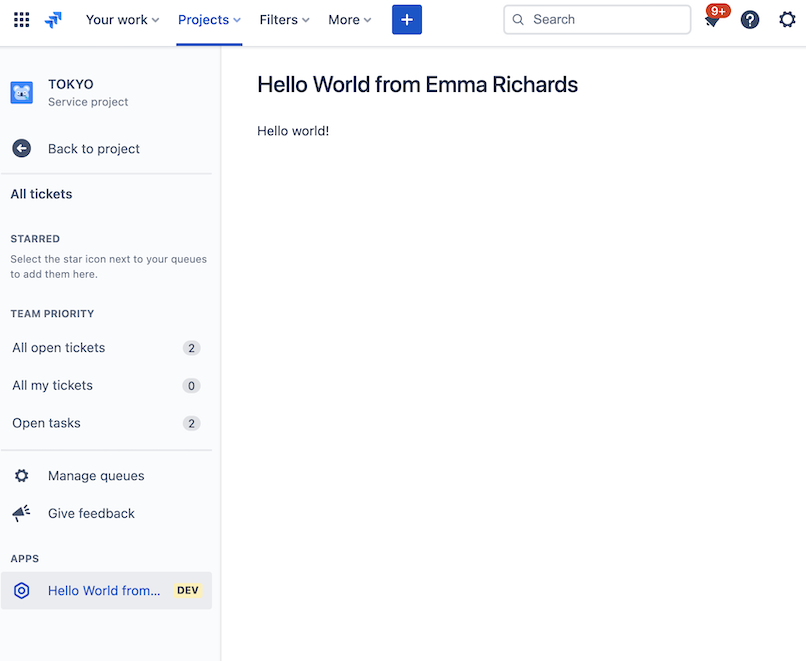
Modify the content of your Custom UI
By now, you can now see your app displaying the message Hello, world! in the Jira Service Management Queues page.
This is the result of setting up your static assets and using a resolver function to dynamically
generate the message.
Modify the static assets for the frontend
Follow these steps to modify the static assets:
-
Navigate to the
static/hello-world/srcdirectory. -
Open the
App.jsfile. The default content of the file is shown below.1 2
import React, { useEffect, useState } from 'react'; import { invoke } from '@forge/bridge'; function App() { const [data, setData] = useState(null); useEffect(() => { invoke('getText', { example: 'my-invoke-variable' }).then(setData); }, []); return ( <div> {data ? data : 'Loading...'} </div> ); } export default App; -
Modify the content of the file.
-
Rebuild the static assets for your Custom UI frontend by running the
npm run buildcommand from thestatic/hello-worlddirectory. -
Navigate to the app's top-level directory and start a tunnel for your app by running:
1 2
forge tunnelYou can see your changes by refreshing the page that your app is on.
-
Redeploy your app by running the
forge deploycommand.
Modify the FaaS backend resolver
Follow these steps to modify the value of the message returned by your FaaS backend resolver:
-
Navigate to the
srcdirectory. -
Open the
index.jsfile. The default content of the file is shown below.1 2
import Resolver from '@forge/resolver'; const resolver = new Resolver(); resolver.define('getText', (req) => { console.log(req); return 'Hello, world!'; }); export const handler = resolver.getDefinitions(); -
Modify the content of the file.
-
Navigate to the app's top-level directory and start a tunnel for your app by running:
1 2
forge tunnelYou can see your changes by refreshing the page that your app is on.
-
Redeploy your app by running the
forge deploycommand.
Next steps
You now know enough to develop your own Forge apps. Continue on to our tutorials, explore the example apps, or look through the reference pages to learn more.
- The Automate Jira using Triggers tutorial uses triggers to respond to user actions in Jira.
- Promote an app to staging or production makes your app ready for your users.
- Learn how to build an app in Jira Service Management using UI Kit.
- See the reference pages to know what else you can do with what you’ve learned.
Rate this page: