Use Async Events API to queue jobs to import objects into Assets
This tutorial describes how to divide your Assets import data into smaller submission chunks to avoid hitting the async events invocation runtime limit of Forge. Refer to forge documentation for more details on the invocation limits. The app you will create as a part of this tutorial uses the Async Events API to queue events that fetch and send data to Assets via the Imports REST API. You will also get exposed to the Forge Storage API through this tutorial.
Before you begin
This tutorial assumes you're already familiar with developing an Assets Import app on Forge and the Imports REST API for Assets. If not, see Import third party data into Assets and Imports REST API Guide.
Understanding the approach
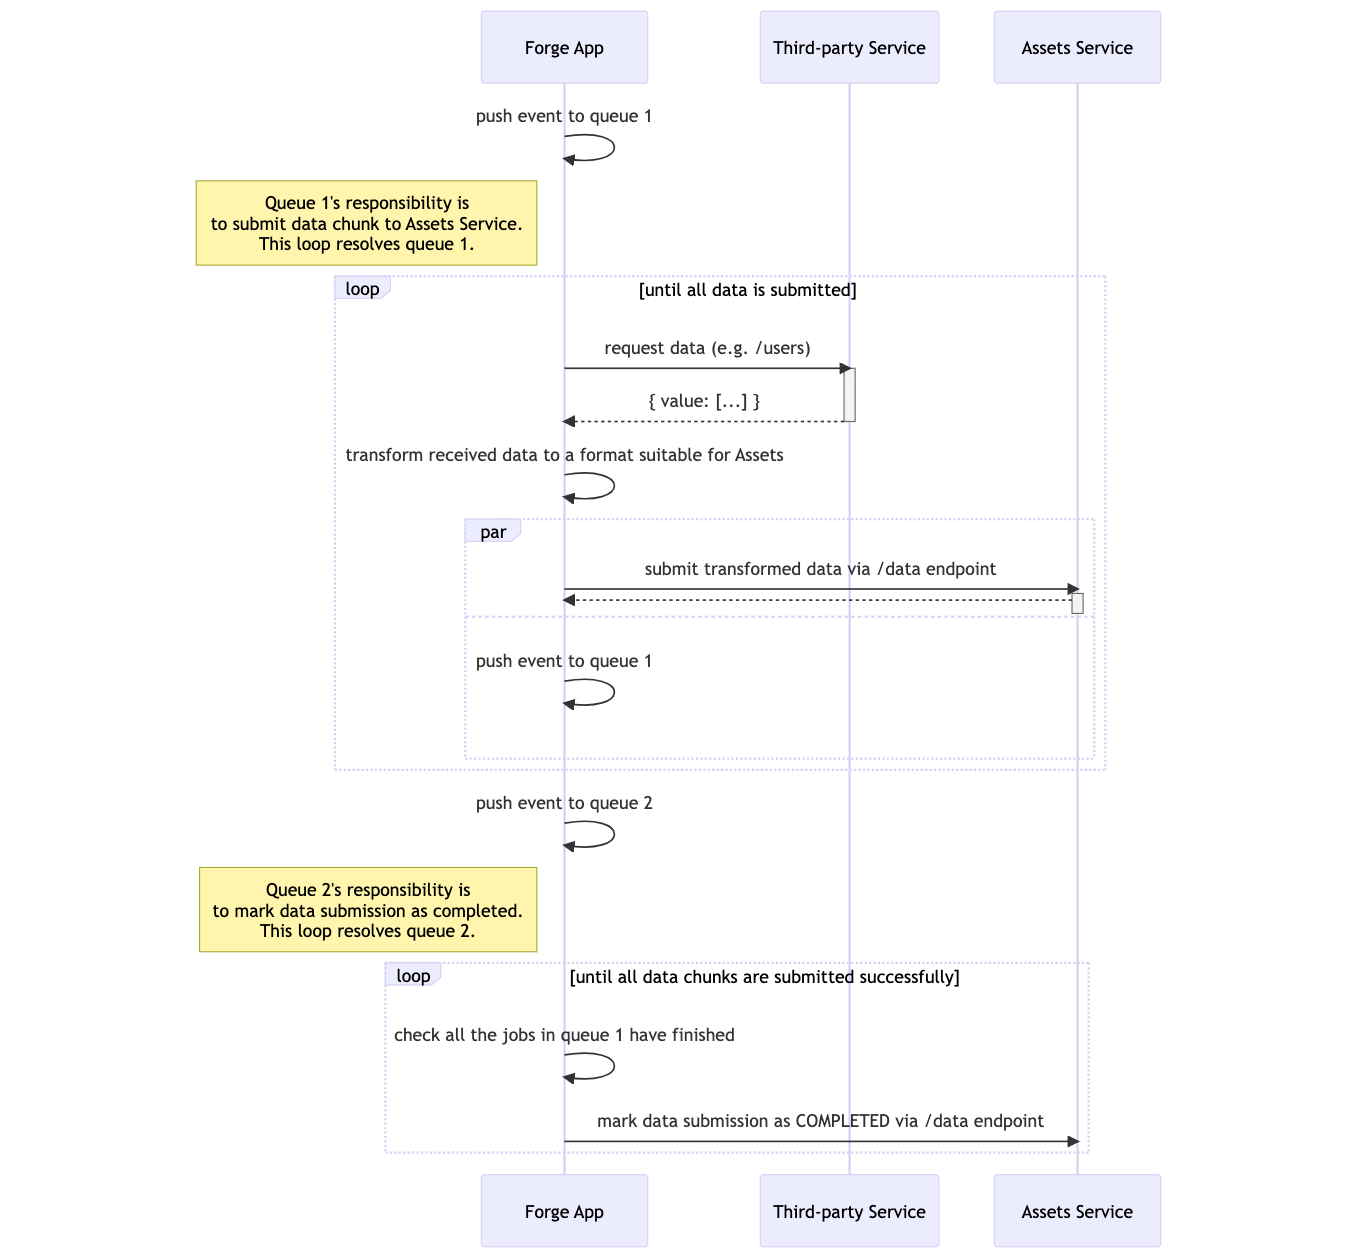
In this app, we are focusing on how to import data into Assets without being bound by the invocation time limit. To overcome this, the import job needs to be divided into smaller tasks that take less than the time limit to finish and we leverage the Forge events package to queue and execute these tasks.
For example, if the third-party service contains 100 objects to be imported into Assets and the third-party API only returns a paginated response of 10 objects per read request, the Forge app in this tutorial will divide the import job into 10 tasks that will be handled by the Forge events package. Each of the tasks will:
- Fetch 10 objects from the source (the third-party service API).
- Transform the 10 objects into the shape that Assets expects.
- Submit the 10 transformed objects to Assets using the Imports REST API.
- Queue another event to execute the same task to handle the next 10 objects until all 100 objects are consumed.
About scheduled imports
In addition to manual imports, you can also implement scheduled imports that run automatically at regular intervals. Scheduled imports are useful for keeping your Assets data synchronized with external systems that are frequently updated.
The scheduled import feature is managed by the Assets backend infrastructure. Your Forge app exposes a webtrigger endpoint that the backend calls at the scheduled time. The app then initiates the import using the same queue-based flow described in this tutorial.
Scheduled imports support various cadences:
- Once: Run once at the specified date and time
- Daily: Run once per day at a specified time
- Weekly: Run on specific days of the week
- Monthly: Run on a specific day of the month
Prerequisites: The schedule configuration requires that the import source is already fully configured with a valid mapping before you can set up a schedule.
Important note on app lifecycle: If a tenant uninstalls your app, you should handle schedule cleanup on your end. The Assets backend will automatically delete the schedule at the next scheduled date if it detects that the app is no longer installed.
This tutorial will show you how to build the core import functionality first, then add scheduling capabilities at the end.
Known platform limitations
Since we are mainly leveraging the Forge Async Events API, there are platform limitations around this library that we should be aware of. To view the full list, see Platform quotas and limit.
The most notable limitation of the Async Events API in our use case is the 1000-depth limit for cyclic invocations.
A cyclic invocation is when an event resolver pushes a new event into the queue and thus creating a cycle, which is what we are implementing in this guide.
If your use case requires the cyclic invocation limit to be increased, you can visit the Platform quotas and limit - Apps exceeding quotas or limits for more details on how to request for the limit for your app to be raised.
Async events also have a higher invocation time limit than other types of invocations. For more details, see Forge invocation limits.
Create your app
- Navigate to the directory where you want to create the app.
- Create your app by running:
1 2
forge create - Enter a name for the app. For example, assets-import-app.
- Select the UI Kit category, and then the Jira Service Management Atlassian app.
- Select the jira-service-management-assets-import-type template from the list.
- Navigate to the top-level of your app directory and install the packages for Forge UI, Forge events and Forge resolvers:
1 2
npm install @forge/react@latest @forge/events@latest @forge/resolver@latest @forge/bridge@latest @forge/kvs@latest --save
Update the manifest
Since this app uses Forge Storage API, we will need to update the manifest to include the following scope:
1
2permissions:
  scopes:
    - import:import-configuration:cmdb
    - storage:app # scope required to use Forge Storage
We also need to set up the queues that will submit the data to Assets and mark the data submission process as completed following Forge's guide on how to use Async Events API.
1
2modules:
  jiraServiceManagement:assetsImportType:
    ...

  consumer:
    - key: submit-data-chunk-queue-consumer
      queue: submit-data-chunk-queue
      function: processImportQueue
    - key: import-completed-queue-consumer
      queue: import-completed-queue
      function: importCompletedHandler

  function:
    - key: processImportQueue
      handler: index.processQueue
      timeoutSeconds: 900
    - key: importCompletedHandler
      handler: index.processQueue
      timeoutSeconds: 900
    ...
We are making API requests to external services that are not a part of Atlassian. The permissions property in the manifest needs to be extended to include egress control, defining the external domains our app sends requests to and reads data from.
1
2permissions:
  scopes:
    ...

  external:
    fetch:
      backend:
        - "example.com" # replace this URL with that of your third-party service
(Optional) Add webtrigger for scheduled imports
If you want to support scheduled imports that run automatically at regular intervals, you'll need to add a webtrigger module to your manifest. The Assets backend will call this endpoint at the scheduled time to trigger imports.
1
2modules:
  jiraServiceManagement:assetsImportType:
    ...

  webtrigger:
    - key: scheduled-import-trigger
      function: scheduledImportHandler
      urlFormat: v2

  function:
    - key: scheduledImportHandler
      handler: index.handleScheduledImport
      timeoutSeconds: 900
    - key: processImportQueue
      handler: index.processQueue
      timeoutSeconds: 900
    - key: importCompletedHandler
      handler: index.processQueue
      timeoutSeconds: 900
    ...
See the Implementing scheduled imports section later in this tutorial for full implementation details.
Create a new mapping for the import on app configuration submission
Imports REST workflow requires the user to define a mapping between the data source fields and the destination object type attributes in Assets.
We can make a request to Assets to create a new mapping for the import when the user finishes configuring the Forge app.
To do this, navigate to the src/frontend/index.jsx file and change the onSubmit function in the App component.
1
2import { requestJira } from '@forge/bridge';
import { useForm, Form, Button, FormSection, FormFooter } from '@forge/react';
import { FullContext } from '@forge/bridge/out/types';
  ...
const App = () => {
  ...
  const [context, setContext] = useState<FullContext | undefined>(undefined);
  useEffect(() => {
        if (!context) {
            view.getContext().then(setContext);
        }
    }, [context]);

  const { handleSubmit } = useForm()
  const onSubmit = async () => {
    const {
        extension: { workspaceId, importId },
    } = context;
    await requestJira(`/jsm/assets/workspace/${workspaceId}/v1/importsource/${importId}/mapping`,
        {
          method: "PUT",
          body: JSON.stringify(/* TODO provide your mapping here */),
          headers: {
            Accept: "application/json",
            "Content-Type": "application/json",
          },
        }
      );

      // should capture error, throw Error and handle error state here if required.
  };

    return (
    <Form onSubmit={handleSubmit(onSubmit)}>
      <FormSection>
        ...
      </FormSection>
      <FormFooter>
        <Button appearance="primary" type="submit">
          Save configuration
        </Button>
      </FormFooter>
    </Form>
  );
};
Submit data to Assets using Forge events
In Step 2, we have defined in the manifest file the queues to which we will push the events.
To consume the queue events, we now need to define the resolver.
Navigate to src/resolvers/index.js and instantiate the queues like below.
1
2export const importQueue = new Queue({ key: "submit-data-chunk-queue" });
export const importCompletedQueue = new Queue({
  key: "import-completed-queue",
});
Before implementing the import logic, you'll need a utility function to extract the execution ID from the API response. The Assets API returns a set of links containing the execution ID as a UUID. Add this helper function:
1
2/**
 * Extracts the execution ID from the submitResults URL
 * The URL format is: /jsm/assets/workspace/{workspaceId}/v1/importsource/{importId}/executions/{executionId}/data
 */
const extractExecutionId = (submitResultsUrl) => {
  const urlParts = submitResultsUrl.split('/');
  // The execution ID is located before '/data' in the URL path
  return urlParts[urlParts.length - 2];
};
Navigate to the startImport function in src/resolvers/index.jsx and add the following logic.
1
2const getImportQueueJobsStorageKey = (importId) =>
  "import-" + importId + "_import-queue_jobs";

const startImport = async (context) => {
  // create a new execution
  const newlyCreatedExecution = await api
    .asUser()
    .requestJira(
      route`/jsm/assets/workspace/${context.workspaceId}/v1/importsource/${context.importId}/executions`,
      {
        method: "POST",
      }
    );

  const newlyCreatedExecutionJson = await newlyCreatedExecution.json();

  // the response is a set of links which contain a UUID that represents the execution
  // hence, we need to extract it
  const executionId = extractExecutionId(
    newlyCreatedExecutionJson.links.submitResults
  );

  // Set up our queue jobs tracker
  await kvs.set(getImportQueueJobsStorageKey(importId, 0), []);

  // Push a single event with JSON payload
  const jobId = await importQueue.push({ body: {
    workspaceId,
    importId,
    executionId,
    start: 0,
    end: apiPageLimit,
  } });

  return {
    result: "start import",
  };
};
Now that we have successfully queued our first job, we need to implement the resolver for that job. Go back to the src/resolvers/index.js file created at the beginning and add the following code.
1
2const getImportQueueJobsStorageKey = (importId) =>
  "import-" + importId + "_import-queue_jobs";

resolver.define(
  "submit-data-chunk-queue-listener",
  async ({ payload, context }) => {
    const { workspaceId, importId, executionId, start, end } = payload;

    // keep track of all the jobs we have queued so far so we can check if they have finished successfully later
    // when we need to mark the execution as completed
    const jobs =
      (await kvs.get(getImportQueueJobsStorageKey(importId))) || [];
    const newJobs = jobs.concat(context.jobId);
    await kvs.set(getImportQueueJobsStorageKey(importId), newJobs);

    // fetch paged response for objects to import from 3rd party source
    const options = {
      method: "GET",
      headers: { "Content-Type": "application/json" },
    };
    const get3rdPartyDataResponse = await api.fetch(
      "https://example.com/GET", // TODO replace this with your 3rd party API
      options
    );

    // calculate the payload for the next job to be queued
    const nextJobPayload = {
      workspaceId,
      importId,
      executionId,
      start: end + 1,
      // TODO insert number of objects per paginated request
      end: end + 100,
    };

    if (get3rdPartyDataResponse.hasNext) {
      // trigger this event listener again
      importQueue.push({ body: nextJobPayload });
    } else {
      // all jobs have finished and mark import as done
      // the details of this queue will be answered in Step 5
      importCompletedQueue.push({ body: { workspaceId, importId, executionId } });
    }

    const transformedData = transform3rdPartyData(get3rdPartyDataResponse.data); /* TODO transform3rdPartyData will need to be implemented by you */

    // send data chunk to Assets
    await api
      .asApp()
      .requestJira(
        route`/jsm/assets/workspace/${workspaceId}/v1/importsource/${importId}/executions/${executionId}/data`,
        {
          method: "POST",
          body: JSON.stringify({
            data: { /* TODO insert your transformed third-party data here */ },
          }),
          headers: {
            Accept: "application/json",
            "Content-Type": "application/json",
          },
        }
      );
  }
);
Mark data submission as completed
Once all the data chunks have been submitted (i.e. get3rdPartyDataResponse.hasNext should be false), we push a new event to the importCompletedQueue or Queue 2 in the diagram. This is to mark the data submission as completed so that Assets knows to start processing the data, reading and writing it to our database.
In the same src/resolvers/index.js file, we add another resolver to handle marking our data submission as completed.
1
2resolver.define(
  "import-completed-queue-listener",
  async ({ payload, context }) => {
    const { workspaceId, importId, executionId } = payload;

    // Check if all jobs have finished successfully
    const jobs = await kvs.get(getImportQueueJobsStorageKey(importId));
    let allJobsSucceed = true;

    for (i = 0; i < jobs.length; i++) {
      const jobId = jobs[i];
      const jobProgress = importQueue.getJob(jobId);
      const { success, inProgress, failed } = await jobProgress.getStats();

      // If a job to submit data to Assets is still in progress, we continue to wait
      // by pushing a new event to the same queue
      if (inProgress) {
        allJobsSucceed = false;
        // we can add how long to wait until this event is picked up by the resolver
        importCompletedQueue.push({ body: { workspaceId, importId, executionId }, delayInSeconds: /* TODO insert the amount of time to wait*/ });

        break;
      }

      if (failed) {
        // TODO we can handle the case that a data submission for some reason failed here...
      }
    }

    if (allJobsSucceed) {
      console.log("All jobs have succeeded, marking import as COMPLETED...");
      // If all jobs have finished, mark data chunk submission as completed
      const submitResponse = await api
      .asApp()
      .requestJira(
        route`/jsm/assets/workspace/${workspaceId}/v1/importsource/${importId}/executions/${executionId}/data`,
        {
          method: "POST",
          body: JSON.stringify({
            completed: true
          }),
          headers: {
            Accept: "application/json",
            "Content-Type": "application/json",
          },
        }
      );
    }
  }
);
(Optional) Implementing scheduled imports
Now that you have the core import functionality working, you can optionally add support for scheduled imports that run automatically at regular intervals. This section assumes you've already added the webtrigger module to your manifest as described in the Update the manifest section.
How scheduled imports work
The scheduled import feature is managed by the Assets backend infrastructure, which uses an internal scheduling service to trigger imports at the configured times. Your Forge app doesn't need to manage the scheduling logic itself. Instead, you expose a webtrigger endpoint that the backend calls when it's time to run a scheduled import.
The flow works as follows:
- User configures schedule: Through your Forge app's UI, the user sets up a schedule by calling the Assets scheduling API
- Backend creates schedule: The Assets backend stores the schedule configuration and your app's webtrigger URL
- Schedule triggers: At the scheduled time, the backend calls your app's webtrigger endpoint with the import details
- App starts import: Your app receives the trigger and initiates the import process using the standard import flow described earlier in this tutorial
Implement the webtrigger handler
Create a handler function that will be called by the backend when the scheduled import should run. Add this to your resolver file (typically src/resolvers/index.js, but you can organize your code structure as needed).
Web trigger request details:
- Method: POST
- Body: The request will include a JSON body with:
workspaceId: The workspace ID where the import should runimportsourceId: The import source ID to execute
Key requirements for the handler:
- Include
"scheduled": truein the executions API request body (required for scheduled imports) - Use
asUser()for the API calls since these operations involve user actions - Return appropriate HTTP status codes (200 for success, 500 for errors)
1
2export const handleScheduledImport = async (event, context) => {
  console.log("Scheduled import triggered via webtrigger");

  // Extract the payload from the webtrigger request
  const { workspaceId, importsourceId } = event.body;

  let executionId = null;

  try {
    // Create a new execution for the scheduled import
    const newlyCreatedExecution = await api
      .asUser()
      .requestJira(
        route`/jsm/assets/workspace/${workspaceId}/v1/importsource/${importsourceId}/executions`,
        {
          method: "POST",
          body: JSON.stringify({
            scheduled: true  // IMPORTANT: This flag is required for scheduled imports
          }),
          headers: {
            Accept: "application/json",
            "Content-Type": "application/json",
          },
        }
      );

    const newlyCreatedExecutionJson = await newlyCreatedExecution.json();

    // Extract the execution ID from the response
    executionId = extractExecutionId(
      newlyCreatedExecutionJson.links.submitResults
    );

    // Start the import queue process
    await importQueue.push({
      body: {
        workspaceId,
        importId: importsourceId,
        executionId,
        start: 0,
        end: apiPageLimit,
      }
    });

    console.log("Scheduled import started successfully", { executionId });
    return {
      statusCode: 200,
      body: JSON.stringify({
        success: true,
        message: "Import started",
        executionId
      })
    };
  } catch (error) {
    console.error("Scheduled import failed", error);

    // If we have an executionId, report the failure to import history.
    // This check is necessary because the error might occur before execution creation
    // (e.g., during the API call to create the execution). In that case, there's no
    // executionId yet, so we can't report to history and should just return the error.
    if (executionId) {
      try {
        await api
          .asUser()
          .requestJira(
            route`/jsm/assets/workspace/${workspaceId}/v1/importsource/${importsourceId}/executions/${executionId}/history/failed`,
            {
              method: "POST",
              body: JSON.stringify({
                failureReason: error.message || "Scheduled import failed to start"
              }),
              headers: {
                Accept: "application/json",
                "Content-Type": "application/json",
              },
            }
          );
      } catch (historyError) {
        console.error("Failed to report error to import history", historyError);
      }
    }

    return {
      statusCode: 500,
      body: JSON.stringify({ success: false, error: error.message })
    };
  }
};
Handle failures during scheduled imports
If your scheduled import encounters errors during the callback execution (such as validation failures, third-party API errors, or configuration issues), you should report these failures to the import history so they are visible to users.
Note: You don't need to manually call this API if a failure occurs during the web trigger call itself. If the Assets backend doesn't receive a success response from your webtrigger API call, it will automatically create a failure history entry on its end.
Important: This API is only available for errors that occur during the INGESTING phase of an external import (when data is being submitted). Once the import starts the PROCESSING phase, this API will return a Bad Request error.
Use the failed import history API to record failure reasons:
1
2const reportImportFailure = async (workspaceId, importsourceId, executionId, failureReason) => {
  try {
    await api
      .asUser()
      .requestJira(
        route`/jsm/assets/workspace/${workspaceId}/v1/importsource/${importsourceId}/executions/${executionId}/history/failed`,
        {
          method: "POST",
          body: JSON.stringify({
            failureReason: failureReason  // Max 1024 characters, required
          }),
          headers: {
            Accept: "application/json",
            "Content-Type": "application/json",
          },
        }
      );
    console.log("Failure reported to import history");
  } catch (error) {
    console.error("Failed to report error to import history", error);
  }
};
Common scenarios to report failures:
- Validation errors: When the import configuration is invalid or incomplete
- Third-party API errors: When fetching data from external services fails
- Authentication failures: When credentials or tokens are expired
- Data transformation errors: When the data cannot be properly transformed
- Rate limiting: When third-party API rate limits are exceeded
Important notes:
- The
failureReasonfield is required and must not exceed 1024 characters - Always report failures with clear, actionable error messages to help users troubleshoot
- The failure will be visible in the Assets import history with the provided reason
- Only call this API after an execution has been created (you have an
executionId)
Create schedule through UI
When the user wants to set up a scheduled import, your frontend should call the Assets scheduling API. Add this functionality to your src/frontend/index.jsx:
1
2import { requestJira, invoke } from '@forge/bridge';
import { useForm, Form, Button, FormSection, FormFooter, Select } from '@forge/react';

const App = () => {
  const [context, setContext] = useState<FullContext | undefined>(undefined);
  const [scheduleFrequency, setScheduleFrequency] = useState('DAILY');
  // Set initial schedule time to tomorrow at 9 AM to avoid immediate past date errors
  const [scheduleTime, setScheduleTime] = useState(() => {
    const tomorrow = new Date();
    tomorrow.setDate(tomorrow.getDate() + 1);
    tomorrow.setHours(9, 0, 0, 0);
    return tomorrow.toISOString();
  });

  useEffect(() => {
    if (!context) {
      view.getContext().then(setContext);
    }
  }, [context]);

  const { handleSubmit } = useForm();

  const onSubmit = async () => {
    const {
      extension: { workspaceId, importId },
    } = context;

    // Create the mapping first
    await requestJira(`/jsm/assets/workspace/${workspaceId}/v1/importsource/${importId}/mapping`,
      {
        method: "PUT",
        body: JSON.stringify(/* your mapping here */),
        headers: {
          Accept: "application/json",
          "Content-Type": "application/json",
        },
      }
    );
  };

  const createSchedule = async () => {
    const {
      extension: { workspaceId, importId },
    } = context;

    // Get the webtrigger URL from your backend resolver
    const webtriggerUrlResponse = await invoke('getWebtriggerUrl');
    const callbackUrl = webtriggerUrlResponse.url;

    // Create the schedule by calling the Assets API
    const scheduleResponse = await requestJira(`/jsm/assets/workspace/${workspaceId}/v1/importsource/${importId}/importschedule`,
      {
        method: "POST",
        body: JSON.stringify({
          runFrequency: scheduleFrequency,
          startTime: scheduleTime,
          timezone: Intl.DateTimeFormat().resolvedOptions().timeZone,
          callbackUrl: callbackUrl
        }),
        headers: {
          Accept: "application/json",
          "Content-Type": "application/json",
        },
      }
    );

    // Store the importScheduleId for future operations (update/delete)
    const scheduleData = await scheduleResponse.json();
    const importScheduleId = scheduleData.id;
    await invoke('storeScheduleId', { importId, importScheduleId });

    // Note: You can also retrieve the importScheduleId dynamically later
    // by calling the GET importsource API, which includes the schedule details
  };

  return (
    <Form onSubmit={handleSubmit(onSubmit)}>
      <FormSection>
        {/* Your existing configuration fields */}

        {/* Schedule configuration */}
        <Select
          label="Schedule Frequency"
          value={scheduleFrequency}
          onChange={setScheduleFrequency}
          options={[
            { label: "Once", value: "ONCE" },
            { label: "Daily", value: "DAILY" },
            { label: "Weekly", value: "WEEKLY" },
            { label: "Monthly", value: "MONTHLY" }
          ]}
        />
      </FormSection>
      <FormFooter>
        <Button appearance="primary" type="submit">
          Save configuration
        </Button>
        <Button appearance="default" onClick={createSchedule}>
          Create schedule
        </Button>
      </FormFooter>
    </Form>
  );
};
Provide webtrigger URL to frontend
Add a resolver that generates the webtrigger URL to pass to the scheduling API:
1
2import { webTrigger } from '@forge/api';

resolver.define("getWebtriggerUrl", async () => {
  // Generate the webtrigger URL
  const url = webTrigger.getUrl('scheduled-import-trigger');

  return { url };
});
Managing scheduled imports
Your app can also allow users to view, update, or delete existing schedules by calling the appropriate Assets APIs:
Get existing schedule
1
2const getSchedule = async (workspaceId, importId, importScheduleId) => {
  const response = await requestJira(
    `/jsm/assets/workspace/${workspaceId}/v1/importsource/${importId}/importschedule/${importScheduleId}`,
    {
      method: "GET",
      headers: {
        Accept: "application/json",
      },
    }
  );

  return await response.json();
};
Update schedule
1
2const updateSchedule = async (workspaceId, importId, importScheduleId, scheduleData) => {
  await requestJira(
    `/jsm/assets/workspace/${workspaceId}/v1/importsource/${importId}/importschedule/${importScheduleId}`,
    {
      method: "PUT",
      body: JSON.stringify(scheduleData),
      headers: {
        Accept: "application/json",
        "Content-Type": "application/json",
      },
    }
  );
};
Delete schedule
1
2const deleteSchedule = async (workspaceId, importId, importScheduleId) => {
  await requestJira(
    `/jsm/assets/workspace/${workspaceId}/v1/importsource/${importId}/importschedule/${importScheduleId}`,
    {
      method: "DELETE",
      headers: {
        Accept: "application/json",
      },
    }
  );
};
Best practices for scheduled imports
When implementing scheduled imports, consider the following best practices:
- Include scheduled flag: Always pass
"scheduled": truein the request body when calling the/executionsAPI from your scheduled import handler. This is required to properly track and display scheduled imports in the import history - Use appropriate API contexts: We highly recommend using
asUser()for schedule-related API calls (creating, updating, deleting schedules and executions during scheduled callbacks) since these operations involve user actions - Report failures: Use the
/history/failedAPI to report any errors that occur during the import process. This ensures users can see why scheduled imports failed in the import history with detailed error messages (max 1024 characters) - Handle errors gracefully: Implement proper error handling and return appropriate HTTP status codes from your webtrigger. Always wrap your import logic in try-catch blocks
- Use the latest data: Scheduled imports will automatically use the most recent data available from your third-party service at the time of execution
- Monitor execution history: The Assets import history will show scheduled imports with a "Scheduled" tag to distinguish them from manual imports
- Respect rate limits: Consider your third-party API rate limits when choosing schedule frequencies
- Test thoroughly: Test your webtrigger endpoint to ensure it handles the scheduled import payload correctly, including error scenarios
- Consider timezones: Allow users to specify their preferred timezone when creating schedules to avoid confusion about when imports will run
- Handle app uninstallation: If a tenant uninstalls your app, you should handle schedule cleanup on your end. Note that the Assets backend will automatically delete the schedule at the next scheduled date if it detects that the app is no longer installed
Important considerations
- The schedule configuration requires that the import source is already fully configured with a valid mapping
- If a scheduled import is triggered while a manual import is already running, the scheduled import will throw an error
- Import execution history will show who triggered the import (manual vs scheduled service)
Test and deploy your app
That’s it! All of the pieces of code required for the import queues to work are in place. It’s time to deploy and test our changes!
You can run the app on your local machine and see logs in real time via the terminal using:
1
2forge tunnel
Once you have tested that all the functionality is working as intended, you can deploy your app by running:
1
2forge deploy
Now you have a working Assets Import app that can handle a larger number of import records because they have been broken down into smaller chunks!
Developing for Atlassian Government Cloud
This content is written with standard cloud development in mind. To learn about developing for Atlassian Government Cloud, go to our Atlassian Government Cloud developer portal.
Rate this page: