Use the Key-Value Store in a Confluence macro
This tutorial describes how to build an app for sharing definitions for terminology and acronyms across an entire Confluence site. The app uses the Key-Value Store (KVS) to store definitions, which allows them to be shared between several macros and accessed from the site administration.
In this tutorial you learn how to persist and retrieve data from the Key-Value Store and display the results in a table.
This tutorial has an accompanying Bitbucket repository. You'll find a link to a git tag at the end of each step which you can use to compare with your code or to skip ahead.
If you are cloning this repository, use forge register before you begin to create a new ID
for the app under your account.
Before you begin
This tutorial assumes you're already familiar with the basics of Forge development. If this is your first time using Forge, see Getting started first.
To complete this tutorial, you need the latest version of Forge CLI. To update your CLI version, run npm install -g @forge/cli@latest
on the command line.
Set up a cloud developer site
An Atlassian cloud developer site lets you install and test your app on Atlassian apps including Confluence and Jira. If you don't have one yet, set it up now:
- Go to http://go.atlassian.com/cloud-dev and create a site using the email address associated with your Atlassian account.
- Once your site is ready, log in and complete the setup wizard.
You can install your app to multiple Atlassian sites. However, app data won't be shared between separate Atlassian apps, sites, or Forge environments.
The limits on the numbers of users you can create are as follows:
- Confluence: 5 users
- Jira Service Management: 1 agent
- Jira Software and Jira Work Management: 5 users
Step 1: Create your app
Create an app based on the Hello world template. Using your terminal complete the following:
-
Navigate to the directory where you want to create the app.
-
Create your app by running:
1 2
forge create -
Enter a name for the app. For example, definitions-macro.
-
Select UI Kit.
-
Select Confluence.
-
Select the confluence-macro template.
-
Your app has been created in a directory with the same name as your app, for example definitions-macro. Open the app directory to see the files associated with your app.
-
Install the latest version of the
@forge/kvspackage to interact with the Key-Value Store.1 2
npm install --save @forge/kvs@latest -
Enable the Key-Value Store by adding the
storage:appscope to themanifest.ymlfile. [Learn more about adding scopes to call an Atlassian REST API] (/platform/forge/add-scopes-to-call-an-atlassian-rest-api/).1 2
permissions: scopes: - storage:app -
Enable the config so that it can appear in the macro by adding
config: trueundermacro.1 2
modules: macro: ... config: true
You can check your app against the tutorial repository.
Step 2: Deploy and install your app
-
Navigate to the app's top-level directory and deploy your app by running:
1 2
forge deploy -
Install your app by running:
1 2
forge install -
Select your Atlassian context using the arrow keys and press the enter key.
-
Enter the URL for your development site. For example, example.atlassian.net. View a list of your active sites at Atlassian administration.
Once the successful installation message appears, your app is installed and ready
to use on the specified site.
You can always delete your app from the site by running the forge uninstall command.
Next, add your new Confluence macro to a page. To view log invocations, start a tunnel to your app:
1
2forge tunnel
You can check your app against the tutorial repository.
Step 3: Add a configuration dialog to the macro
-
Within the
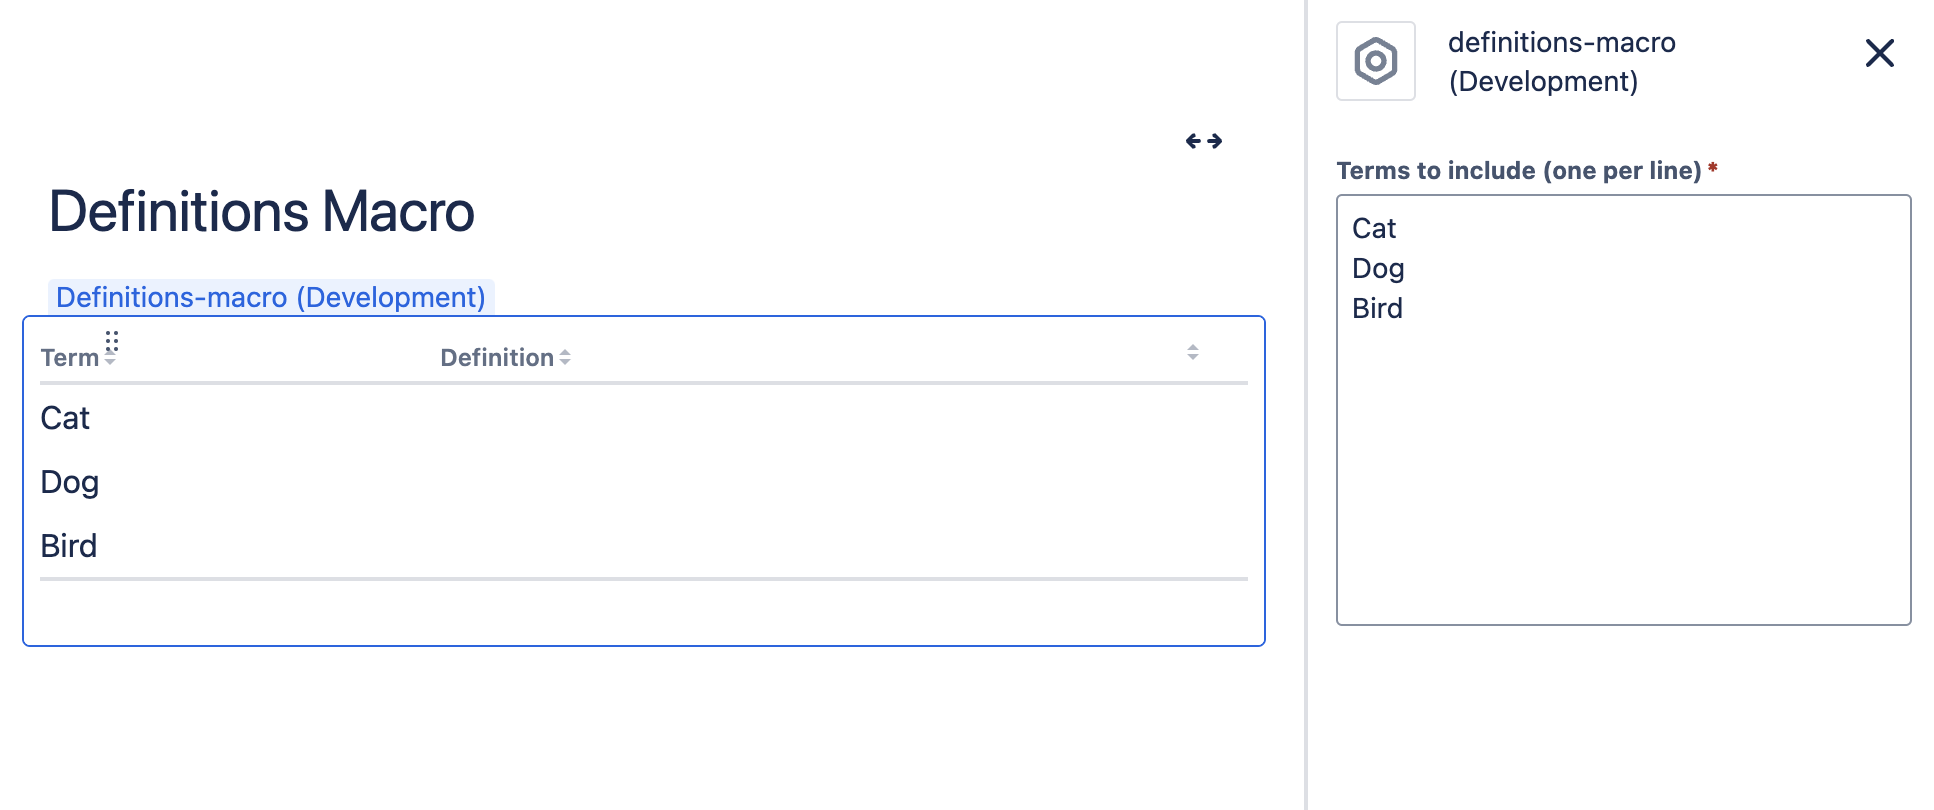
src/frontend/index.jsxfile, add a new component namedConfigcontaining TextArea and Label from the@forge/reactlibrary. This configuration form allows a user of the macro to specify a set of definitions to show in a table.1 2
const Config = () => { return ( <> <Label labelFor="terms">Terms to include (one per line)</Label> <TextArea name="terms" id="terms" defaultValue="" isRequired /> </> ) }; -
Add the
Configfunction to theForgeReconcilerto allow for configuration changes, under the existingForgeReconciler.render()forApp.1 2
ForgeReconciler.render( <React.StrictMode> <App /> </React.StrictMode> ); ForgeReconciler.addConfig(<Config />); -
Add the
useConfighook to theAppcomponent. This hook allows the app to access configuration set by the user in the macro configuration dialog, and defaults to an empty object if undefined. If there is no list of terms found in config,termsdefaults to an empty array. App currently returns the information wrapped in the Text component.1 2
const App = () => { const config = useConfig() || {}; const terms = config.terms ? config.terms.split("\n") : []; if (terms.length === 0) { return ( <Text>No Terms</Text> ); } return ( <Text>{terms.join(",")}</Text> ); };
For reference, a finished version of the src/frontend/index.jsx file is available on the tutorial repository.
Step 4: Fetch a list of definitions from storage
Your app makes use of the @forge/kvs package to interact with the Key-Value Store. This package provides methods for reading, writing, and querying data.
This tutorial starts with reading a list of definitions from the Key-Value Store. Initially the results are empty; adding definitions is covered in a later stage.
The app stores key entities based on the term, with the following format:
1
2interface Term {
  definition: string;
  term: string;
}
-
Within
src/resolvers/index.js, add agetTermDefinitionfunction to load a definition given a term.1 2
import Resolver from '@forge/resolver'; import { kvs } from '@forge/kvs'; const resolver = new Resolver(); // Create a key composed from the term function termKey(term) { return `term-${term}`; } async function getTermDefinition(term) { const value = await kvs.get(termKey(term)); return value ? value.definition : ""; } export const handler = resolver.getDefinitions(); -
Also create a
getTermDefinitionsfunction usingresolverto turn a list of terms into a list of definitions.1 2
resolver.define('getTermDefinitions', async(req) => { const pendingDefinitions = req.payload.terms.map((term) => getTermDefinition(term)); return await Promise.all(pendingDefinitions); })This function makes use of the
Promise.alloperation to turn a list of pending promises into a single promise. The resulting promise resolves to an array of definitions when awaited. -
Inside the
src/frontend/index.jsxfile, add a new hook within theAppcomponent fordefinitions.1 2
const [definitions, setDefinitions] = useState([]); -
In the
src/frontend/index.jsxfile, define an async helper function calledpopulateDefinitionsinside theAppcomponent using useEffect. This invokes the resolver with keygetTermDefinitions.1 2
useEffect(() => { const populateDefinitions = async() => { if (terms.length !== 0) { const data = await invoke('getTermDefinitions', { terms: terms }); setDefinitions(data); } } populateDefinitions(); }, [terms, invoke, setDefinitions]); -
Change the return of the
Appcomponent to load the definitions for the provided terms list. Since no definitions have been provided yet, definitions should be empty.1 2
const App = () => { const [definitions, setDefinitions] = useState([]); const config = useConfig() || {}; const terms = config.terms ? config.terms.split("\n") : []; useEffect(() => { const populateDefinitions = async() => { if (terms.length !== 0) { const data = await invoke('getTermDefinitions', { terms: terms }); setDefinitions(data); } } populateDefinitions(); }, [terms, invoke, setDefinitions]); return ( <> <Text>{terms.join(",")}</Text> <Text>{definitions.join(",")}</Text> </> ); };
For reference, a finished version of the src/resolvers/index.jsx file is available on the tutorial repository.
Step 5: Create the definitions table
In this step, you'll add a Dynamic Table to the definitions macro to show the list of terms side by side with a list of definitions.
It can be useful when building a UI Kit app to group elements together into reusable components.
For this app, we will add a DefinitionTable component.
-
Create a new file named
definition-table.jsxinsrc/frontend. -
In this file, create a component named
DefinitionTable. This component renders a list of definitions in a table. Also add an object calledhead, which will contain the data for the headers ofDefinitionTable. Also remember to importinvokefor later.1 2
import React from 'react'; import { DynamicTable } from "@forge/react"; import { invoke } from '@forge/bridge'; // Render the table headers const head = { cells: [ { key: "term", content: "Term", isSortable: true, }, { key: "definition", content: "Definition", shouldTruncate: true, isSortable: true, }, { key: "buttons", // Additional column for buttons on each row content: "", shouldTruncate: true, isSortable: true, }, ], }; // Render the Definition Table export const DefinitionTable = ({ terms, definitions }) => { return ( <DynamicTable head={head} emptyView="No terms provided, please press Edit on the app and add terms in the Configuration box" /> ); }; -
In the same file, add an object called
row- this will be used to render each row in the definitions table. Also add acreateKeyfunction that generates a key for each term in the row.1 2
// create a key for each term const createKey = (input) => { return input ? input.replace(/\s/g, "") : input; // remove whitespace } // Render the Definition Table export const DefinitionTable = ({ terms, definitions }) => { const rows = terms.map((term, index) => ({ key: `row-${index}-${term}`, cells: [ { key: createKey(term), content: term }, { key: index, content: definitions[index], colSpan: 2, }, ], })); return ( <DynamicTable head={head} rows={rows} emptyView="No terms provided, please press Edit on the app and add terms in the Configuration box" /> ); } -
Add an import for the
DefinitionTablecomponent insrc/frontend/index.jsx.1 2
import { DefinitionTable } from './definition-table'; -
Add this table to your existing macro in
src/frontend/index.jsx.1 2
return ( <> <DefinitionTable terms={terms} definitions={definitions}/> </> );
For reference, a finished version of the src/frontend/definition-table.jsx file is available on the tutorial repository.
Step 6: Allow a user to add a definition
At this stage, there's still no data stored for the app. In this step, you'll add the ability to store a definition for a term.
-
Add a
saveDefinitionmethod to thesrc/resolvers/index.jsfile.1 2
resolver.define('saveDefinition', async(req) => { const { term, definition } = req.payload; await kvs.set(termKey(term), { term, definition }); }) -
Add a
removeDefinitionmethod to thesrc/resolvers/index.jsfile.1 2
resolver.define('removeDefinition', async(req) => { let term = req.payload.term; await kvs.delete(termKey(term)); }) -
In
src/frontend/definition-table.jsx, within theDefinitionTablecomponent, set up React hooks that will be used to open an input modal. This enables a user to provide a definition for a term.1 2
const { handleSubmit, register, getFieldId } = useForm(); const [term, setTerm] = useState(''); const [definition, setDefinition] = useState(''); const [loadingState, setLoadingState] = useState(false); const [inputIsOpen, setInputIsOpen] = useState(false); const openInputModal = () => setInputIsOpen(true); const closeInputModal = () => setInputIsOpen(false); -
Also set up React hooks that will be used to open a delete confirmation modal as well. This enables a user to delete a provided definition for a term.
1 2
const [deleteIsOpen, setDeleteIsOpen] = useState(false); const openDeleteModal = () => setDeleteIsOpen(true); const closeDeleteModal = () => setDeleteIsOpen(false); -
Add two Modals in the return statement of the
DefinitionTablecomponent. When the user clicks submit for the input modal, thesaveDefinitionresolver callback is invoked in the Form component and then the modal closed. When the user clicks submit for the delete modal, theremoveDefinitionresolver callback is invoked.1 2
return ( <> <DynamicTable head={head} rows={rows} emptyView="No terms provided, please press Edit on the app and add terms in the Configuration box" isLoading={loadingState} /> <ModalTransition> {inputIsOpen && ( <Modal onClose={closeInputModal}> <Form onSubmit={handleSubmit(submitInput)} > <ModalHeader> <ModalTitle>{`Add definition for ${term}`}</ModalTitle> </ModalHeader> <ModalBody> <Label labelFor={getFieldId("definition")}>{`Definition for ${term}`}</Label> <TextArea name="definition" id="definition" defaultValue={definition} {...register("definition", { required: true })} /> </ModalBody> <ModalFooter> <Button appearance="subtle" onClick={closeInputModal}> Cancel </Button> <Button appearance="primary" onClick={closeInputModal} type="submit"> Submit </Button> </ModalFooter> </Form> </Modal> )} </ModalTransition> <ModalTransition> {deleteIsOpen && ( <Modal onClose={closeDeleteModal}> <Form onSubmit={handleSubmit(submitDelete)} > <ModalHeader> <ModalTitle>{`Delete definition for ${term}?`}</ModalTitle> </ModalHeader> <ModalFooter> <Button appearance="subtle" onClick={closeDeleteModal}> Cancel </Button> <Button appearance="danger" onClick={closeDeleteModal} type="submit"> Delete </Button> </ModalFooter> </Form> </Modal> )} </ModalTransition> </> ); -
Add two submit functions for the input and delete modals respectively within the
DefinitionTablecomponent.1 2
const submitInput = async({ definition }) => { setLoadingState(true); await invoke('saveDefinition', { term: term, definition: definition }) setLoadingState(false); }; const submitDelete = async() => { setLoadingState(true); await invoke('removeDefinition', { term: term }) setLoadingState(false); }; -
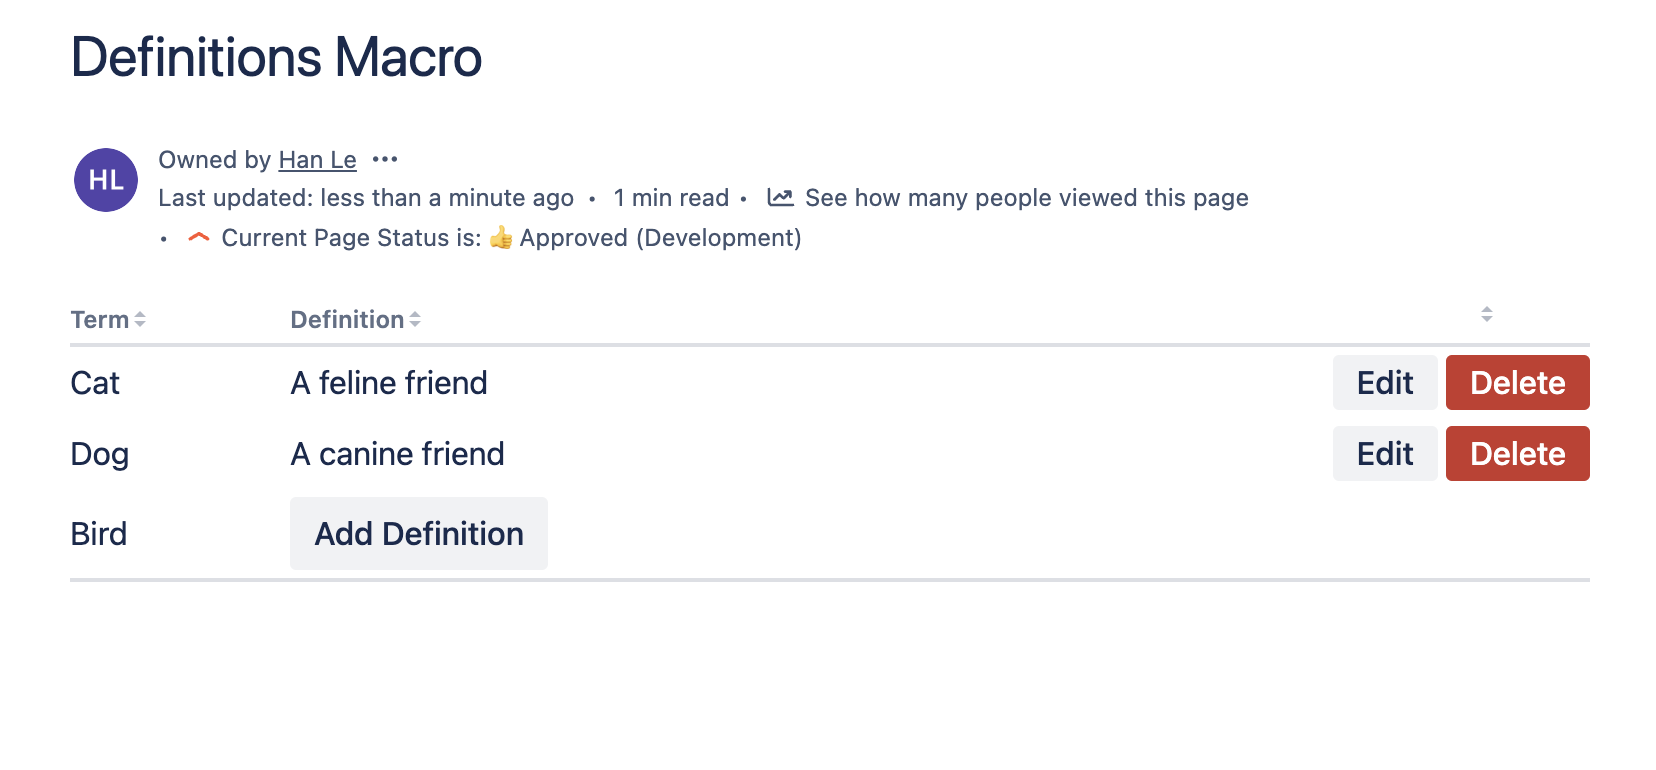
Create a
generateRowfunction that uses useCallback. This will return the definition of a term if it exists, along with anEditandDeletebutton for modifying the definition. This is formatted using Inline. If the definition for the term does not exist, it will render anAdd Definitionbutton. Otherwise, it will render a Spinner.1 2
const generateRow = useCallback( (index, term, generatedDefinition) => { let definitionContent = <Spinner />; if (generatedDefinition === "") { definitionContent = <Button appearance="default" onClick={() => { setTerm(term); setDefinition(""); openInputModal(); }}> Add Definition </Button> } else if (generatedDefinition) { definitionContent = <Inline spread="space-between"> <Text>{generatedDefinition}</Text> <ButtonGroup> <Button appearance="default" spacing="compact" onClick={() => { setTerm(term); setDefinition(generatedDefinition); openInputModal(); }}> Edit </Button> <Button appearance="danger" spacing="compact" onClick={() => { setTerm(term); openDeleteModal(); }}> Delete </Button> </ButtonGroup> </Inline> } return ({ key: `row-${index}-${term}`, cells: [ { key: createKey(term), content: term }, { key: index, content: definitionContent, colSpan: 2, }, ], }) }, [setTerm, setDefinition, openInputModal, openDeleteModal, createKey]); -
Add
generateRowfunction to the rows variable, so it will be rendered in<DynamicTable>.1 2
const rows = terms.map((term, index) => ( generateRow(index, term, definitions[index]) )); -
Stop tunneling your app and deploy it by running:
1 2
forge deploy
Next steps
At this point your app is able to display a list of terms and their associated definitions. The app stores definitions in the Key-Value Store, and shares these across all the instances of the macro in the site.
Explore the Key-Value Store in further detail over the following pages:
- Read App storage options for an overview of the different ways Forge apps can store data.
- Read about the Key-Value Store which details the JavaScript API.
- Learn more about how Queries can be run against data stored in the Key-Value Store.
- View the Limits that apply to apps using the Key-Value Store.
Rate this page: