Part 3: Change the front end with UI Kit
This section describes how to use tools in UI Kit, including UI Kit components.
You'll use these components to build dynamic and interactive interfaces for your app's front end. When your app is complete, you'll learn how to continue monitoring the Forge environment using the forge logs command.
This is part 3 of 3 in this tutorial. Complete Part 2: Call a Jira API before working on this page.
Modify the user interface
The hello world app contains a single Text component that displays 'Hello world!' in a Jira issue.
In the UI Kit, this is represented by <Text>Hello world!</Text>. You’ll update the component
to display the number of comments on an issue.
When using multiple UI Kit components, you must wrap them in a fragment (<>) block because
a function can only return one top-level component. In the example below <> acts as a wrapper
for the other UI Kit components.
-
In the app's top-level directory make sure your tunnel is running:
1 2
forge tunnel -
Open the
src/frontend/index.jsx -
Find the
<Text>Hello world!</Text>line and following below it:1 2
<Text> Number of comments on this issue: {comments?.length} </Text>Your
src/frontend/index.jsxshould look like this:1 2
import React from 'react'; // useProductContext hook retrieves current product context import ForgeReconciler, { Text, useProductContext } from '@forge/react'; // requestJira calls the Jira REST API import { requestJira } from '@forge/bridge'; const App = () => { const context = useProductContext(); // add the the 'comments' variable to store comments data const [comments, setComments] = React.useState(); console.log(`Number of comments on this issue: ${comments?.length}`); // start of function that calls Jira REST API const fetchCommentsForIssue = async () => { // extract issue ID instead expecting one from function input const issueId = context?.extension.issue.id; // modify to take issueId variable const res = await requestJira(`/rest/api/3/issue/${issueId}/comment`); const data = await res.json(); return data.comments; }; React.useEffect(() => { if (context) { // extract issue ID from the context const issueId = context.extension.issue.id; // use the issue ID to call fetchCommentsForIssue(), // then updates data stored in 'comments' fetchCommentsForIssue().then(setComments); } }, [context]); return ( <> // This UI will now render the value of `comments` variable <Text>Hello world!</Text> <Text> Number of comments on this issue: {comments?.length} </Text> </> ); }; ForgeReconciler.render( <React.StrictMode> <App /> </React.StrictMode> ); -
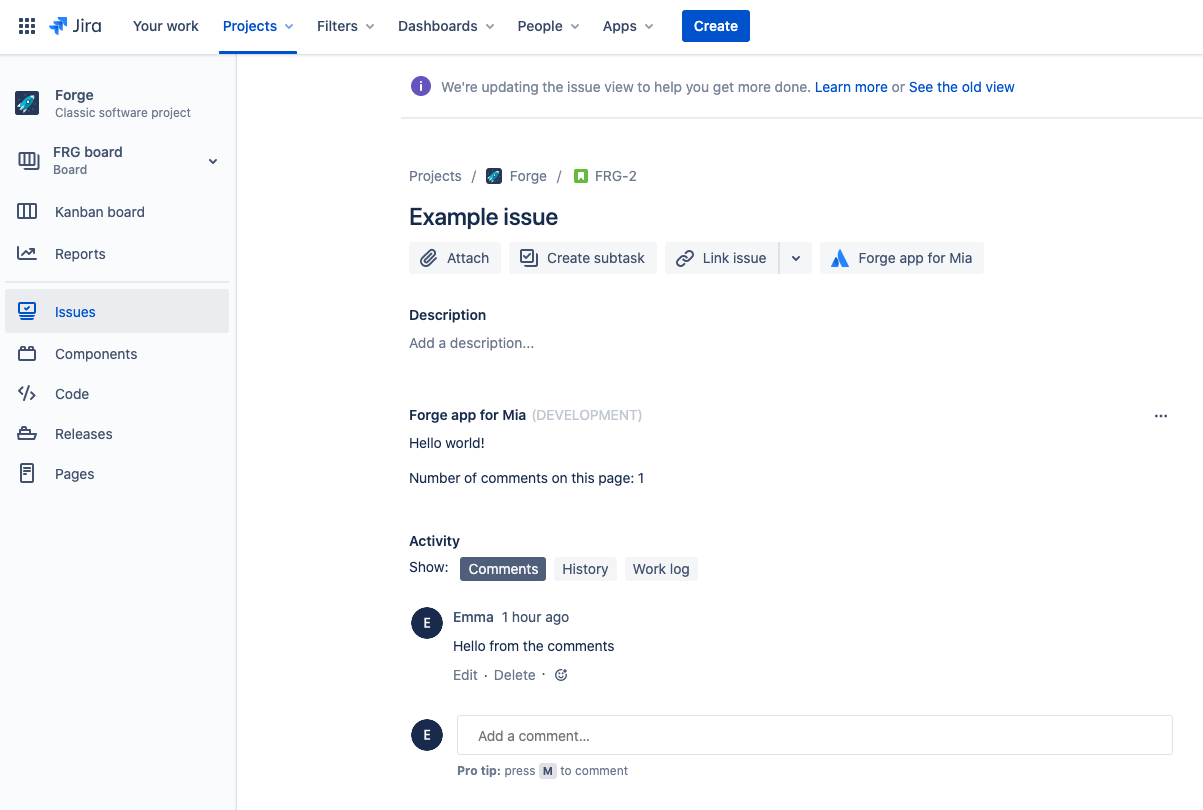
Refresh the Jira issue view.
The app displays the number of comments in the issue panel. Add more comments and refresh the page to count them in your app. Your issue should look like the following:
Close the tunnel and deploy the app
After confirming the app works locally, deploy the app so that it continues to work when you close the tunnel.
-
Close your tunnel by pressing Ctrl+C.
-
Deploy your app by running:
1 2
forge deploy -
Refresh the page where your app is installed.
Check the logs
After you deploy your app, open your browser’s developer console to view app logs. Logs are created after the app loads, so you may need to refresh your page.
1
2Number of comments on this issue: 1
Your logs are an important tool when debugging Forge apps. Learn more about debugging.
View your app in the developer console
Once your app is deployed, it will appear in the developer console. From the console, you can manage and distribute your apps. You can also see how your app is performing, view your app logs and installations, and manage app alerts.
Get a Developer Community badge
Share a screenshot of your App on the Atlassian Developer Community - Hello Jira Thread to earn a Badge
Next steps
You now know enough to develop your own Forge apps. Learn more from our tutorials, guides, example apps or reference pages.
- Continue learning with Forge Quest
- The Automate Jira using Triggers tutorial uses triggers to respond to user actions in Jira.
- Install the Jira issue translator example app to see how you can enrich Jira issue content with Forge.
- Promote an app to staging or production makes your app ready for your users.
- Learn how to build a Custom UI app in Jira.
- See the reference pages to learn what else you can do with what you’ve learned.

Rate this page: