Part 3: Add support for Jira as an optional Atlassian app
Now that you have set up your app with Confluence as the required Atlassian app, you can add support for optional Atlassian apps to your app. In this case, we will be adding a Jira module and calling a Jira API.
This is part 3 of 4 in this tutorial. Complete Part 2: Call a Confluence API before working on this page.
Add Jira as an optional Atlassian app to the manifest
To add support for optional Atlassian apps, you declare them in the compatibility section of
the manifest.yml file using required: false.
For this tutorial, we will be adding Jira:
1
2app:
  id: '<app id>'
  compatibility:
    confluence:
      required: true
    jira:
      required: false
Add a Jira module
Now, we will add a jira:issuePanel module to the manifest to
enable the app to display 'Hello world' on the Jira issue view page.
Copy the below code and paste it in the modules section of the manifest.yml file:
1 2jira:issuePanel: - key: hello-world-hello-world-issue-panel resource: main resolver: function: resolver render: native title: <your app name> icon: https://developer.atlassian.com/platform/forge/images/icons/issue-panel-icon.svg
Your manifest.yml should now look like this:
1
2modules:
  macro:
    - key: hello-world-app-hello-world
      resource: main
      render: native
      resolver:
        function: resolver
      title: Forge app for Mia
      description: Inserts hello world!
  jira:issuePanel:
    - key: hello-world-hello-world-issue-panel
      resource: main
      resolver:
        function: resolver
      render: native
      title: Forge app for Mia
      icon: https://developer.atlassian.com/platform/forge/images/icons/issue-panel-icon.svg
  function:
    - key: resolver
      handler: index.handler
resources:
  - key: main
    path: src/frontend/index.jsx
app:
  runtime:
    name: nodejs24.x
  id: <your app id>
  compatibility:
    confluence:
      required: true
permissions:
  scopes:
    - read:comment:confluence
You can now run forge deploy to update the app with the new module.
Make a Jira API call
In this section, you'll modify your app to call the Jira REST API. Using the requestJira function from the @forge/bridge package, you'll get the comments on a Jira issue in the form of an array and print the number of comments to the console.
The @forge/bridge package simplifies HTTP operations and contains other Forge APIs such as the Storage and Properties APIs. For this tutorial, you'll also use the UI Kit hook
useProductContext to get context information about the Jira issue the app is on.
-
In the app's top-level directory make sure your tunnel is running:
1 2
forge tunnel -
Navigate to the
src/frontenddirectory and open theindex.jsxfile. Import therequestJirafrom@forge/bridgepackage. Your imports from@forge/bridgeshould now look like:1 2
import { requestConfluence, requestJira } from '@forge/bridge'; -
Copy the following code to create a function that calls the Jira REST API by using the
requestJirafunction:1 2
const fetchCommentsForIssue = async (issueIdOrKey) => { const res = await requestJira(`/rest/api/3/issue/${issueIdOrKey}/comment`); const data = await res.json(); return data.comments; };This function takes an
issueIdOrKeyto call the REST API with path/rest/api/3/issue/${issueIdOrKey}/comment.
When you save the index.jsx file, the tunnel output in the terminal
will display a permission-scope-required error. To address this, you'll
need to add the required permissions first; this is covered later in the
Set required permissions section.
- We can get the
IDof the issue we are currently on from the Atlassian app context which was previously added in Part 2: Call a Confluence API.1 2
import ForgeReconciler, { Text, useProductContext } from '@forge/react'; - Modify the
Appcomponent to usefetchCommentsForIssuefunction, so it automatically runs whencontextfinishes loading and updates the data stored incomments:1 2
React.useEffect(() => { if (context) { // extract page ID from the context const pageId = context.extension.content?.id; if (pageId) { fetchCommentsForPage(pageId).then(setComments); } // extract issue ID from the context const issueId = context.extension.issue?.id; if (issueId) { fetchCommentsForIssue(issueId).then(setComments); } } }, [context]);
This code checks if the context is being loaded onto a Confluence or Jira page. If a Jira issue is found, the issue ID
is passed to fetchCommentsForIssue, and then updates the data stored in comments.
We recommend clearing the src/frontend/index.jsx file and replacing it with the provided code for error free results.
Your index.jsx file should look like the following:
1
2import React from 'react';
import ForgeReconciler, { Text, useProductContext } from '@forge/react';
import { requestConfluence, requestJira } from '@forge/bridge';

const fetchCommentsForPage = async (pageId) => {
  const res = await requestConfluence(`/wiki/api/v2/pages/${pageId}/footer-comments`);
  const data = await res.json();
  return data.results;
};

const fetchCommentsForIssue = async (issueIdOrKey) => {
  const res = await requestJira(`/rest/api/3/issue/${issueIdOrKey}/comment`);
  const data = await res.json();
  return data.comments;
};

const App = () => {
  const context = useProductContext();

  // add these code to keep track of comments
  const [comments, setComments] = React.useState();
  console.log(`Number of comments: ${comments?.length}`);

  React.useEffect(() => {
    if (context) {
      // extract page ID from the context
      const pageId = context.extension.content?.id;
      if (pageId) {
        fetchCommentsForPage(pageId).then(setComments);
      }

      // extract issue ID from the context
      const issueId = context.extension.issue?.id;
      if (issueId) {
        fetchCommentsForIssue(issueId).then(setComments);
      }
    }
  }, [context]);

  return (
    <>
      // This UI will be updated in the next part of this tutorial to display number of comments onto the screen
      <Text>Hello world!</Text>
    </>
  );
};

ForgeReconciler.render(
  <React.StrictMode>
    <App />
  </React.StrictMode>
);
Enable usage analytics (optional)
If you haven't enabled usage analytics yet, we recommend you do so using following command:
1
2forge settings set usage-analytics true
This command provides the consent required by Forge to collect data about your app's deployments and installations (including error data). This, in turn, helps us monitor the overall performance and reliability of Forge. The collected data also helps us make better decisions on improving Forge's feature set and performance.
For information about how Atlassian collects and handles your data, read our Privacy Policy.
Install your app onto Jira
You can now run the forge deploy and forge install commands to install your app onto Jira.
-
Navigate to the app's top-level directory and deploy your app by running:
1 2
forge deploy -
Install your ap by running the below command using
jiraas the Atlassian app with the-p [Atlassian app]flag:1 2
forge install -p jira -
When prompted, provide your site url.
Note that your app must always be installed into the required Atlassian app before you can install it in other Atlassian apps.
Test your app
-
Create a new Jira issue.
-
In the issue panel of that issue, select the Apps button and select your app from the list.
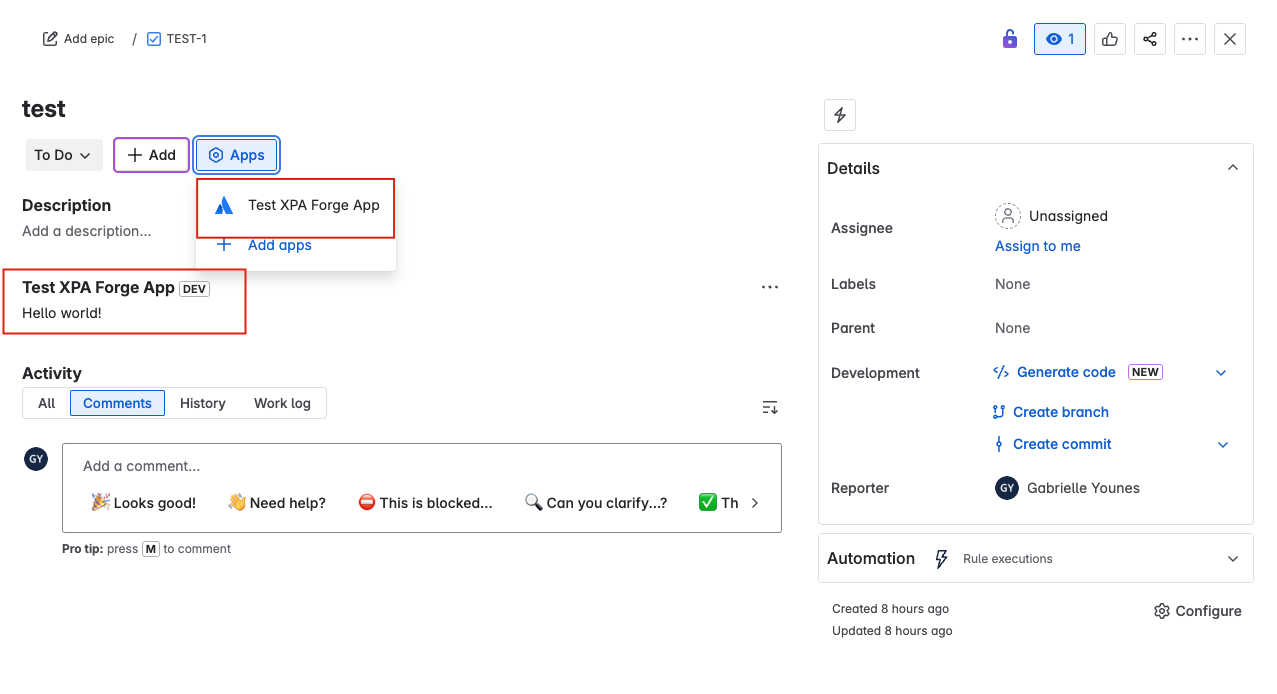
-
Add a comment to the Jira issue. For example, a comment with Hello from the comments.
-
Refresh the Jira issue view.
-
Check the output of the app in your browser's developer console. The number of comments on the issue displays as follows:
1 2
Number of comments: 1
When you save the index.jsx file, the tunnel output in the developer console may display a permission-scope-required error. To address this, you'll need to add the required permissions first and this is covered in the next section.
Set required permissions
Your app calls a remote resource; namely, the Jira REST API. As such, you'll need to grant your app the right permissions. To do this, you'll need to add the required OAuth 2.0 scope to the app's manifest.
For more information on adding scopes, see Add scopes to call an Atlassian REST API.
In the steps below, you'll do this by using the forge lint command. This command will automatically
add the required scope to your manifest.yml file (in this case, read:jira-work).
-
Run the following command:
1 2
forge lint --fix -
Whenever you change permissions, you must upgrade the app's installation. Stop your tunnel process and run these commands to deploy and install your change:
1 2
forge deploy forge install --upgrade -
Start the tunnel again:
1 2
forge tunnel
Alternatively, you can also manually add required scopes to your manifest.yml file.
Learn more about adding scopes to call an Atlassian REST API.
Next step
In the next tutorial, you'll learn how to make changes to your app's frontend using the UI Kit components of Forge.


Rate this page: