Build a Jira Automation Action with Forge
This tutorial will walk you through the steps necessary to create a Forge app that provides an action that can be utilised in automation rules.
The action we will be building in this tutorial will retrieve requirements information from a requirements management system. The intention is that customers can use this action to automatically link Jira work items to requirements that are managed in a separate system.
Before you begin
This tutorial assumes you're already familiar with the basics of Forge development. If this is your first time using Forge, see Getting started first.
To complete this tutorial, you need the latest version of Forge CLI. To update your CLI version, run npm install -g @forge/cli@latest
on the command line.
Set up a cloud developer site
An Atlassian cloud developer site lets you install and test your app on Atlassian apps including Confluence and Jira. If you don't have one yet, set it up now:
- Go to http://go.atlassian.com/cloud-dev and create a site using the email address associated with your Atlassian account.
- Once your site is ready, log in and complete the setup wizard.
You can install your app to multiple Atlassian sites. However, app data won't be shared between separate Atlassian apps, sites, or Forge environments.
The limits on the numbers of users you can create are as follows:
- Confluence: 5 users
- Jira Service Management: 1 agent
- Jira Software and Jira Work Management: 5 users
Step 1: Initial app creation
The first step involves creating a Forge app from a template that provides similar functionality to that needed. In this case, we are going to use the blank app template since web triggers will allow the app to accept requests from external systems.
Step 1a: In a terminal window, navigate to a directory where you want to locate your app.
1
2cd {your-preferred-location}
Step 1b: Now start the app creation process by running the command forge create.
Step 1c: When prompted, select or create a developer space to create the app in.
Step 1d: Enter Requirement Resolver as the name of the app.
Step 1e: Agree to the various terms of creating Forge apps as applicable.
Step 1f: Use the up and down arrow keys to select Show All as the Atlassian app or platform tool.
Step 1g: Use the up and down arrow keys to select Show All as the category.
Step 1h: Use the up and down arrow keys to select blank as the template.
Step 1i: Verify you see output similar to the following:
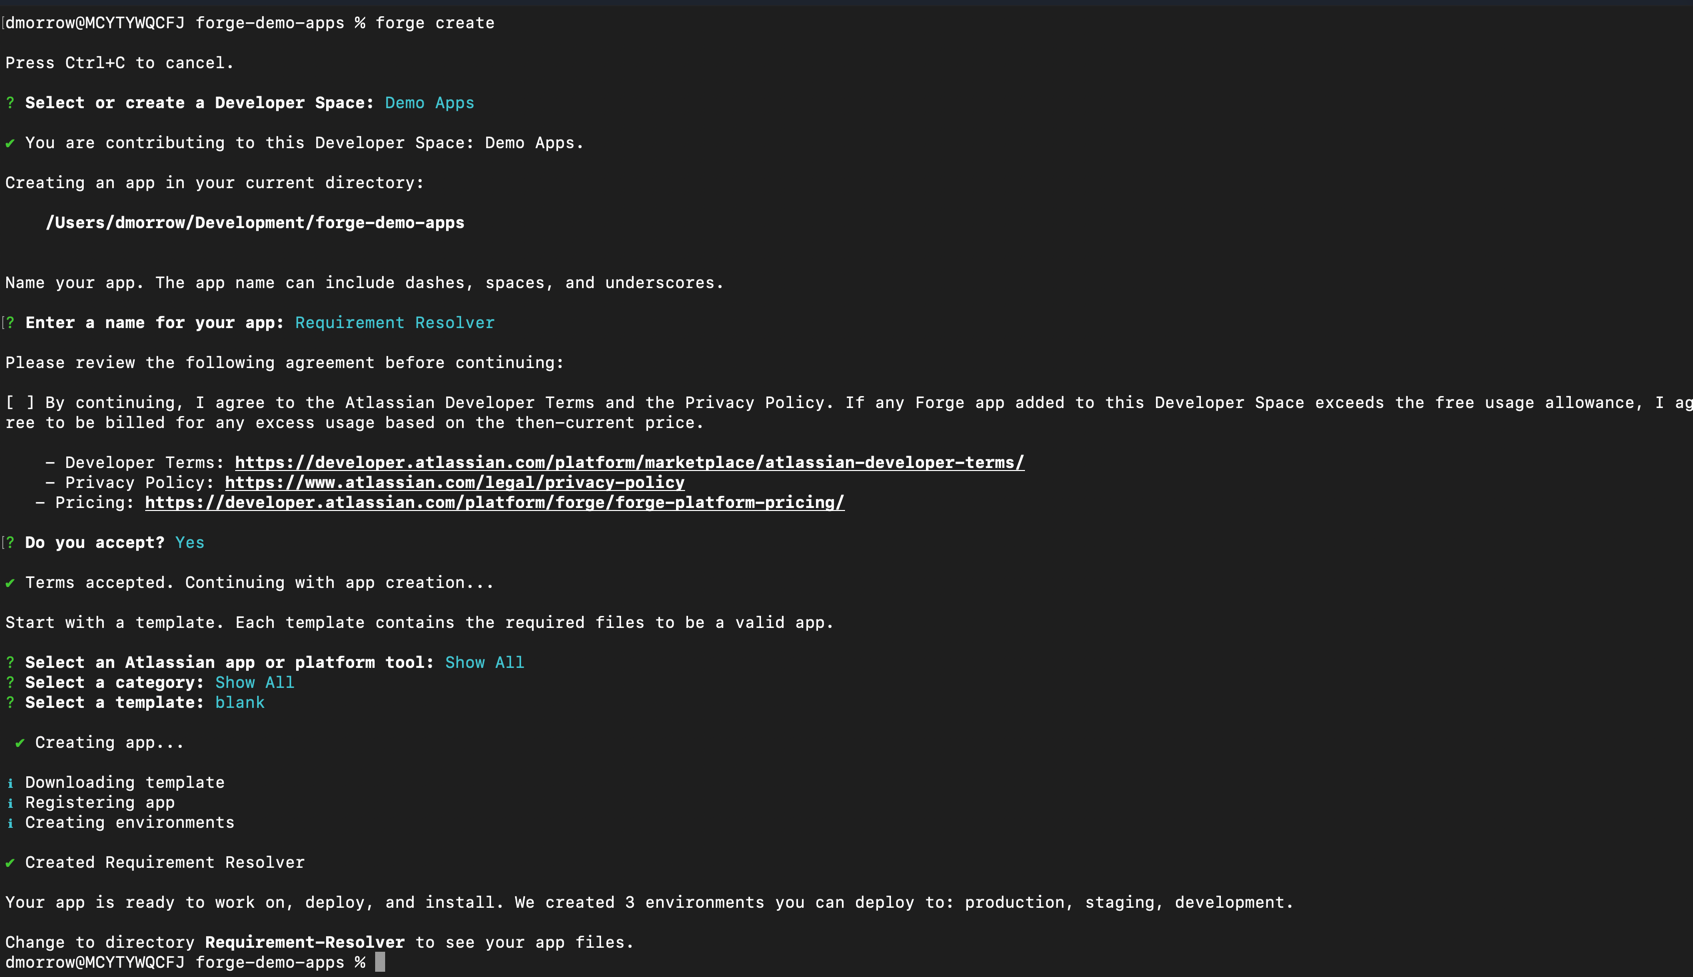
Step 1j: This will have created a directory named Requirement-Resolver and files within it that is the initial version of your app. You could deploy and install your app as it is, but the app doesn’t do anything yet so we will make changes first. All future Forge CLI command for the app need to be done in the app’s root directory so run the command cd Requirement-Resolver.
Step 2: Create a package.json
The blank project doesn't have a package.json file so we need to create it.
Step 2a: Create the file in the root of the project and add the following content:
1
2{
  "name": "requirements-automation-action",
  "version": "1.1.5",
  "main": "index.js",
  "license": "MIT",
  "private": true,
  "scripts": {
    "lint": "eslint src/**/*"
  },
  "devDependencies": {
    "eslint": "^8.56.0",
    "eslint-plugin-react-hooks": "^4.6.0"
  },
  "dependencies": {
    "@forge/api": "^6.4.1",
    "@forge/bridge": "5.10.0",
    "@forge/react": "11.8.2",
    "@forge/resolver": "1.7.1",
    "react": "^18.2.0"
  }
}
Step 2b: Run npm install or yarn to resolve the dependencies.
Step 3: Building the action’s requirements retrieval code
These steps will implement the code that the action will use to retrieve the requirements relating to a specific Jira work item.
The requirements management system that this tutorial will utilise is a mock system that is implemented by a separate Forge app which provides a webtrigger. Our action will invoke this webtrigger to retrieve the mock requirements information. The URL of mock system is https://a94fc9cc-4ce2-49ec-b588-42e609969d26.hello.atlassian-dev.net/x1/lS731HDWJ5HleJIn3fQwR5qHHQ0 and accepts a query parameter work-item-key which the system needs to look up the requirement.
Here is an example request using the curl command:
1
2curl "https://a94fc9cc-4ce2-49ec-b588-42e609969d26.hello.atlassian-dev.net/x1/lS731HDWJ5HleJIn3fQwR5qHHQ0?work-item-key=foo-123"
An example response from this curl command is as follows:
1
2{
  "id": "req-12345",
  "status": "approved",
  "approvalDate": "2025-12-12T01:11:08.845Z",
  "context": {
    "workItemKey": [
      "foo-123"
    ]
  }
}
Step 3a: Open your integrated development environment (IDE) such as Visual Studio Code at the the app’s root directory.
Step 3b: In /manifest.yml, add the following permissions section so that the app is allowed to access the external requirements system:
1
2permissions:
  external:
    fetch:
      backend:
        - address: https://a94fc9cc-4ce2-49ec-b588-42e609969d26.hello.atlassian-dev.net
Step 3c: Create a directory named backend with the src directory.
Step 3d: Create a file named requirementRetriever.js within scr/backend.
Step 3e: Copy the following code into requirementRetriever.js:
1
2const requirementsSystemApiEndpoint = `https://a94fc9cc-4ce2-49ec-b588-42e609969d26.hello.atlassian-dev.net/x1/lS731HDWJ5HleJIn3fQwR5qHHQ0`;

const fetchRequirementData = async (workItemKey) => {
  const url = `${requirementsSystemApiEndpoint}?work-item-key=${workItemKey}`;
  const response = await fetch(url);
  if (response.ok) {
    const requirementInfo = await response.json();
    console.log(`Fetched requirement info for work item ${workItemKey}: ${JSON.stringify(requirementInfo)}`);
    return {
      success: true,
      requirementInfo: requirementInfo,
    }
  } else {
    const errorText = await response.text();
    const errorMessage = `Failed to add comment to issueKey: ${issueKey}. Status: ${response.status}. Response: ${errorText}`;
    console.log(`Failed to fetch requirement for workItemKey: ${workItemKey}`);
    return {
      success: false,
      errorMessage: errorMessage,
    }
  }
};

export const getRequirementInfo = async (payload) => {
  const workItemKey = payload.workItemKey;
  const requirementData = await fetchRequirementData(workItemKey);
  // Convert the requirement info into the schema that we want our action
  // output to have...
  const requirementInfoActionOutput = {
    requirementId: requirementData.requirementInfo?.id,
    requirementStatus: requirementData.requirementInfo?.status,
  }
  console.log(`Requirement info action output: ${JSON.stringify(requirementInfoActionOutput, null, 2)}`);
  return requirementInfoActionOutput;
}
Step 4: Building the action’s automation form
The action needs to provide a form that users utilising the automation action will complete. In this case the form will need one input which is the work item key to retrieve the requirement for.
Step 4a: Create a directory named frontend with the src directory.
Step 4b: Create a file named AutomationInputsForm.jsx within scr/frontend.
Step 4c: Copy the following code into AutomationInputsForm.js:
1
2import { view } from '@forge/bridge';
import {
  Form,
  useForm,
  Stack,
  Text,
  ErrorMessage,
  Textfield,
  Box,
} from '@forge/react';

export const AutomationInputsForm = ({ context, isValidating }) => {
  const formInstance = useForm({
    defaultValues: context.extension.data.inputs,
    disabled: isValidating
  });
  const { handleSubmit, register, getValues, formState } = formInstance;

  const onChange = (input) => {
    const updatedFormData = { ...getValues(), ...input };

    view.submit(updatedFormData);
  };

  const onSubmit = data => {
    view.submit(data);
  };

  const { onChange: workItemKeyOnChange, ...workItemKeyRegisterProps } = register('workItemKey', {
    required: { value: true, message: 'Work item key is required' },
    disabled: isValidating,
  });

  return (
    <Box>
      <Form onSubmit={handleSubmit(onSubmit)}>
        <Stack space="space.100">
          <Text>Work item key</Text>
          <Textfield
            {...workItemKeyRegisterProps}
            onChange={(e) => {
              workItemKeyOnChange(e);
              onChange({ workItemKey: e.target.value });
            }}
          />
          {formState.errors.workItemKey?.message && (
            <ErrorMessage>
              {formState.errors.workItemKey?.message}
            </ErrorMessage>
          )}
        </Stack>
      </Form>
    </Box>
  );
};
Step 4d: Create a file named AutomationConfig.jsx within scr/frontend.
Step 4e: Copy the following code into AutomationConfig.js:
1
2import React, { useEffect, useState } from 'react';

import {  events } from '@forge/bridge';
import ForgeReconciler, {
  Text,
  useProductContext,
} from '@forge/react';
import { AutomationInputsForm } from './AutomationInputsForm.jsx';

export const AutomationConfig = () => {

  const context = useProductContext();
  const [isValidating, setIsValidating] = useState(false);

  // This effect sets up a listener for the 'AUTOMATION_ACTION_VALIDATE_RULE_EVENT' event.
  useEffect(() => {
    const subscription = events.on('AUTOMATION_ACTION_VALIDATE_RULE_EVENT', onValidateAutomationRuleEvent);
    return () => subscription.then(sub => sub.unsubscribe());
  }, []);

  const onValidateAutomationRuleEvent = ({ isValidating }) => {
    setIsValidating(isValidating);
  }

  const render = () => {
    if (context) {
      return <AutomationInputsForm context={context} isValidating={isValidating} />;
    } else {
      return <Text>Loading...</Text>;
    }
  }

  return render();
};

ForgeReconciler.render(
  <React.StrictMode>
    <AutomationConfig />
  </React.StrictMode>
);
Step 4f: Modify src/index.js so that it exports the getRequirementInfo function from src/backend/requirementRetriever.
1
2export { getRequirementInfo } from './backend/requirementRetriever';
Step 5: Building the app’s manifest
We now need to complete the app by implementing additional aspects of the manifest.
Step 5a: Change the function section of the manifest so that it defines a single function:
1 2function: - key: get-requirement-info handler: index.getRequirementInfo
Step 5b: Add an action section to the manifest as follows:
1 2action: - key: requirement-info-action name: Requirement Info Provider function: get-requirement-info description: Retrieves requirement information for a work item. actionVerb: GET config: resource: config-form-res render: native inputs: workItemKey: title: Work item Key type: string description: The work item key for the Jira work item that the requirement relates to required: true outputs: requirementId: description: The requirement ID that was retrieved type: string nullable: false requirementStatus: description: The status of requirement type: string nullable: false outputContext: entityName: requirement outputType: OBJECT outputDomain: jira
Step 5c: To make the action available to automation rules, a automation:actionProvider module must be provided. Add the following to the app’s manifest:
1 2automation:actionProvider: - key: requirement-action-provider actions: - requirement-info-action
Step 5d: The action’s config section references a resource with the key config-form-res that is not yet defined so let’s define it by adding a resources section to the manifest.
1
2resources:
  - key: config-form-res
    path: src/frontend/AutomationConfigForm.jsx
Step 5e: Since we’ve made a lot of individual changes to the manifest, here is the complete manifest except for the app key which is unique to each app:
1
2modules:
  automation:actionProvider:
    - key: requirement-action-provider
      actions:
        - requirement-info-action
  action:
    - key: requirement-info-action
      name: Requirement Info Provider
      function: get-requirement-info
      description: Retrieves requirement information for a work item.
      actionVerb: GET
      config:
        resource: config-form-res
        render: native
      inputs:
        workItemKey:
          title: Work item Key
          type: string
          description: The work item key for the Jira work item that the requirement
            relates to
          required: true
      outputs:
        requirementId:
          description: The requirement ID that was retrieved
          type: string
          nullable: false
        requirementStatus:
          description: The status of requirement
          type: string
          nullable: false
      outputContext:
        entityName: requirement
        outputType: OBJECT
        outputDomain: jira
  function:
    - key: get-requirement-info
      handler: index.getRequirementInfo
resources:
  - key: config-form-res
    path: src/frontend/AutomationConfig.jsx
app:
  runtime:
    name: nodejs22.x
    memoryMB: 256
    architecture: arm64
  id: ari:cloud:ecosystem::app/your-app-id
permissions:
  external:
    fetch:
      backend:
        - address: https://a94fc9cc-4ce2-49ec-b588-42e609969d26.hello.atlassian-dev.net
Step 6: Deploy and install the app
The app is now be ready for testing so you need to deploy and install it.
Step 6a: Deploy the app by running forge deploy.
Step 6b: Install the app in your development Jira site by running forge install.
Step 7: Create an automation rule
The app’s action should now be available for use within an automation rule.
Step 7a: Visit the automation rule builder within your development Jira site.
Step 7b: Create a new rule titled “Requirement Info Provider Test”.
Step 7c: Select the “Work item created” trigger.
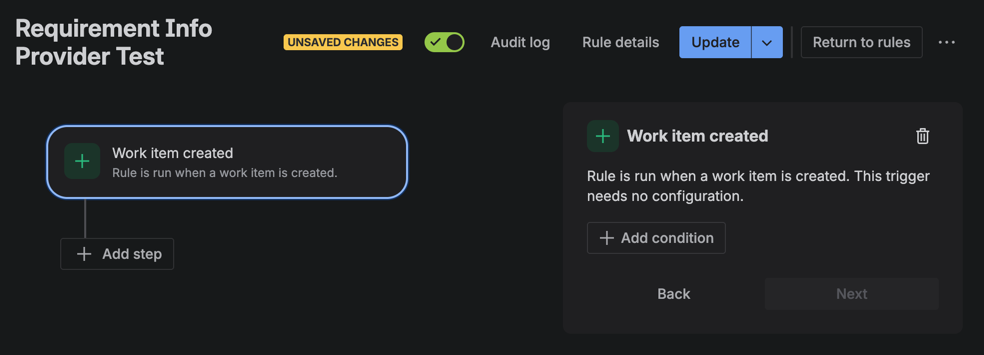
Step 7d: Add the action “Requirement Info Provider”.
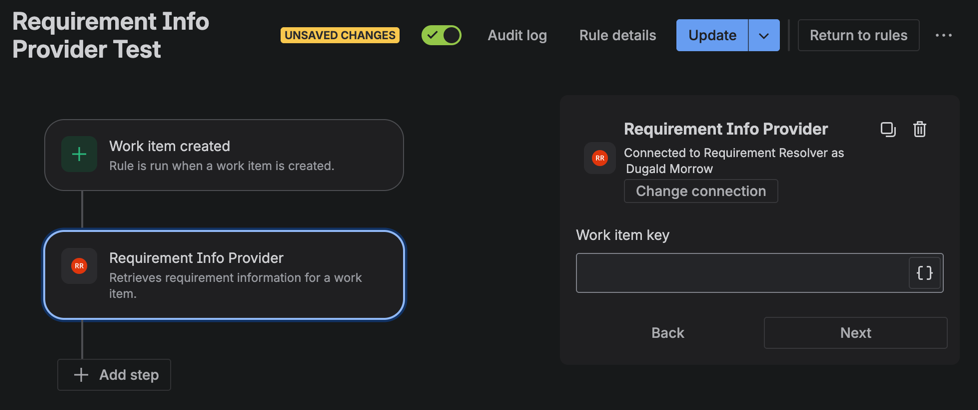
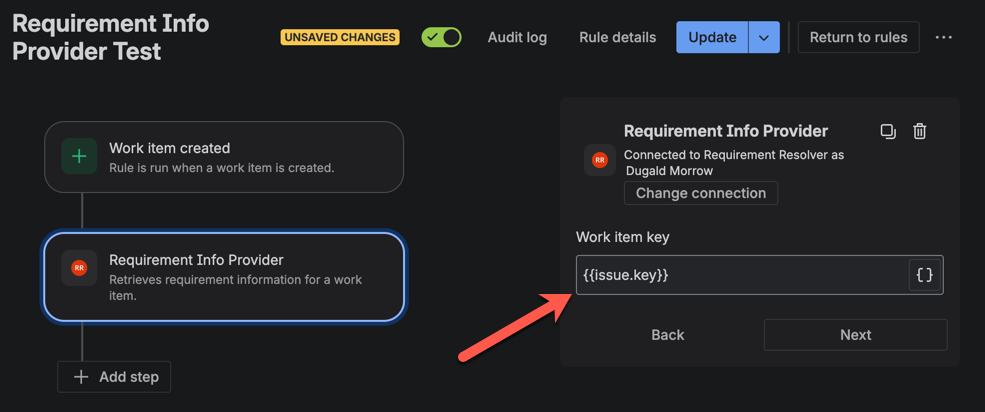
Step 7e: To configure the action, you need to enter {{issue.key}} into the text field so the automation engine passes the work item key to the action when it is invoked. This form is rendered by your app’s code in src/frontend/AutomationConfig.jsx and src/frontend/AutomationInputsForm.jsx.
Step 7f: Add another step such as “Comment on work item” and enter the following into the “Comment” text field to configure the step:
1
2Found requirement:
* ID: "{{fetchedJiraRequirement.requirementId}}"
* Status: "{{fetchedJiraRequirement.requirementStatus}}"
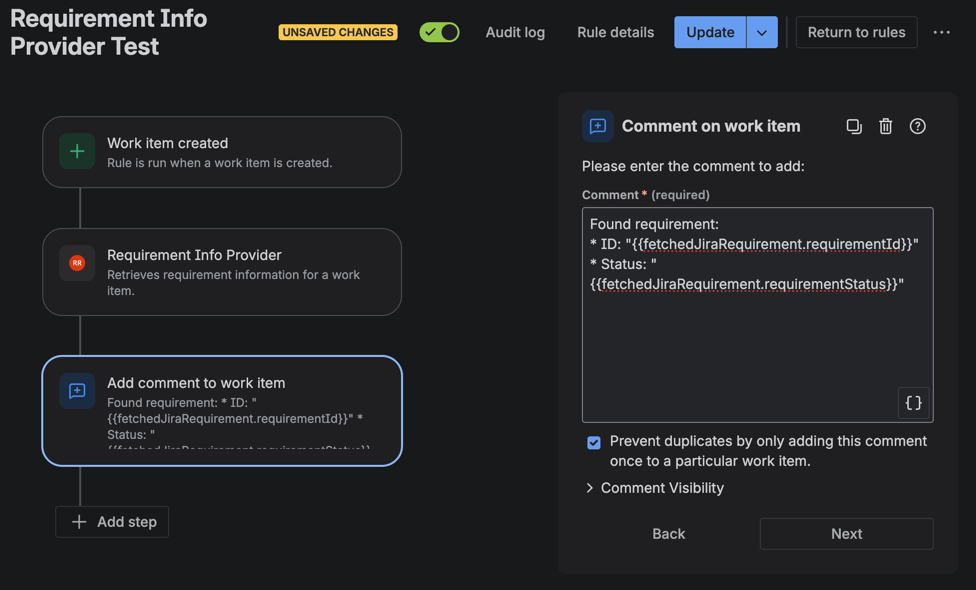
Note that the fields requirementId and requirementStatus are defined by the outputs section in the app’s manifest, manifest.yml and effectively forms a contract with the rules that use the app’s action so you need to be mindful of this when changing it.
Step 7g: Save the rule and ensure it is enabled.
Step 8: Test the automation rule
Step 8a: In your development Jira site, create a new work item.
Step 8b: After a short delay, validate that the automation rule added a comment to the work item similar to the following:
1
2Found requirement:
* ID: "req-12345"
* Status: "approved"

Wrapping up
This tutorial shows how to build an automation action in Forge. Whilst this is the only feature provided by the app we built, you could add more features to the app by adding other Forge modules. You could also follow these same steps to add an action to an existing Forge app.
Forge based automation actions have additional features that are not exercised by the action built in this tutorial. You may like to visit the https://developer.atlassian.com/platform/forge/manifest-reference/modules/automation-action/ module documentation to explore its capabilities. You may also like to visit the https://developer.atlassian.com/platform/forge/building-automations/ to learn about additional techniques for building automations with Forge.
Rate this page: