Add configuration to a macro with UI Kit
With the release of @forge/react version 11.0.0, enhancements have been made
to the useConfig hook to improve performance in macro config apps when receiving configuration value changes.
Confluence macro config apps relying on the useProductContext
hook or view.getContext() need to
transition to the useConfig hook before upgrading to
@forge/react version 11.0.0 or higher in order to properly access the latest values after the configuration updates.
Confluence macro config apps using the useConfig hook
should upgrade to @forge/react version 11.0.0 for improved performance.
Configuration allows you to customize what the macro displays by adjusting settings in a form. To access these settings, you need to go into the edit mode for the macro, as demonstrated below. This gives you the ability to customize the macro's output according to your preferences.
Before you begin
Make sure you have the following:
- Confluence macro created using UI Kit or Custom UI.
- The latest version of Forge CLI. To update your CLI version, run
npm install -g @forge/cli@lateston the command line. - The latest version of UI Kit. To update your version, navigate to the app's top-level
directory, and run
npm install @forge/react@latest --saveon the command line. If your macro uses Custom UI, navigate to the resource directory and run the same command.
Add configuration to the Confluence macro module
In this tutorial, we will add fun facts about pets which are passed through configuration we create.
We recommend you to change the values as listed in the below manifest.yml file.
Make sure you run forge login before you creating your app. For more information on how to log in
to Forge, see Log in with an Atlassian API scoped token.
Create an app using a template.
-
Navigate to the directory where you want to create the app.
-
Create your app by running:
1 2
forge create -
Enter a name for the app.
-
Select the UI Kit category from the list.
-
Select the confluence-macro template from the list.
-
Change to the app subdirectory to see the app files
To add configuration to the Confluence macro module:
- In the app’s top-level directory, open the
manifest.ymlfile. - Add the
configproperty with the value set totrue.
After doing this, your manifest.yml should look like the following, with your own values
for each of the properties.
1
2modules:
  macro:
    - key: pet-facts
      resource: main
      render: native
      resolver:
        function: resolver
      title: Pet
      config: true
  function:
    - key: resolver
      handler: index.handler
resources:
  - key: main
    path: src/frontend/index.jsx
app:
  id: "<your app id>"
To make the side panel open automatically when the macro is inserted, set the config object to { openOnInsert: true } in your manifest.
1
2modules:
  macro:
    - key: pet-facts
      resource: main
      render: native
      resolver:
        function: resolver
      title: Pet
      config:
        openOnInsert: true
Building the app
Create the configuration
You can create a new function component that will return the configuration (Config) components.
The config components must be selected from the following list, along with the subset of available props that can be used in the configuration
| Component | Props available for configuration |
|---|---|
| Checkbox group (Preview) | options, defaultValue, isRequired, name |
| Date picker | defaultValue, isRequired, name, placeholder |
| Label (from Form) | children |
| Radio group | options, defaultValue, isRequired, name |
| Select | defaultValue, options, placeholder, isRequired, name |
| Textfield | defaultValue, isRequired, name, placeholder |
| Text area | defaultValue, isRequired, name, placeholder |
| User picker | isMulti, isRequired, name, defaultValue, description, placeholder |
Configuration is stored in key-value pairs corresponding to each form component.
We recommend clearing the src/frontend/index.jsx file and replacing it with the provided code
for error-free results.
- In your
src/frontend/index.jsxfile, create a function component that constructs the configuration of the UI Kit components you're using:
1
2import React from "react";
import { Label, Textfield } from "@forge/react";

const Config = () => {
  return (
    <>
      <Label>Pet age</Label>
      <Textfield name="age" />
    </>
  );
};
The use of Label in the macro configuration is different from that of other extension points. It does not use the labelFor and id properties and will instead be rendered in the order specified in the app. See the Label in the macro configuration documentation for more details.
- At the bottom of the
src/frontend/index.jsxfile, call theaddConfigmethod onForgeReconcilerwith your config element. Ensure you haveForgeReconcilerimported at the top.
1
2import React from 'react';
import ForgeReconciler, { Label, Textfield } from '@forge/react';

const Config = () => {
  return (
    <>
      <Label>Pet age</Label>
      <Textfield name="age" />
    </>
  );
};

const App = () => {
  ...
}

ForgeReconciler.render(
  <React.StrictMode>
    <App />
  </React.StrictMode>
);

ForgeReconciler.addConfig(<Config />);
Storing sensitive information
- Use config to store general data, but not sensitive information.
- The config data is stored in plaintext, so other users and apps can access and modify the values.
- Consider using the encryption features of Forge Storage to store sensitive data.
Removing config fields
- If you remove a field from the config definition component, the next time a user edits and saves the macro config, the value stored in that field will also be removed from the stored data.
- It can only be recovered if the user restores an old version of the page prior to the edit.
Note: Changing the name property of a field is treated as removing the field and adding a new one.
Use the configuration
You access the config for a macro in your app code with the
useConfig hook.
When the config object is resolved, it returns the key, which is the name property on the form component in configuration, and the value, which is what the user enters.
In your src/frontend/index.jsx file:
- Add the following imports:
1
2import React from "react";
import ForgeReconciler, {
  Label,
  Text,
  Textfield,
  useConfig,
} from "@forge/react";
- Create a component called
Appand call theuseConfigmethod to get the macro config.
1
2const Config = () => {
...
};

const App = () => {
  const config = useConfig();

  return (
    <>
      <Text>Hello World</Text>
    </>
  );
};
- Access the configuration data by key within the App component. Add the second text component
with
ageto the return statement.
1
2const App = () => {

  ...

  const config = useConfig();
  const age = config?.age;

  return (
    <>
      <Text>
        {age || 'Fetching config...'}
      </Text>
    </>
  );
}
The index.jsx file should look like this:
1
2import React from "react";
import ForgeReconciler, {
  Label,
  Text,
  Textfield,
  useConfig,
} from "@forge/react";

const Config = () => {
  return (
    <>
      <Label>Pet age</Label>
      <Textfield name="age" />
    </>
  );
};

const App = () => {
  const config = useConfig();
  const age = config?.age;

  return <Text>{age || "Fetching config..."}</Text>;
};

ForgeReconciler.render(
  <React.StrictMode>
    <App />
  </React.StrictMode>
);

ForgeReconciler.addConfig(<Config />);
We recommend you add sensible defaults for each of your configuration values.
If it's more sensible for the macro to not have default configuration values, we recommend you display a section message with the appropriate instructions, as shown below:
1
2import ForgeReconciler, {
  Label,
  Text,
  Textfield,
  SectionMessage,
} from "@forge/react";
//Add SectionMessage to the import statement

<SectionMessage title="You need to configure this macro" appearance="warning">
  <Text>
    While editing the page, select the macro, and click on the pencil icon to
    display configuration options.
  </Text>
</SectionMessage>;
Wrap the SectionMessage in a conditional such as {!actualConfig && <SectionMessage>...</SectionMessage>} so it only displays when the macro has not been configured yet. Otherwise, it will always show on the macro.
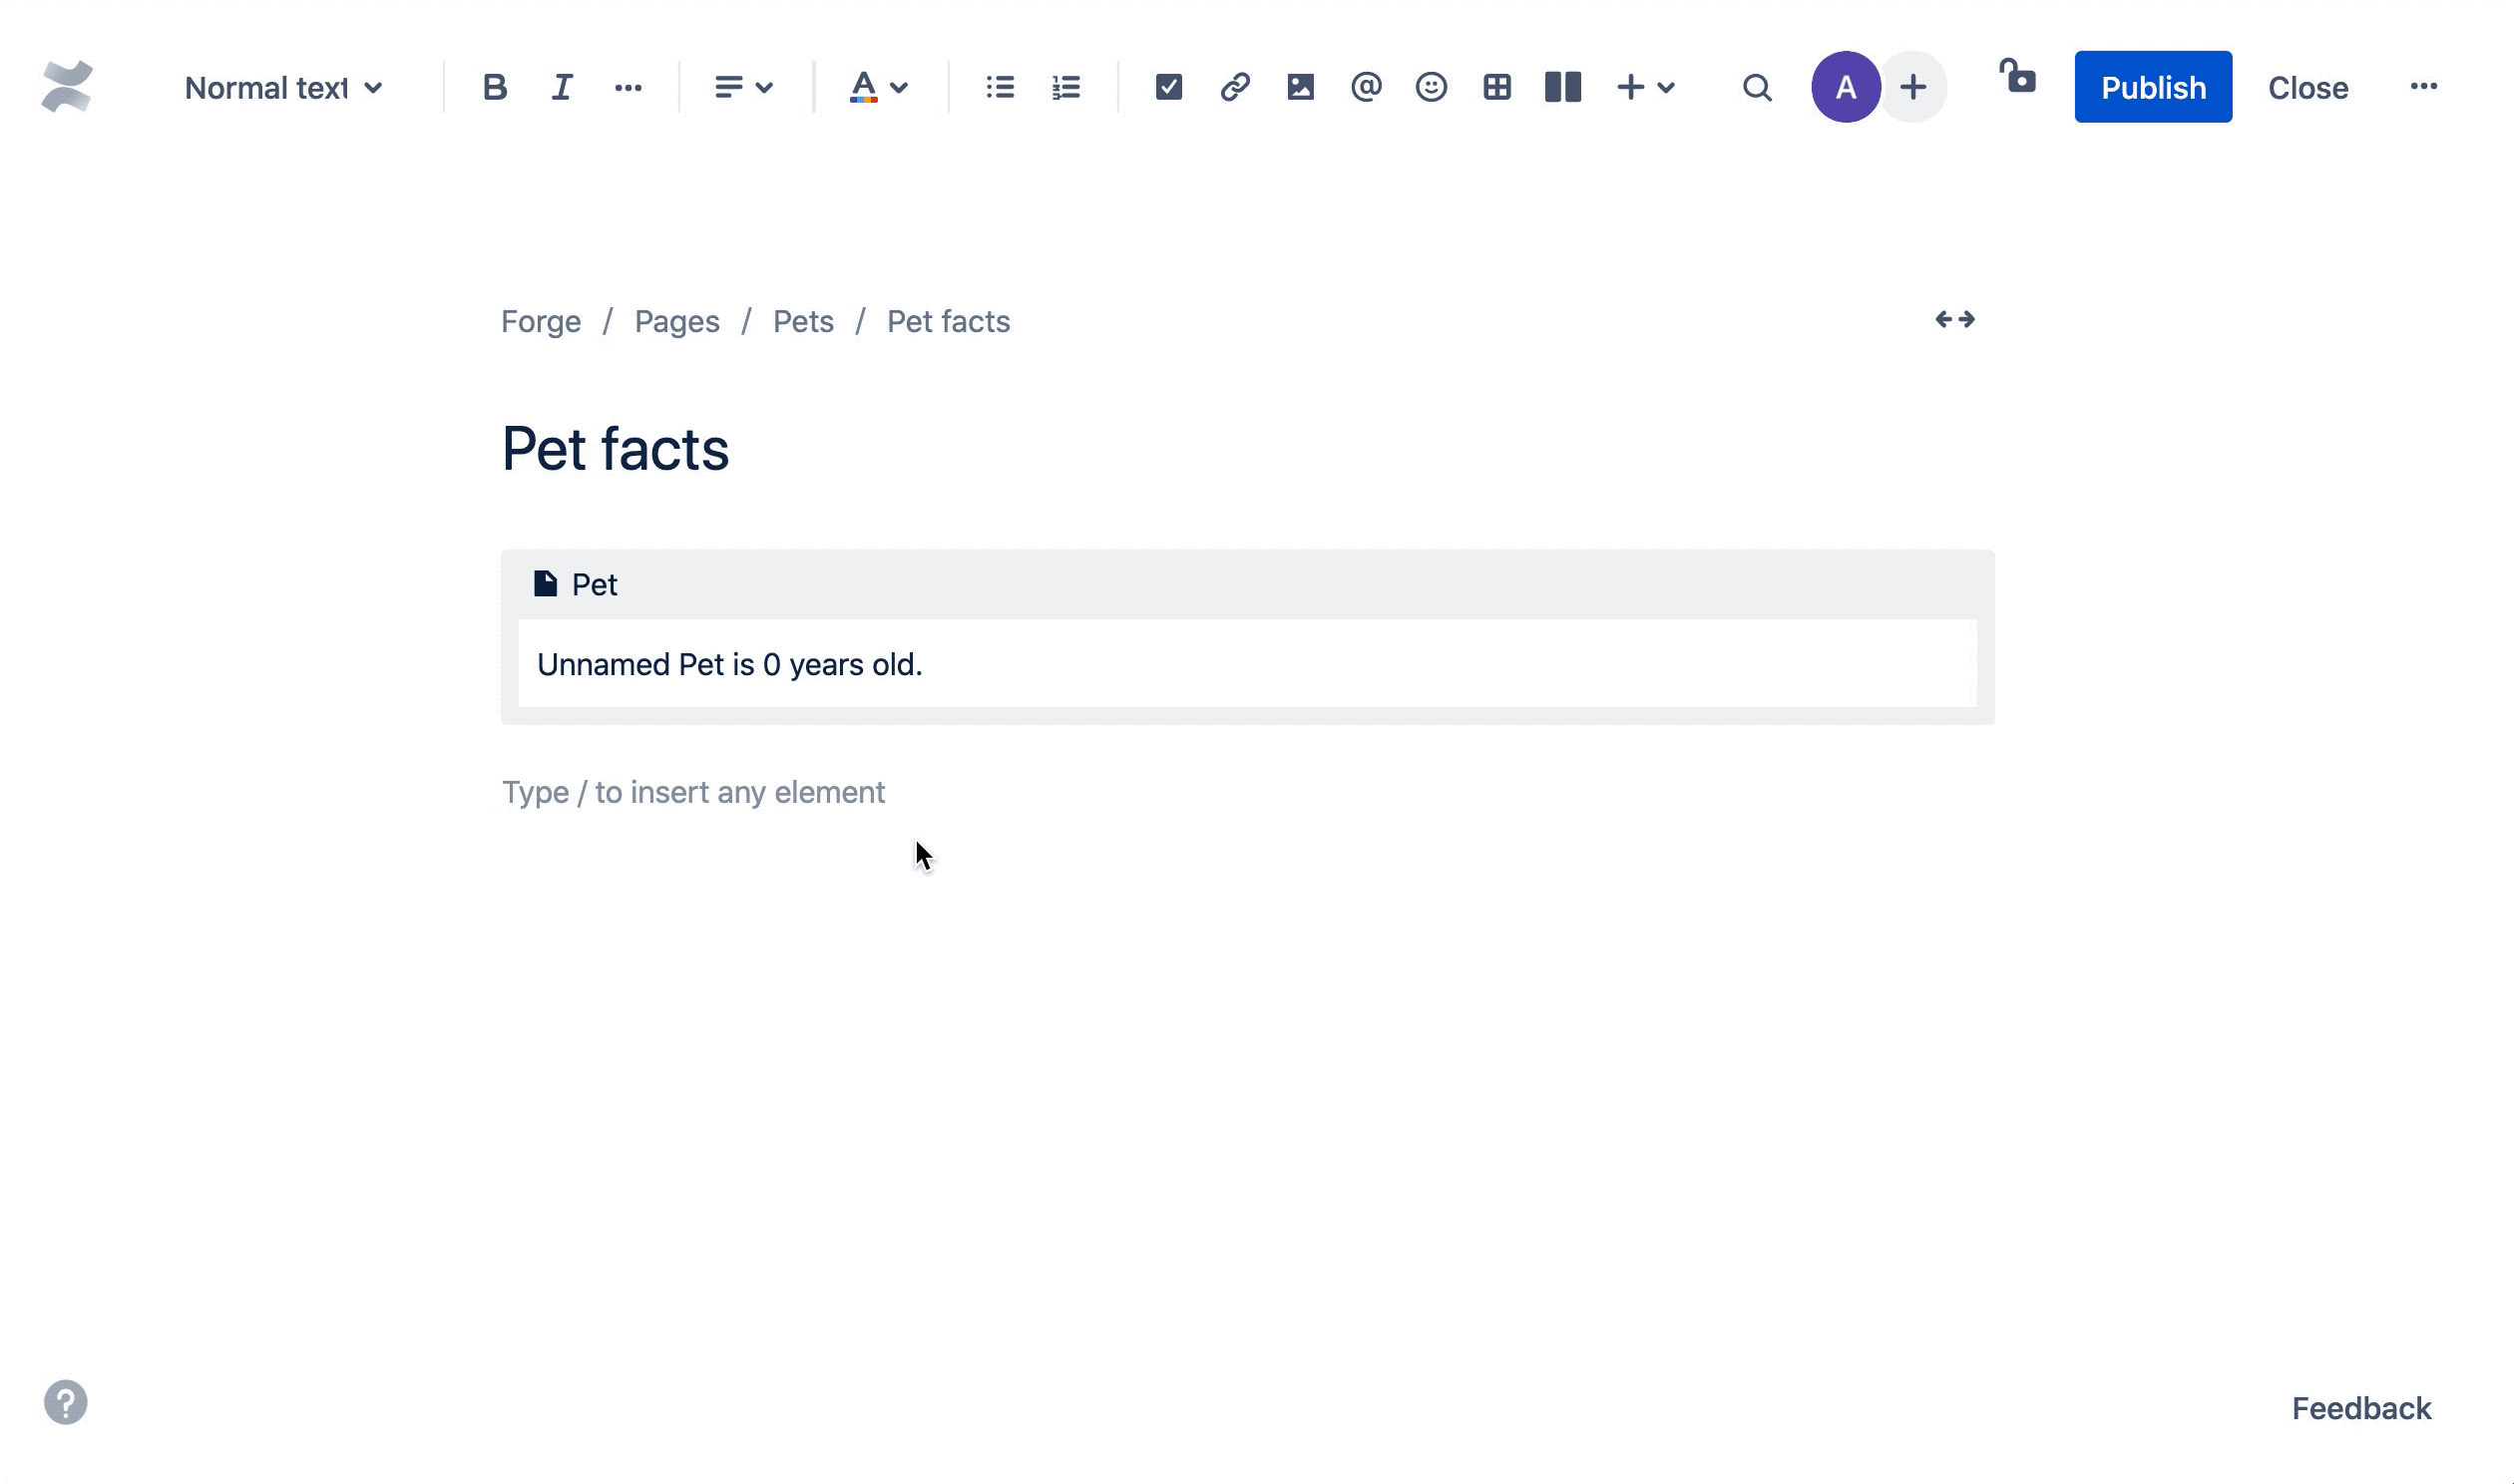
Add default pet configuration
In this example, by default, the macro displays Unnamed Pet is 0 years old.
Create a default configuration for the pet's name and age, and then
add defaultConfig variable as a fallback in case config is not set.
In your src/frontend/index.jsx file outside the Config and App components, add:
1
2const defaultConfig = {
  name: "Unnamed Pet",
  age: "0",
};
Then replace the const config inside the App component with the following:
1
2const actualConfig = useConfig();
const config = actualConfig || defaultConfig;
Add dynamic input values for the pet's name and age.
Now that we have created configurations (name and age) for your macro, we can now enhance
this feature to include dynamic input for the pet's name and age.
For example, if a user submits the name Fluffy and age 2, the macro displays Fluffy is 2 years old.
In your index.jsx file:
Add function that defines the config UI for the pet's name and age
1
2const Config = () => {
  return (
    <>
      <Label>Pet name</Label>
      <Textfield name="name" defaultValue={defaultConfig.name} />
      <Label>Pet age</Label>
      <Textfield name="age" defaultValue={defaultConfig.age} />
    </>
  );
};
Display the pet's name and age using the configuration values
In the return statement of the App component, replace everything with:
1
2return (
  <Text>
    {config.name} is {config.age} years old.
  </Text>
);
Your main file containing the application's root component (here index.jsx) should look like this:
1
2import React from "react";
import ForgeReconciler, {
  Label,
  Textfield,
  Text,
  useConfig,
  SectionMessage,
} from "@forge/react";

const defaultConfig = {
  name: "Unnamed Pet",
  age: "0",
};

// Function that defines the configuration UI for the pet's name and age
const Config = () => {
  return (
    <>
      <Label>Pet name</Label>
      <Textfield name="name" defaultValue={defaultConfig.name} />
      <Label>Pet age</Label>
      <Textfield name="age" defaultValue={defaultConfig.age} />
    </>
  );
};

const App = () => {
  const actualConfig = useConfig();
  const config = actualConfig || defaultConfig;
  return (
    <>
      <Text>
        {config.name} is {config.age} years old.
      </Text>
      {!actualConfig && (
        <SectionMessage
          title="You need to configure this macro"
          appearance="warning"
        >
          <Text>
            While editing the page, select the macro, and click on the pencil icon
            to display configuration options.
          </Text>
        </SectionMessage>
      )}
    </>
  );
};

// Adding the Config function to the ForgeReconciler to allow for configuration changes
ForgeReconciler.render(
  <React.StrictMode>
    <App />
  </React.StrictMode>
);

ForgeReconciler.addConfig(<Config />);
Install your app
If you haven't done so already, make sure you have installed the latest version of UI Kit
before you begin deploying your app. Navigate to the top-level directory of the app
and run npm install @forge/react@latest --save on the command line.
Build, deploy, and install the app to see it in your Confluence site.
To use your app, it must be installed onto an Atlassian site. The
forge deploy command builds, compiles, and deploys your code; it'll also report any compilation errors.
The forge install command then installs the deployed app onto an Atlassian site with the
required API access.
You must run the forge deploy command before forge install because an installation
links your deployed app to an Atlassian site.
-
Navigate to the app's top-level directory and deploy your app by running:
1 2
forge deploy -
Install your app by running:
1 2
forge install -
Select your Atlassian context using the arrow keys and press the enter key.
-
Enter the URL for your development site. For example, example.atlassian.net. View a list of your active sites at Atlassian administration.
Once the successful installation message appears, your app is installed and ready
to use on the specified site.
You can always delete your app from the site by running the forge uninstall command.
View your app
- Edit a Confluence page in your development site.
- Select
 from the toolbar.
 - Find the macro by name and select it. The app is displayed on the page.
- Click the pencil icon to open the app's config panel on the right side of the page.
- Type the
Pet age,Pet name, and then close the configuration page. The config values are saved automatically.
You should now see the config values displayed within the app.
Rate this page: