Part 3: Change the front end with UI Kit
This section describes how to use tools in UI Kit, including UI Kit components.
You'll use these components to build dynamic and interactive interfaces for your app's front end. When your app is complete, you'll learn how to continue monitoring the Forge environment using the forge logs command.
This is part 3 of 3 in this tutorial. Complete Part 2: Call a Confluence API before working on this page.
Modify the user interface
The hello world app contains a Text component that displays 'Hello world!' on a Confluence page. In the UI kit,
this is represented by <Text>Hello world!</Text>.
When using multiple UI Kit components, you must wrap them in a fragment (<>) block because a function
can only return one top-level component. In the example below <> acts as a wrapper for
the other UI Kit components.
You’ll add a new component to display the number of comments on a page.
-
Start the tunnel by running:
1 2
forge tunnel -
Navigate to the
src/frontenddirectory and open theindex.jsxfile. -
Inside the
<>tag, add the following before the firstTextcomponent:1 2
<Text> Number of comments on this page: {comments?.length} </Text> -
Refresh the Confluence page that contains your app.
Your index.jsx file should look like the following:
1
2import React from 'react';
import ForgeReconciler, { Text, useProductContext } from '@forge/react';
import { requestConfluence } from '@forge/bridge';

const fetchCommentsForPage = async (pageId) => {
  const res = await requestConfluence(`/wiki/api/v2/pages/${pageId}/footer-comments`);
  const data = await res.json();
  return data.results;
};

const App = () => {
  const context = useProductContext();

  // add these code to keep track of comments
  const [comments, setComments] = React.useState();
  console.log(`Number of comments on this page: ${comments?.length}`);

  React.useEffect(() => {
    if (context) {
      // extract page ID from the context
      const pageId = context.extension.content.id;

      fetchCommentsForPage(pageId).then(setComments);
    }
  }, [context]);

  return (
    <>
      <Text>
        Number of comments on this page: {comments?.length}
      </Text>
      <Text>Hello world!</Text>
    </>
  );
};

ForgeReconciler.render(
  <React.StrictMode>
    <App />
  </React.StrictMode>
);
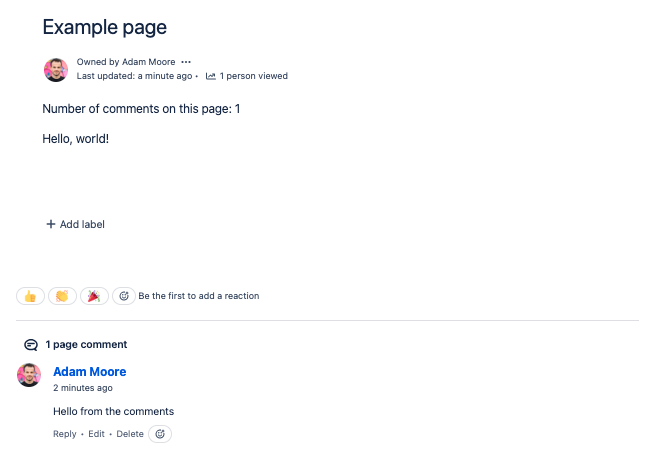
Your app should display the number of comments on the page. You can add more top-level comments to the page and refresh the page to see your app update. Your page should look like the following:
Specify the export view
When a Confluence page is exported to PDF or Word, or viewed in the page history, you can specify how
the app should be displayed. This is done by defining an adfExport function and referencing it in
your app's manifest.yml file.
The function returns a representation of the macro in Atlassian document format (ADF).
- In your app's
srcdirectory (alongsideindex.js), create a new file calledmacroExport.js, and open it. - To include the number of comments in the export view, fetch the comments on the page with the @forge/api package. The Confluence macro template already includes
@forge/api, so you only need to install@atlaskit/adf-utilsto build ADF. Run the following command from your app's top-level directory:1 2
npm install @atlaskit/adf-utils - Now, add the following to the top of your
macroExport.jsfile:1 2
import api, { route } from '@forge/api'; import { doc, p } from '@atlaskit/adf-utils/builders'; - Next call the Confluence REST API to fetch the comments. Add the following function to the file:
1 2
const fetchComments = async (pageId) => { const res = await api .asApp() .requestConfluence(route`/wiki/api/v2/pages/${pageId}/footer-comments`); const data = await res.json(); return data.results; }; - Now specify the actual export function, which returns Atlassian document format (ADF).
Here you can use the adf-utils package to create the ADF. Add the following function to the file:
Notice that the function is consuming the1 2
export const exportFunction = async (payload) => { const pageId = payload.context.extension.content.id; const comments = (await fetchComments(pageId)) ?? []; return doc( p(`Number of comments on this page: ${comments.length}`), p(`Hello world! This is an export of type ${payload.exportType}.`) ); }exportTypefrom thepayloadobject. The validexportTypevalues arepdf,word, andother.
Your complete src/macroExport.js file should look like the following:
1 2import api, { route } from '@forge/api'; import { doc, p } from '@atlaskit/adf-utils/builders'; const fetchComments = async (pageId) => { const res = await api .asApp() .requestConfluence( route`/wiki/api/v2/pages/${pageId}/footer-comments`); const data = await res.json(); return data.results; }; export const exportFunction = async (payload) => { const pageId = payload.context.extension.content.id; const comments = (await fetchComments(pageId)) ?? []; return doc( p(`Number of comments on this page: ${comments.length}`), p(`Hello world! This is an export of type ${payload.exportType}.`) ); };
Reference the export function in the manifest
- In the app's top-level directory, open the
manifest.ymlfile. - Under the
macromodule, add theadfExportproperty:1 2
adfExport: function: export-key - Under the
functionlist, add a new entry for the export function:1 2
- key: export-key handler: macroExport.exportFunction
Your complete manifest.yml should look like the following:
1
2modules:
  macro:
    - key: hello-world-app-hello-world-macro
      resource: main
      render: native
      resolver:
        function: resolver
      title: hello-world-app
      adfExport:
        function: export-key
  function:
    - key: resolver
      handler: index.handler
    - key: export-key
      handler: macroExport.exportFunction
resources:
  - key: main
    path: src/frontend/index.jsx
app:
  runtime:
    name: nodejs24.x
    memoryMB: 256
    architecture: arm64
  id: '<your app id>'
permissions:
  scopes:
    - read:comment:confluence
Once deployed, your macro content is included when you export the Confluence page to PDF or Word, or view it in the page history.
Close the tunnel and deploy the app
After confirming the app works locally, deploy the app so that it continues to work when you close the tunnel.
-
Close your tunnel by pressing Ctrl+C.
-
Deploy your app by running:
1 2
forge deploy -
Refresh the page where your app is installed.
View your app in the developer console
Once your app is deployed, it will appear in the developer console. From the console, you can manage and distribute your apps. You can also see how your app is performing, view your app logs and installations, and manage app alerts.
Get a Developer Community badge
Share a screenshot of your App on the Atlassian Developer Community - Hello Confluence Thread to earn a Badge
Next steps
You now know enough to develop your own Forge apps. Learn more from our tutorials, guides, example apps or reference pages.
- Continue learning with Forge Quest
- Create a GIPHY app using the UI kit creates a more complex front end with the UI kit.
- Promote an app to staging or production makes your app ready for your users.
- Learn how to build a Custom UI app in Confluence.
- See the reference pages to learn what else you can do with what you’ve learned.

Rate this page: