Build a feedback integration app
This tutorial will walk you through how to create an app that has an external system to submit and retrieve feedback in Jira.
Before you begin
This tutorial assumes you're already familiar with the basics of Forge development and have set up your environment for Forge app development. If this is your first time using Forge, see Getting started with Forge first.
Step 1: Create your app
The first step involves creating a Forge app from a template that provides similar functionality to that needed. In this case, we are going to use the web trigger template since web triggers will allow the app to accept requests from external systems.
-
Navigate to the directory where you want to create the app. A new subdirectory with the app’s name will be created there.
-
Create your app by running:
1 2
forge create -
When prompted, enter the name of the app. For example, FeedbackIntegration.
-
Select Show All as the Atlassian app or platform tool because the web trigger template does not relate to a specific Atlassian app or tool.
-
Select Triggers and Validator category.
-
Select webtrigger template.
-
Verify you see output similar to the following:
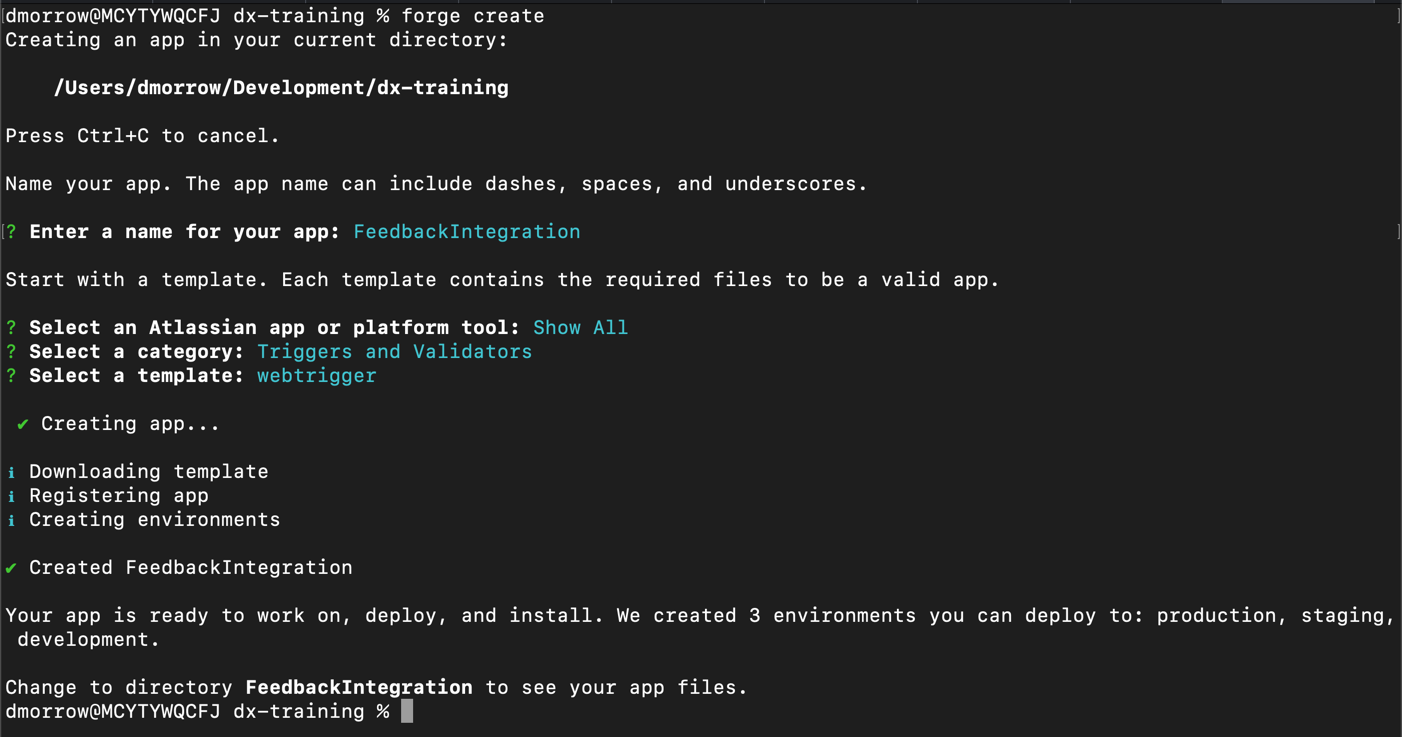
This will have created a directory named FeedbackIntegration and files within it that is the initial version of your app.
Step 2: Update the manifest and index file
Next, you’ll need to update your app’s manifest.yml and update the index.js file.
- Open your integrated development environment (IDE) such as Visual Studio Code at the app’s root directory. The web trigger template contains two web triggers. One web trigger will call a synchronous JavaScript function and the other will call an asynchronous JavaScript function. Our app only needs one web trigger and it needs to be asynchronous because it will invoke the Jira API and retrieve the response asynchronously.
- Delete the following lines from your
manifest.yml:1 2
- key: feedbackintegration-webtrigger-sync function: sync response: type: dynamic - Delete the related function with the key sync from your
manifest.yml:1 2
- key: sync handler: index.runSync4 - Verify your
manifest.ymlnow looks as follows:1 2
modules: webtrigger: - key: feedbackintegration-webtrigger-async function: async response: type: dynamic function: - key: async handler: index.runAsync app: runtime: name: nodejs24.x memoryMB: 256 architecture: arm64 id: ari:cloud:ecosystem::app/your-app-id5 - Change the name of the
webtriggerfunction toonCreateFeedbackso that it relates to our feedback functionality.1 2
modules: webtrigger: - key: feedbackintegration-webtrigger-async function: async response: type: dynamic function: - key: async handler: index.onCreateFeedback app: runtime: name: nodejs24.x memoryMB: 256 architecture: arm64 id: ari:cloud:ecosystem::app/your-app-id5 - Open the file
src/index.jsand rename the runAsync function toonCreateFeedback. - Delete the runSync function in the JavaScript file
src/index.js. - Verify your JavaScript file
src/index.jsnow looks as follows:1 2
/** * @returns {import('@forge/api').WebTriggerResponse} */ const buildOutput = (rnd) => ({ body: '{"hello": "world"}', headers: { 'Content-Type': ['application/json'], 'X-Request-Id': [`rnd-${rnd}`] }, statusCode: 200, statusText: 'OK' }); /** * @param {import('@forge/api').WebTriggerRequest} event * @param {import('@forge/api').WebTriggerContext} context * @returns {Promise<import('@forge/api').WebTriggerResponse>} */ exports.onCreateFeedback = (event, context) => { return new Promise((resolve) => { setTimeout(() => { const result = buildOutput(Math.random()); resolve(result); }, 1000); }); };
Step 3: Deploy and install your app
-
Navigate to the app's top-level directory and deploy your app by running:
1 2
forge deploy -
Install your app by running:
1 2
forge install -
Select Jira as the Atlassian app to install the app in.
If you don't have a test site, create a free development site by visiting https://go.atlassian.com/cloud-dev.
-
Determine the URL of your web trigger by running:
1 2
forge webtrigger create -
Select your site in the CLI. The
feedbackintegration-webtrigger-asyncweb trigger will also be selected since only one exists. -
Confirm the selection by pressing the return key.
-
Confirm you see the URL of your web trigger displayed in a message similar to the following:
1 2
Copy your web trigger URL below to start using it: https://123456-0441-46ab-a647-440e9b6db295.hello.atlassian-dev.net/x1/123456-7ztMKudBQPrIng9GwA -
Copy your web trigger URL and input to it in your browser.
-
Verify your browser displays
{"hello": "world"}.
Step 4: Secure the web trigger
You need a form of authentication on the web trigger to avoid it being used maliciously. For this exercise, we will use an API key approach where the required API key value is SECRET_KEY, but production implementations will change this to a secure value. We will require the API key to be sent in an Authorization header where the header value will be Basic SECRET_KEY. We also want to only support POST requests since the web trigger will be creating Jira work items.
- Update
src/index.jsto the following:1 2
/** * @param {import('@forge/api').WebTriggerRequest} request * @param {import('@forge/api').WebTriggerContext} context * @returns {Promise<import('@forge/api').WebTriggerResponse>} */ export const onCreateFeedback = async (request, context) => { console.log('Received request:', JSON.stringify(request, null, 2)); console.log('Context:', JSON.stringify(context, null, 2)); const authorizationHeader = request.headers['authorization']; if (authorizationHeader && authorizationHeader[0] === 'Basic SECRET_KEY') { if (request.method !== 'POST') { return buildMethodNotAllowedOutput(Math.random()); } const result = buildOutput(Math.random()); return result; } else { console.warn('Unauthorized access attempt with header:', authorizationHeader); return buildUnauthorzesOutput(Math.random()); } }; /** * @returns {import('@forge/api').WebTriggerResponse} */ const buildOutput = (rnd) => ({ body: '{"hello": "world"}', headers: { 'Content-Type': ['application/json'], 'X-Request-Id': [`rnd-${rnd}`] }, statusCode: 200, statusText: 'OK' }); const buildUnauthorzesOutput = (rnd) => ({ body: '{"error": "Unauthorized"}', headers: { 'Content-Type': ['application/json'], 'X-Request-Id': [`rnd-${rnd}`] }, statusCode: 401, statusText: 'Unauthorized' }); const buildMethodNotAllowedOutput = (rnd) => ({ body: '{"error": "Method Not Allowed"}', headers: { 'Content-Type': ['application/json'], 'X-Request-Id': [`rnd-${rnd}`] }, statusCode: 405, statusText: 'Method Not Allowed' }); - Run the tunnel using:
1 2
forge tunnel - Test the code by running the command:
1 2
curl -X POST --header "Authorization: Basic SECRET_KEY" https://your-webtrigger-url - Verify your browser displays
{"hello": "world"}. - Test the code rejects invalid API keys by running the command:
1 2
curl -X POST --header "Authorization: Basic INVALID_KEY" https://your-webtrigger-url - Verify your browser displays
{"error": "Unauthorized"}.
Step 5: Create Jira work items from feedback requests
Next, update the web trigger code to call the Jira API and create a new work item for the submitted feedback.
The following steps include multiple code edits. The final app code is listed after all of these steps.
-
Create a new space (formerly known as project) in your Jira development site, where your feedback work items will be created.
-
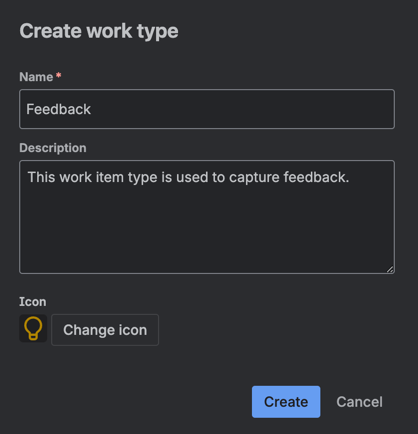
Add a new work type to the Jira space that will be used to represent feedback.
-
Record the Jira space identifier and key by visiting
https://your-site.atlassian.net/rest/api/3/projectand finding the feedback project. This will allow you to capture the details on the Jira space and work item type that was created.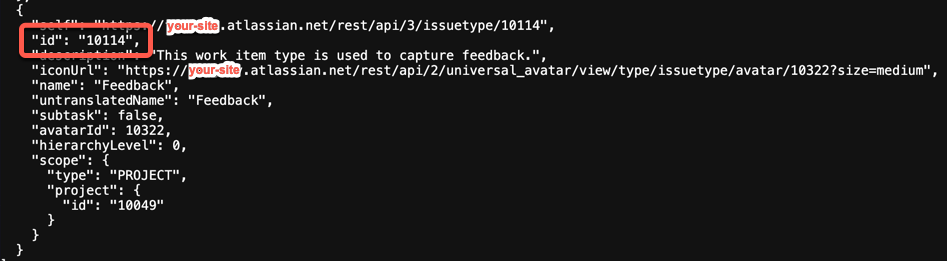
-
Use the Jira space identifier to find the identifier of the feedback work item type by visiting:
https://your-site.atlassian.net/rest/api/3/issuetype/project?projectId=your-work-item-type-id.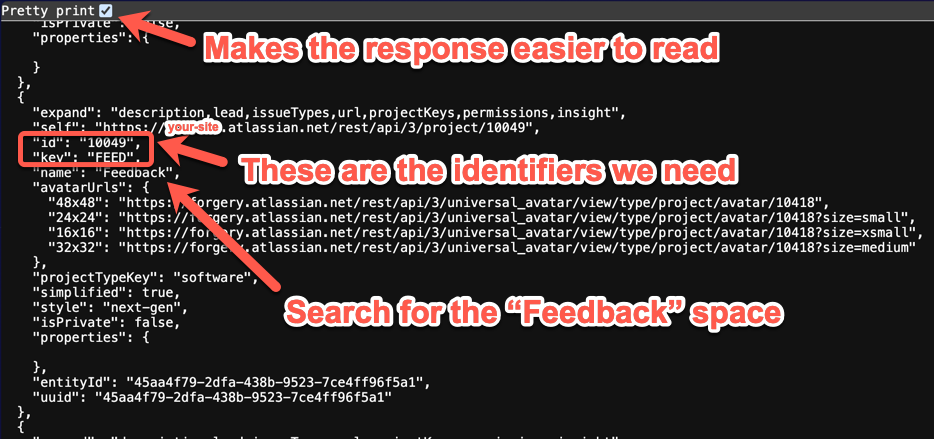
-
Add three constants at the top of
src/index.jsfor the identifiers retrieved in the previous steps:1 2
const feedbackSpaceKey = 'FEED'; // Make sure you use your space key here const feedbackSpaceId = '10049'; // Make sure you use your identifier value here const feedbackWorkItemTypeId = '10114'; // Make sure you use your identifier value here -
Declare the required permission in the app’s
manifest.ymlfile. The create issue API documentation indicates the scope required iswrite:jira-work:1 2
permissions: scopes: - write:jira-workMost apps use classic scopes rather than granular scopes.
-
Update your feedback handler to extract feedback details from the request and create a Jira work item using the Jira API. First, add the following function to
src/index.jsto build an object in the Atlassian Document Format, which is required by the Jira API:1 2
const buildAdf = (paragraphText) => { const adf = { content: [ { content: [ { type: "text", text: paragraphText, } ], type: "paragraph" } ], type: "doc", version: 1 }; return adf; } -
Ensure that submissions to the feedback web trigger include the following fields:
- summary (string)
- details (string)
- rating (number from 0 to 5, where 5 is excellent and 0 is poor)
Create a function named
createFeedbackWorkItemto extract these fields from the request:1 2
const createFeedbackWorkItem = async (request) => { const summary = requestBody.summary; const details = requestBody.details; const ratingString = requestBody.rating; const rating = ratingString ? parseInt(ratingString) : -1; console.log(`summary: ${summary}`); console.log(`details: ${details}`); console.log(`rating: ${rating}`); } -
Call the
createFeedbackWorkItemfunction from within theonCreateFeedbackfunction. Add this invocation immediately after verifying that the web trigger was invoked as a POST request:1 2
if (request.method !== 'POST') { return buildMethodNotAllowedOutput(Math.random()); } await createFeedbackWorkItem(request); -
Add code to invoke the Jira API and create the feedback work item. Go to the the Jira Cloud platform REST API, select the Forge code snippet tab, and copy the example code. Edit the code as needed for your use case. For more information, see the the Jira Cloud platform REST API.
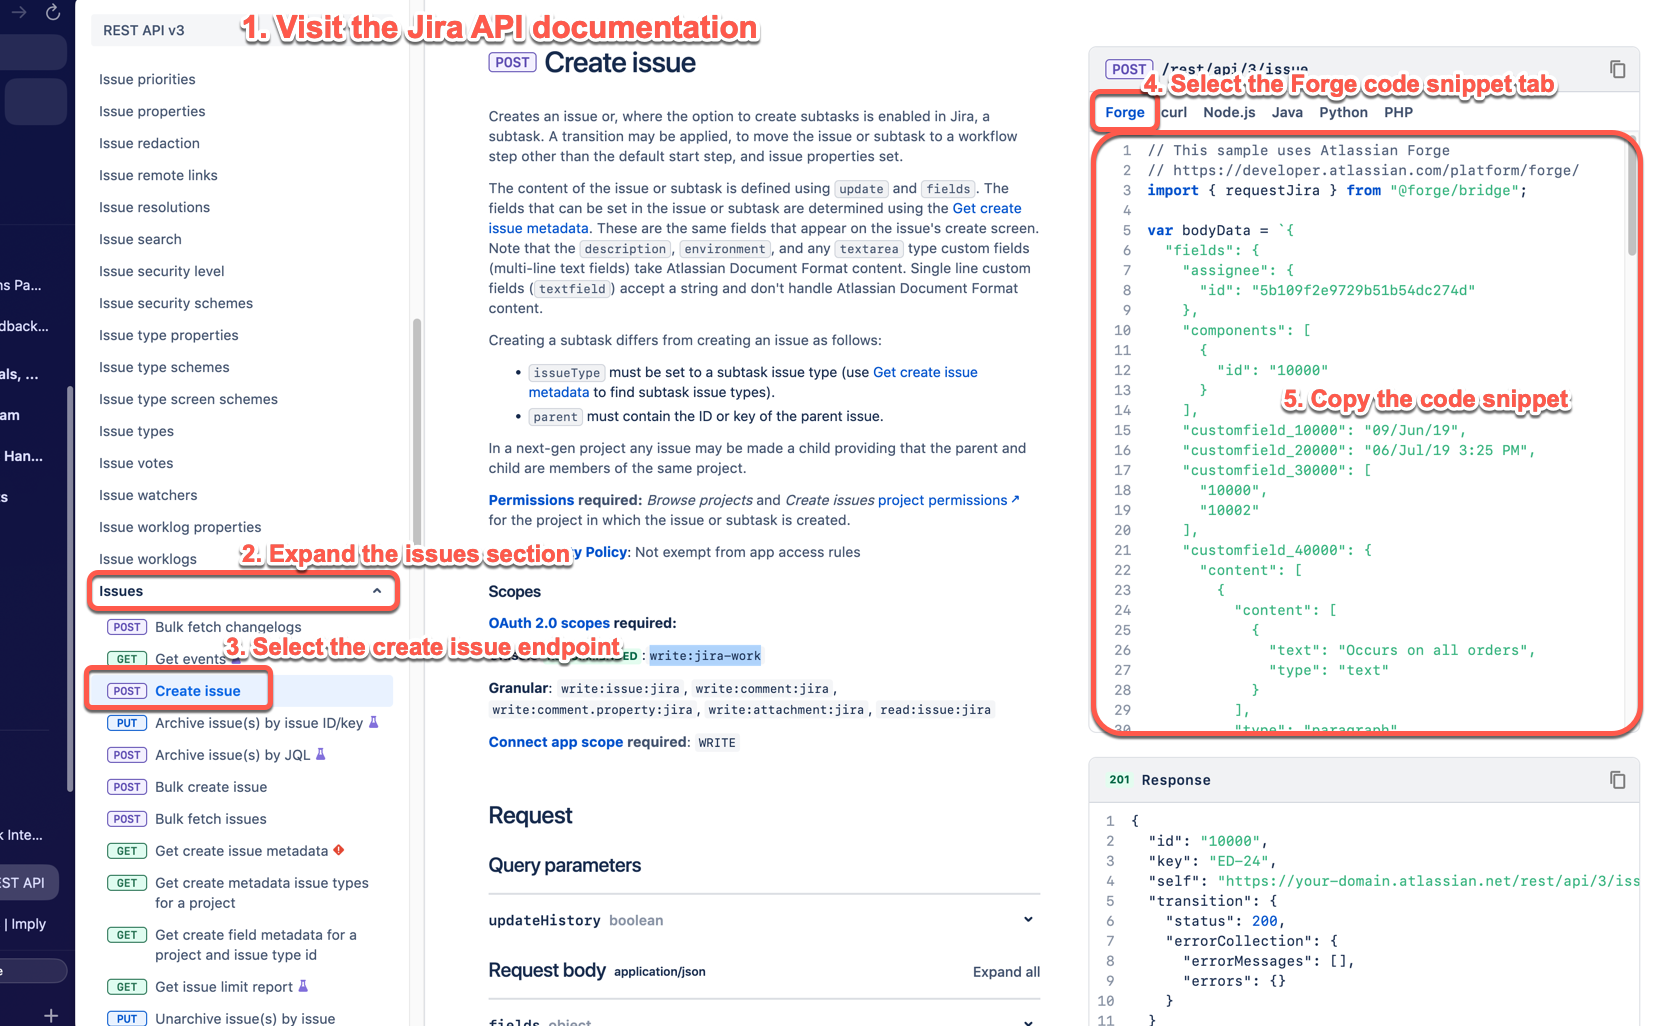
If you haven’t copied the code snippet yet, the following steps will provide detailed instructions for the required edits.
-
Start by adding a new function named
buildCreateIssueBodyData:1 2
const buildCreateIssueBodyData = (summary, details, rating) => { // Note: the rating parameter is currently being ignored const bodyData = { fields: { project: { key: feedbackSpaceKey, }, summary: summary, description: buildAdf(details ? details : "(no details provided)"), issuetype: { id: feedbackWorkItemTypeId, }, }, } console.log(`feedback.buildCreateIssueBodyData: Issue creation bodyData: ${JSON.stringify(bodyData, null, 2)}`); return bodyData; } -
Update the
createFeedbackWorkItemfunction to call thebuildCreateIssueBodyDatafunction to build the payload, then invoke the Jira API:1 2
const createFeedbackWorkItem = async (request) => { let feedbackCreationResult = {status: 500, message: ''}; try { const requestBodyText = request.body; const requestBody = requestBodyText ? JSON.parse(requestBodyText) : {}; const summary = requestBody.summary; const details = requestBody.details; const ratingString = requestBody.rating; const rating = ratingString ? parseInt(ratingString) : -1; console.log(`summary: "${summary}"`); console.log(`details: "${details}"`); console.log(`rating: ${rating}`); if (summary) { const bodyData = buildCreateIssueBodyData(summary, details, rating); // We invoke the API using the `asApp`. This means the request is made on behalf of the // app rather than a particular user. const response = await api.asApp().requestJira(route`/rest/api/3/issue`, { method: 'POST', body: JSON.stringify(bodyData), headers: { 'Content-Type': 'application/json', }, }); if (response.ok) { feedbackCreationResult = {status: response.status, message: 'Feedback created successfully'}; } else { const errorText = await response.text(); feedbackCreationResult = {status: response.status, message: `Failed to create feedback: ${errorText}`}; } } else { feedbackCreationResult = {status: 400, message: 'Summary is required for feedback submission.'}; } } catch (error) { feedbackCreationResult = {status: 400, message: `Error handling feedback page request: ${error.message}`}; } return feedbackCreationResult; } -
This code introduces a dependency on a Forge JavaScript package called
@forge/api. Add the@forge/apipackage to your project by running:1 2
npm install @forge/api --save -
Import the required dependencies from
@forge/apiat the top of your file:1 2
import api, { route } from '@forge/api'; -
Update the
buildOutputfunction to return the work item creation result to thewebtriggercaller:1 2
const buildOutput = (feedbackCreationResult, rnd) => ({ body: `{"message": "${feedbackCreationResult.message}"}`, headers: { 'Content-Type': ['application/json'], 'X-Request-Id': [`rnd-${rnd}`] }, statusCode: feedbackCreationResult.status, statusText: feedbackCreationResult.message }); -
Update the
onCreateFeedbackfunction to use the updatedbuildOutputfunction:1 2
const feedbackCreationResult = await createFeedbackWorkItem(request); const result = buildOutput(feedbackCreationResult, Math.random());
If you need to verify your implementation, your src/index.js file should now look like this file.
1 2import api, { route } from '@forge/api'; const feedbackSpaceKey = 'FEED'; // Make sure you use your space key here const feedbackSpaceId = '10049'; // Make sure you use your identifier value here const feedbackWorkItemTypeId = '10114'; // Make sure you use your identifier value here /** * @param {import('@forge/api').WebTriggerRequest} request * @param {import('@forge/api').WebTriggerContext} context * @returns {Promise<import('@forge/api').WebTriggerResponse>} */ export const onCreateFeedback = async (request, context) => { console.log('Received request:', JSON.stringify(request, null, 2)); console.log('Context:', JSON.stringify(context, null, 2)); const authorizationHeader = request.headers['authorization']; if (authorizationHeader && authorizationHeader[0] === 'Basic SECRET_KEY') { if (request.method !== 'POST') { return buildMethodNotAllowedOutput(Math.random()); } const feedbackCreationResult = await createFeedbackWorkItem(request); const result = buildOutput(feedbackCreationResult, Math.random()); return result; } else { console.warn('Unauthorized access attempt with header:', authorizationHeader); return buildUnauthorzesOutput(Math.random()); } }; const createFeedbackWorkItem = async (request) => { let feedbackCreationResult = {status: 500, message: ''}; try { const requestBodyText = request.body; const requestBody = requestBodyText ? JSON.parse(requestBodyText) : {}; const summary = requestBody.summary; const details = requestBody.details; const ratingString = requestBody.rating; const rating = ratingString ? parseInt(ratingString) : -1; console.log(`summary: "${summary}"`); console.log(`details: "${details}"`); console.log(`rating: ${rating}`); if (summary) { const bodyData = buildCreateIssueBodyData(summary, details, rating); // We invoke the API using the `asApp`. This means the request is made on behalf of the // app rather than a particular user. const response = await api.asApp().requestJira(route`/rest/api/3/issue`, { method: 'POST', body: JSON.stringify(bodyData), headers: { 'Content-Type': 'application/json', }, }); if (response.ok) { feedbackCreationResult = {status: response.status, message: 'Feedback created successfully'}; } else { const errorText = await response.text(); feedbackCreationResult = {status: response.status, message: `Failed to create feedback: ${errorText}`}; } } else { feedbackCreationResult = {status: 400, message: 'Summary is required for feedback submission.'}; } } catch (error) { feedbackCreationResult = {status: 400, message: `Error handling feedback page request: ${error.message}`}; } return feedbackCreationResult; } const buildCreateIssueBodyData = (summary, details, rating) => { // Note: the rating parameter is currently being ignored const bodyData = { fields: { project: { key: feedbackSpaceKey, }, summary: summary, description: buildAdf(details ? details : "(no details provided)"), // [ratingCustomFieldId]: rating ? rating : -1, issuetype: { id: feedbackWorkItemTypeId, }, }, } console.log(`feedback.buildCreateIssueBodyData: Issue creation bodyData: ${JSON.stringify(bodyData, null, 2)}`); return bodyData; } const buildAdf = (paragraphText) => { const adf = { content: [ { content: [ { type: "text", text: paragraphText, } ], type: "paragraph" } ], type: "doc", version: 1 }; return adf; } /** * @returns {import('@forge/api').WebTriggerResponse} */ const buildOutput = (feedbackCreationResult, rnd) => ({ body: `{"message": "${feedbackCreationResult.message}"}`, headers: { 'Content-Type': ['application/json'], 'X-Request-Id': [`rnd-${rnd}`] }, statusCode: feedbackCreationResult.status, statusText: feedbackCreationResult.message }); const buildUnauthorzesOutput = (rnd) => ({ body: '{"error": "Unauthorized"}', headers: { 'Content-Type': ['application/json'], 'X-Request-Id': [`rnd-${rnd}`] }, statusCode: 401, statusText: 'Unauthorized' }); const buildMethodNotAllowedOutput = (rnd) => ({ body: '{"error": "Method Not Allowed"}', headers: { 'Content-Type': ['application/json'], 'X-Request-Id': [`rnd-${rnd}`] }, statusCode: 405, statusText: 'Method Not Allowed' });
Step 6: Test your app
-
Deploy the updated app code:
1 2
forge deploy -
After deploying, upgrade the app installation to apply the new
write:jira-workpermission. Run:1 2
forge install --upgrade -
Follow the prompts to complete the upgrade.
-
Test the web trigger by sending a
POSTrequest without a summary field:1 2
curl -X POST --header "Authorization: Basic SECRET_KEY" https://your-webtrigger-urlThe response should be:
1 2
{"message": "Summary is required for feedback submission."} -
Test the web trigger with a summary field:
1 2
curl -X POST --header "Authorization: Basic SECRET_KEY" -d '{"summary":"My feedback"}' https://your-webtrigger-urlThe response should be:
1 2
{"message": "Feedback created successfully"} -
In Jira, verify that the new feedback work item has been created in your feedback space.
At this point, you would have built a Forge app that enables your web application to submit feedback to Jira by making a simple REST API call to the app’s web trigger.

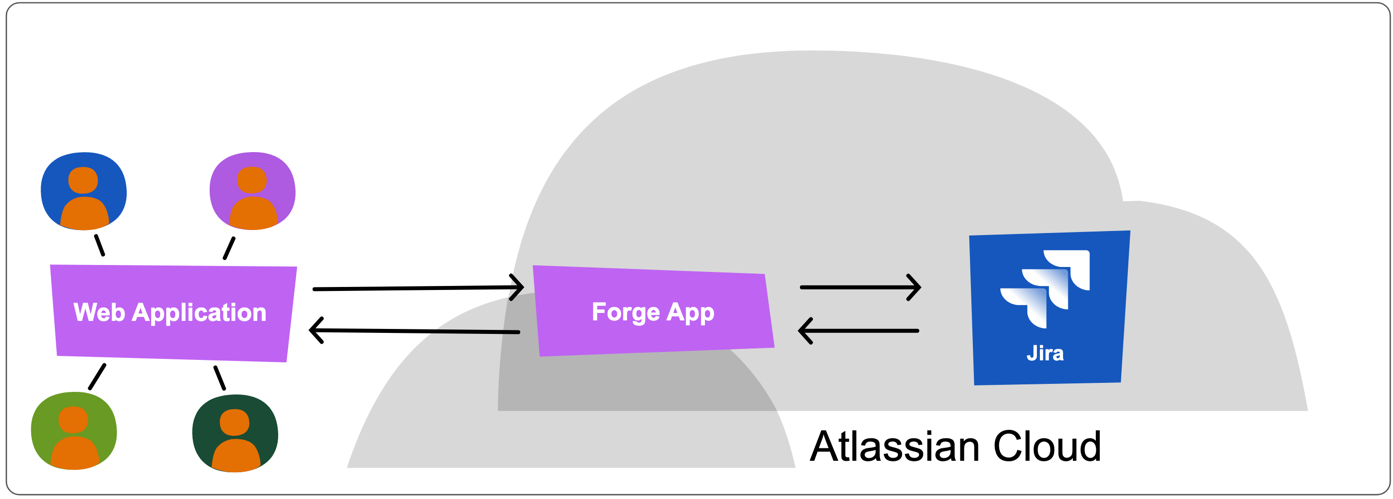
While your web application could call the Jira REST API directly, this would require using OAuth 2.0 (which is more complex) or personal access tokens (which attribute all actions to a single user). Using a Forge app provides more flexibility and allows you to extend functionality, such as adding user interfaces to view or manage feedback.
Send the work item feedback changes to the web application
Enhance your Forge app to notify your web application when feedback work items are created, updated, or deleted in Jira. This will require adding a trigger module to the manifest.yml and listening to certain Jira events.
-
Create a new file
src/eventHandler.jsand add the following function:1 2
export const onIssueMutationEvent = async (event, context) => { console.log('Received event:', JSON.stringify(event, null, 2)); console.log('Context:', JSON.stringify(context, null, 2)); } -
Add a trigger module to the
modulessection of yourmanifest.ymlto listen for issue events:1 2
modules: trigger: - key: issue-mutation-trigger function: issue-mutation-fn events: - avi:jira:created:issue - avi:jira:updated:issue - avi:jira:deleted:issueRead the Jira events to view all available events.
-
Add the function definition to your
manifest.yml:1 2
function: - key: issue-mutation-fn handler: eventHandler.onIssueMutationEvent5 -
Since the app is receiving work item data in the issue events, the app needs the
read:jira-workscope. Add theread:jira-workscope to yourmanifest.yml:1 2
permissions: scopes: - read:jira-work -
Your
manifest.ymlshould now look like this:1 2
modules: webtrigger: - key: feedbackintegration-webtrigger-async function: async response: type: dynamic trigger: - key: issue-mutation-trigger function: issue-mutation-fn events: - avi:jira:created:issue - avi:jira:updated:issue - avi:jira:deleted:issue function: - key: async handler: index.onCreateFeedback - key: issue-mutation-fn handler: eventHandler.onIssueMutationEvent app: runtime: name: nodejs24.x memoryMB: 256 architecture: arm64 id: ari:cloud:ecosystem::app/your-app-id permissions: scopes: - read:jira-work - write:jira-work -
In
src/eventHandler.js, define the URL for your web application’s API endpoint:1 2
const webApplicationEventHandlerUrl = ''; // Replace with an endpoint URL in your web application, e.g. example.com/onWorkItemMutation -
If your web application requires an API token, set it as an encrypted environment variable:
1 2
forge variables set --encrypt WEB_APPLICATION_SECRET_TOKEN {your-value-here} -
Update
src/eventHandler.jsto invoke your web application endpoint:1 2
const webApplicationEventHandlerUrl = ''; // Replace with an endpoint URL in your web application, e.g. example.com/onWorkItemMutation export const onIssueMutationEvent = async (event, context) => { console.log('Received issue event:', JSON.stringify(event, null, 2)); console.log('Context:', JSON.stringify(context, null, 2)); const issueData = event.issue; const eventType = event.eventType; if (webApplicationEventHandlerUrl) { // Set an environment variable named "WEB_APPLICATION_SECRET_TOKEN" with the secret token value that your web application expects. This // is just an example as your web application could use a different kind of authentication scheme. See the Forge environment variable // documentation for details about setting environment variables, https://developer.atlassian.com/platform/forge/environments-and-versions/. const myWebApplicationSecretToken = process.env.WEB_APPLICATION_SECRET_TOKEN; const changeType = eventType === 'avi:jira:created:issue' ? 'created' : eventType === 'avi:jira:updated:issue' ? 'updated' : eventType === 'avi:jira:deleted:issue' ? 'deleted' : 'unknown'; const issueKey = issueData ? issueData.key : 'unknown'; console.log(`Invoking web application event handler for issue ${issueKey} that was ${changeType}.`); const bodyData = { changeType: changeType, workItem: issueData } const webApplicationResponse = await fetch(webApplicationEventHandlerUrl, { method: 'POST', body: JSON.stringify(bodyData), headers: { 'Content-Type': 'application/json', 'Authorization': `Bearer ${myWebApplicationSecretToken}` // Replace with your web application secret token }, }); if (Response.ok) { // TODO } else { const errorText = await webApplicationResponse.text(); console.error(`Failed to invoke web application event handler: ${errorText}`); } } else { console.warn('No web application endpoint configured to handle issue events.'); } } -
Deploy your app:
1 2
forge deploy -
Upgrade the installation to apply new permissions (
read:jira-work):1 2
forge install --upgrade -
Update a work item in Jira and check for a log entry starting with
Received issue eventusing:1 2
forge logs
You can also check your web application’s observability tools to verify that the event was received.
Now, the Forge app provides the ability to send work item change events to the web application as depicted by the arrows from Jira to the Forge app to the web application. This may be important if the web application needs to present user interfaces summarising or detailing the open feedback.
Next steps
The previous steps outline core integration capabilities of Forge. However, there are several ways you can further enhance your app:
-
Rating custom field: Enhance the app with the Jira custom field or Jira custom field type to add a custom field that displays the ratings provided with the feedback. You can render ratings in any way that makes sense, such as a 1 to 5 star rating scheme.
-
Feedback Rovo Agent: Use the Rovo Agent to provide a Rovo Agent that delivers custom AI capabilities related to feedback.
-
Custom views: Add views at the Jira space or work item level to present feedback in ways that highlight interesting aspects. For example, see the Jira issue panel and Jira project page modules.
-
Feedback workflow: Use workflow validator extension points to apply custom rules for validating state transitions. See the Forge Jira workflow validator (preview), Jira workflow condition (preview), and Jira workflow post function (preview) for more details.
-
External OAuth 2.0: Enhance authentication between your web application and Forge app using OAuth 2.0. The External authentication can help you implement this, removing the need to directly manage API tokens.
Rate this page: