Register apps
You can install apps using the app manager for Atlassian apps, the Universal Plugin Manager (UPM). First, in the UPM you can register the app through the UI, similar to how an administrator does. You can also do so programmatically do so against UPM's REST API.
After registration, the app appears in the list of user-installed apps in the Manage apps page, and its features are available for use in the target application.
This page focuses on Atlassian Cloud apps, but the steps also apply for Server and Data Center apps.
Install an app using the Universal Plugin Manager
Installing your app adds it to your Atlassian Cloud application. To be more precise, installing is really just registering the app with the application and the only thing that is stored by the application at this time is the app descriptor.
You can install an app with the UPM, for version 2.14 or later, as follows:
- Log in to the Atlassian application interface as an admin or a system administrator. If you started the application with Atlassian's SDK, the default username/password combination is
admin/admin. - Choose
 > Add-ons from the menu. The Administration page will display.
 - Choose the Manage apps option.
- Scroll to the page's bottom and click the Settings link. The Settings dialog will display.
- Make sure the Private listings option is checked and click Apply.
- Scroll to the top of the page and click the Upload Add-on link.
- Enter the URL to the hosted location of your app descriptor. In this example, the URL is similar to the following:
http://localhost:8000/atlassian-plugin.xml. (If you are installing to a cloud site, the URL must be served from the Marketplace, and will look likehttps://marketplace.atlassian.com/download/plugins/com.example.app/version/39/descriptor?access-token=9ad5037b) - Press Upload. The system takes a moment to upload and register your app. It displays the Installed and ready to go dialog when installation is complete.
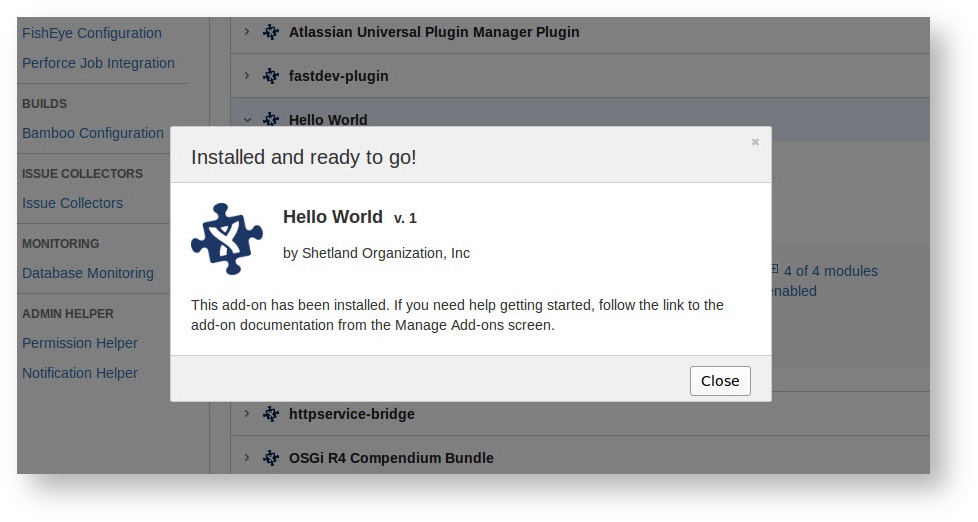
- Click Close.
- Verify that your app appears in the list of User installed add-ons. For example, if you used Hello World for your app name, that name will appear in the list.
Automatic app installation with UPM
The Publish a new app form has a Deployable option that indicates whether an app installs with UPM. You should not check the Deployable option if your app consists of multiple JARs. The Atlassian Marketplace and UPM do not support Try, Buy, Install, Upgrade, and Renew buttons for non-deployable apps. Non-deployable apps cannot be sold under the Atlassian Marketplace Partner Agreement as they do not support the UPM licensing API.
Additionally, if your app requires multiple downloads, configuration or license files on the file system, or if your app is not meant to be installed into the host Atlassian app (like Jira Client, for example), then do not check the Deployable option. Your app is still available for download, but the UPM does not attempt to install it in the host Atlassian app.
Installing an app using the REST API
You can also install an app using the UPM's REST API. You'll find this method useful if you want to install apps programmatically, say from a script, or simply want to quickly install an app from the command line. Broadly speaking, installing an app (or performing any operation against the REST API of the UPM) is a two-step process:
First get a UPM token. Next, issue the request to the REST API, including the token you received.
The following steps walk you through these steps in detail:
Send a GET request to the following resource:
1
2https://HOST_NAME:PORT/CONTEXT/rest/plugins/1.0/?os_authType=basic
In your request:
- Replace
HOST_NAMEandPORTwith the actual host name and port of the target Atlassian application. If applicable (i.e., if using a development instance), include theCONTEXTwith the application context (/jiraor/confluence). - Include the username and password for a system administrator user in the target Atlassian application as HTTP Basic Authentication credentials.
- Set the Accept header for the request to: "
application/vnd.atl.plugins.installed+json"
Capture the header named upm-token in the response. This is the UPM token you need for the next request.
Now install your app by issuing a POST request to the following resource:
1
2https://HOST_NAME:PORT/CONTEXT/rest/plugins/1.0/?token=${upm-token}
In your request:
-
Again use the actual host name and port and path for your target Atlassian application.
-
The token value should be the value of the
upm-tokenheader you just received. -
In the request, set the Accept header to: "
application/json" -
Set the
Content-Typefor the data to: "application/vnd.atl.plugins.install.uri+json" -
In the body of the
POST, include the following JSON data:1 2
{ "pluginUri": "${plugin-xml-url}", "pluginName": "the app name" }Replace
plugin-xml-urlwith the hosted location of your descriptor file, and the app name with the name by which you want the app to be registered in the application.
This registers the app declared by the atlassian-plugin.xml file at the URL.
You should not rely on the response returned from the POST request to confirm that the app has been installed. Instead, the best way to confirm that the app has been installed is to add a webhook to your app descriptor that listens for the app installation event. The webhook declaration in the atlassian-plugin.xml file would look something like this:
1
2<webhook key="installed" event="remote_plugin_installed" url="/your-url-here" />
Troubleshooting authentication
When registering from the command line using cURL, keep in mind that cURL does not perform session maintenance across calls (unlike other clients, such as Apache HttpClient). Thus, you need to either:
Send the authentication credentials in both requests, or have curl save any cookies from the first request and send them in the second.
To set curl to save any cookies from the first request to use in the second:
- To save cookies, use the
-cswitch:curl -c cookiesfile.txt ... - And then include the cookies in the second request:
curl -b cookiesfile.txt ...
Rate this page: